How to Connect the Dots: Creating Complex CI/CD with JFrog Pipelines

By
7 min read
As software gets more complex, so do software builds. With applications being composed of multiple services — often developed by separate teams — it can be challenging to automate a unified continuous integration process.
JFrog Pipelines is unique among DevOps CI/CD solutions in empowering developers to create highly complex DevOps Pipeline workflows. Pipelines can be defined with multiple paths, trigger points and trigger types. And pipelines can connect to each other as well, enabling teams to collaborate on interdependent projects.
Moreover, as part of the JFrog Platform difference for CI/CD, Pipelines’ natural integration with Artifactory repository manager, Xray, and Distribution provides the control you need to support and manage those complex builds.
Let’s look at some basic examples in JFrog Pipelines to show how complex pipelines can be built from simple mechanisms:
Single Trigger
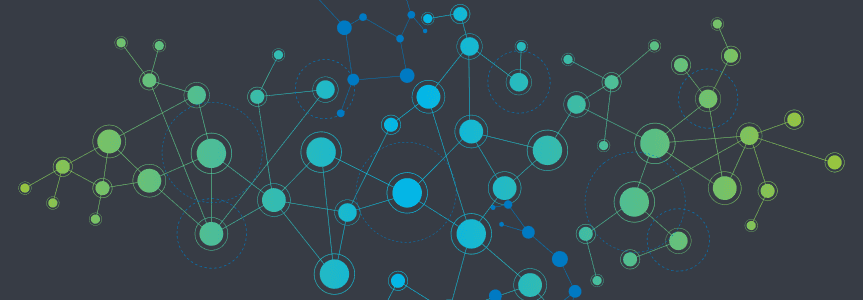
In the simplest type of CI/CD workflow, a single trigger launches execution of a single path within a single pipeline. For example, this example pipeline builds a Golang service from a single source repository in GitHub.
In the Pipelines DSL, we declare a GitRepo resource for the Golang service’s source repo (gosvc_gitRepo). By default, the resource will trigger on a commit to any file in any branch, but if you choose to, you can specify more narrow conditions such as: only certain files, only certain branches, or other repository events.
resources:
  - name: gosvc_gitRepo
    type: GitRepo
    configuration:
      path: mygithub/go-service
      gitProvider: demo_github
      files:                        # Optional: only specific files
        include:    Dockerfile
        include:    main.go
      branches:                     # Optional: only specific branches
        include:    master
      buildOn:                      # Optional: specify trigger events
         commit:            true    #   Defaults to true
         pullRequestClose:  true    #   Defaults to false
         releaseCreate:     true    #   Defaults to false
Then we can declare that GitRepo as inputResources in the first step of the pipeline.
pipelines:
  - name: demo_gosvc
    steps:
      - name: bld_svc
        type: DockerBuild
        configuration:
          affinityGroup: DockerImageBuild
          dockerFileLocation: .
          dockerFileName: Dockerfile
          dockerImageName: demo.jfrog-pipelines.com/kol-docker-local/gosvc
          dockerImageTag: ${run_number}
          inputResources:
            - name: gosvc_gitRepo
          integrations:
            - name: demoArt
In the default configuration of a GitRepo resource, any new commit to that source repository triggers execution of the pipeline. Or the GitRepo will trigger according to the conditions you may have specified.
You can see how a single GitRepo change triggers a simple pipeline in this annotated Pipeline History diagram:
If needed, you can instead trigger on receipt of a webhook, or on a cron time interval. To explore these options, see the documentation topic Triggering Pipelines and Steps.
Multiple Triggers
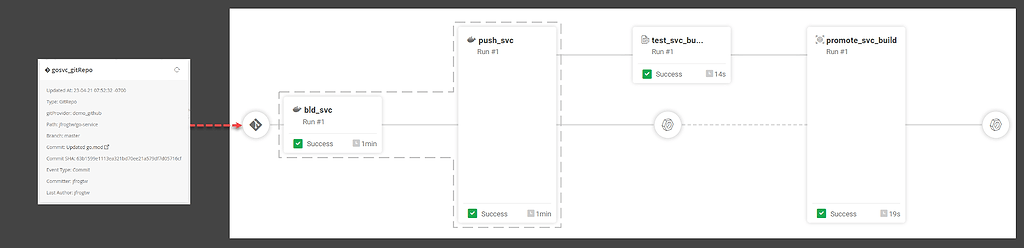
This more complex pipeline example creates an application composed of a front-end section from npm and a back-end section built from a Maven repository. The code for each are in separate source repositories in GitHub. Each component is built separately, but then combined into a single Docker image.
For this type of continuous integration workflow, when either our front-end or back-end component has changed, we’ll need to rebuild only the changed component. Then we’ll need to produce a new Docker image for the application.
In the Pipelines DSL, this is easy to accomplish when you:
- Declare a GitRepo resource for the front-end source repo (
fe_gitrepo) - Declare a GitRepo resource for the back-end source repo (
be_gitrepo)
Each of those GitRepo resources can now separately trigger our pipeline at different starting points. In the Pipelines DSL, we declare each of those GitRepo resources as inputResources to trigger the steps that perform the builds.
pipelines:
  - name: demo_application
    steps:
      - name: bld_frontend
        type: NpmBuild
        configuration:
          npmArgs: --no-progress --no-audit
          sourceLocation: .
          repositoryName: kol-npm-dev-remote
          inputResources:
            - name: fe_gitRepo
          integrations:
            - name: demoArt

      - name: bld_backend
        type: MvnBuild
        configuration:
          sourceLocation: .
          mvnCommand: clean install -ntp
          configFileLocation: .
          configFileName: mvn-art-config
          inputResources:
            - name: be_gitRepo
          integrations:
            - name: demoArt
The resulting multiple trigger points can be seen in this annotated Pipeline History diagram:
Connecting Pipelines
The prior example showed a single pipeline constructed with two trigger paths to build one of two application components that compose a single application. In theory, you could use this same method of multiple trigger paths for an application with three, ten, or a hundred components. But it would be difficult to manage a single pipeline that’s so complex, especially when different teams are responsible for each component.
Instead, it may be easier to have each team create and manage a pipeline for their own component, then connect them into a “pipeline of pipelines” that ultimately produces a final build of the complete application or a signed release bundle for JFrog Distribution.
In JFrog Pipelines, when a new build completes or is promoted, it’s best DevOps practice for it to output a new BuildInfo to Artifactory. This ensures your builds will be fully traceable through your Artifactory repositories. As part of the JFrog Platform, Pipelines’ natural integration with Artifactory and native steps makes this as easy as saying “Yes, please” in the Pipelines DSL.
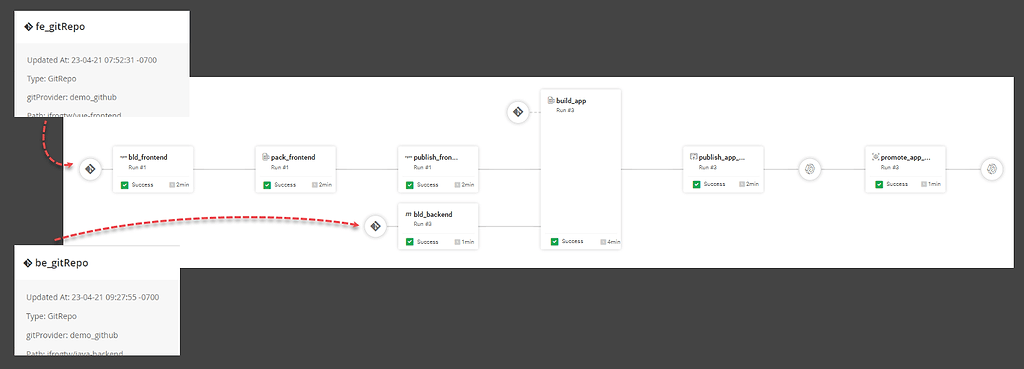
For example, our prior example pipelines output these BuildInfo resources:
- The promoted build of the Golang service (
gosvc_promoted_build_info) - The promoted build of the application (
appl_promoted_build_info)
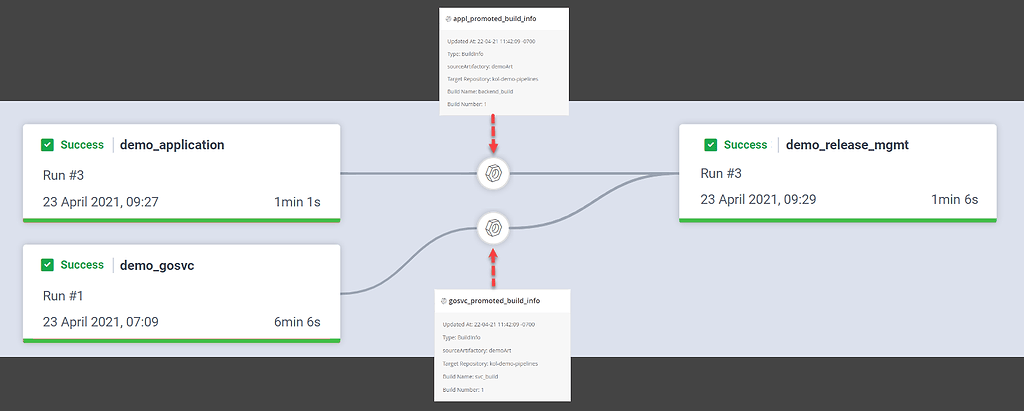
Both of those BuildInfo resources can be used to trigger the next pipeline in the sequence. In the Pipelines DSL, we declare each of those BuildInfo resources as inputResources to trigger the first step, which creates a Distribution release bundle:
  - name: demo_release_mgmt
    steps:
      - name: bundle
        type: CreateReleaseBundle
        configuration:
          releaseBundleName: demo_rb
          releaseBundleVersion: v1.0.${run_number}
          dryRun: false
          sign: false
          description: "some random test description"
          inputResources:
            - name: gosvc_promoted_build_info
            - name: appl_promoted_build_info
          outputResources:
            - name: release_bundle
          releaseNotes:
            syntax: markdown
            content: |
              ## Heading
                * Bullet
                * Points
This is the best practice for chaining pipelines together.
This pipeline triggers when either of the prior pipelines successfully completes a new build, as shown in this annotated Pipeline History diagram:
Pipeline of Pipelines
As you can see, your CI/CD workflows can get as complex as your ambition enables, with many individual pipelines that interconnect across teams.
JFrog Pipelines helps you to keep track of them through its innovative Graph view available in the My Pipelines tab of the JFrog Platform. For example, you can see how all of our above examples interconnect for a unified CI process:
In this view, you can see clearly how a set of pipelines work together, and clarify the path to or from any pipeline within the set.
With JFrog Pipelines, you can build your pipelines as complex as you need them to be without losing track of how they interconnect. If needed, you can even interconnect to Jenkins pipelines in your pipeline chain. When your builds fail due to errors, test results, or critical security vulnerabilities, you can readily trace them through their execution path.
Eager to give it a try? Get started with JFrog Platform for free with a JFrog cloud account!


