

How to Connect the JFrog Platform to Your GitHub Environment to Create a Seamless Integration
Guide to integrating your GitHub and JFrog platforms, providing a unified experience for managing and securing software projects throughout coding and building phases.

The latest JFrog collaboration with GitHub enables you to easily combine your favorite solutions for source code and binaries in a seamless integration. This means you now have a unified comprehensive and secure end-to-end experience that supports your software projects.
This integration covers everything from curating open source packages, coding, CI, release management, deployment and production. Including three major improvements to your developer experience.
- Unified Authentication and Authorization – for GitHub workflow actions and for seamless SSO authentication between JFrog and GitHub.
- Bi-directional Code and Package Linking – Code and packages are linked across both platforms.
- Unified Security – JFrog Advanced Security findings are available directly from within the GitHub dashboard, and pull requests checks performed on merges.
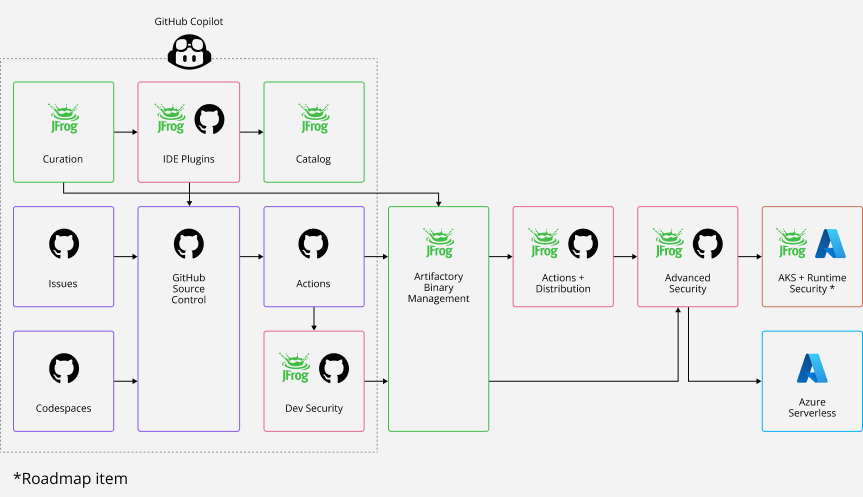
Unified end-to-end JFrog and GitHub experience, from code to package
In this blog post we’ll go through the use case flows, including step-by-step instructions to demonstrate the integration.
Let’s get started!
Before you start
Here’s what you’ll need:
- JFrog Platform Cloud or Self Hosted
- Create a JFrog Project called CodeNinjas_AI
- GitHub Example Repository
- Fork this example repository so that you have your own copy to experiment with.
1. Authentication and Authorization
To achieve authentication and authorization across both platforms, you’ll need to configure:
Github Variables
GitHub Variables are used to store your sensitive authentication. Define the following two variables in GitHub, that will point to JFrog. Go to Settings > Secrets and variables > Actions, and add your variables.
- JF_URL – represents the base URL to the JFrog server
- JF_PROJECT – represent the JFrog project key that connects to the GitHub repository
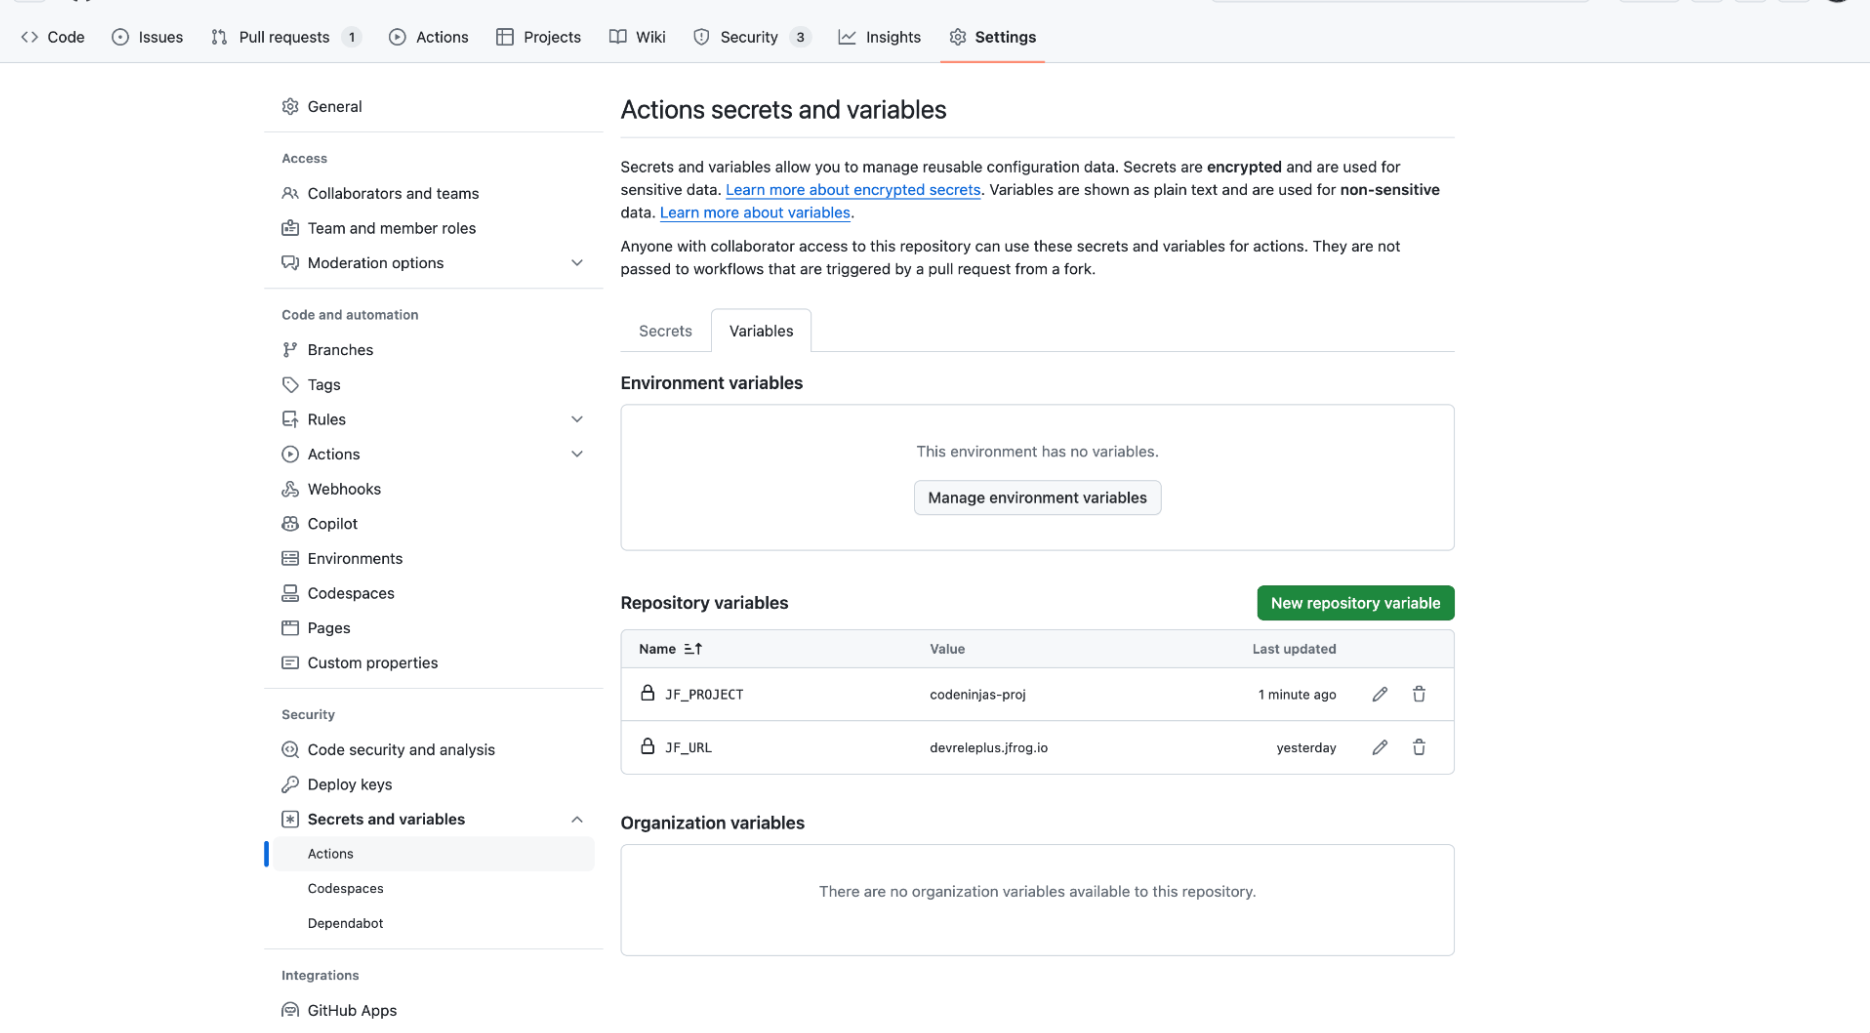 GitHub Actions Secrets and Variables
OAuth
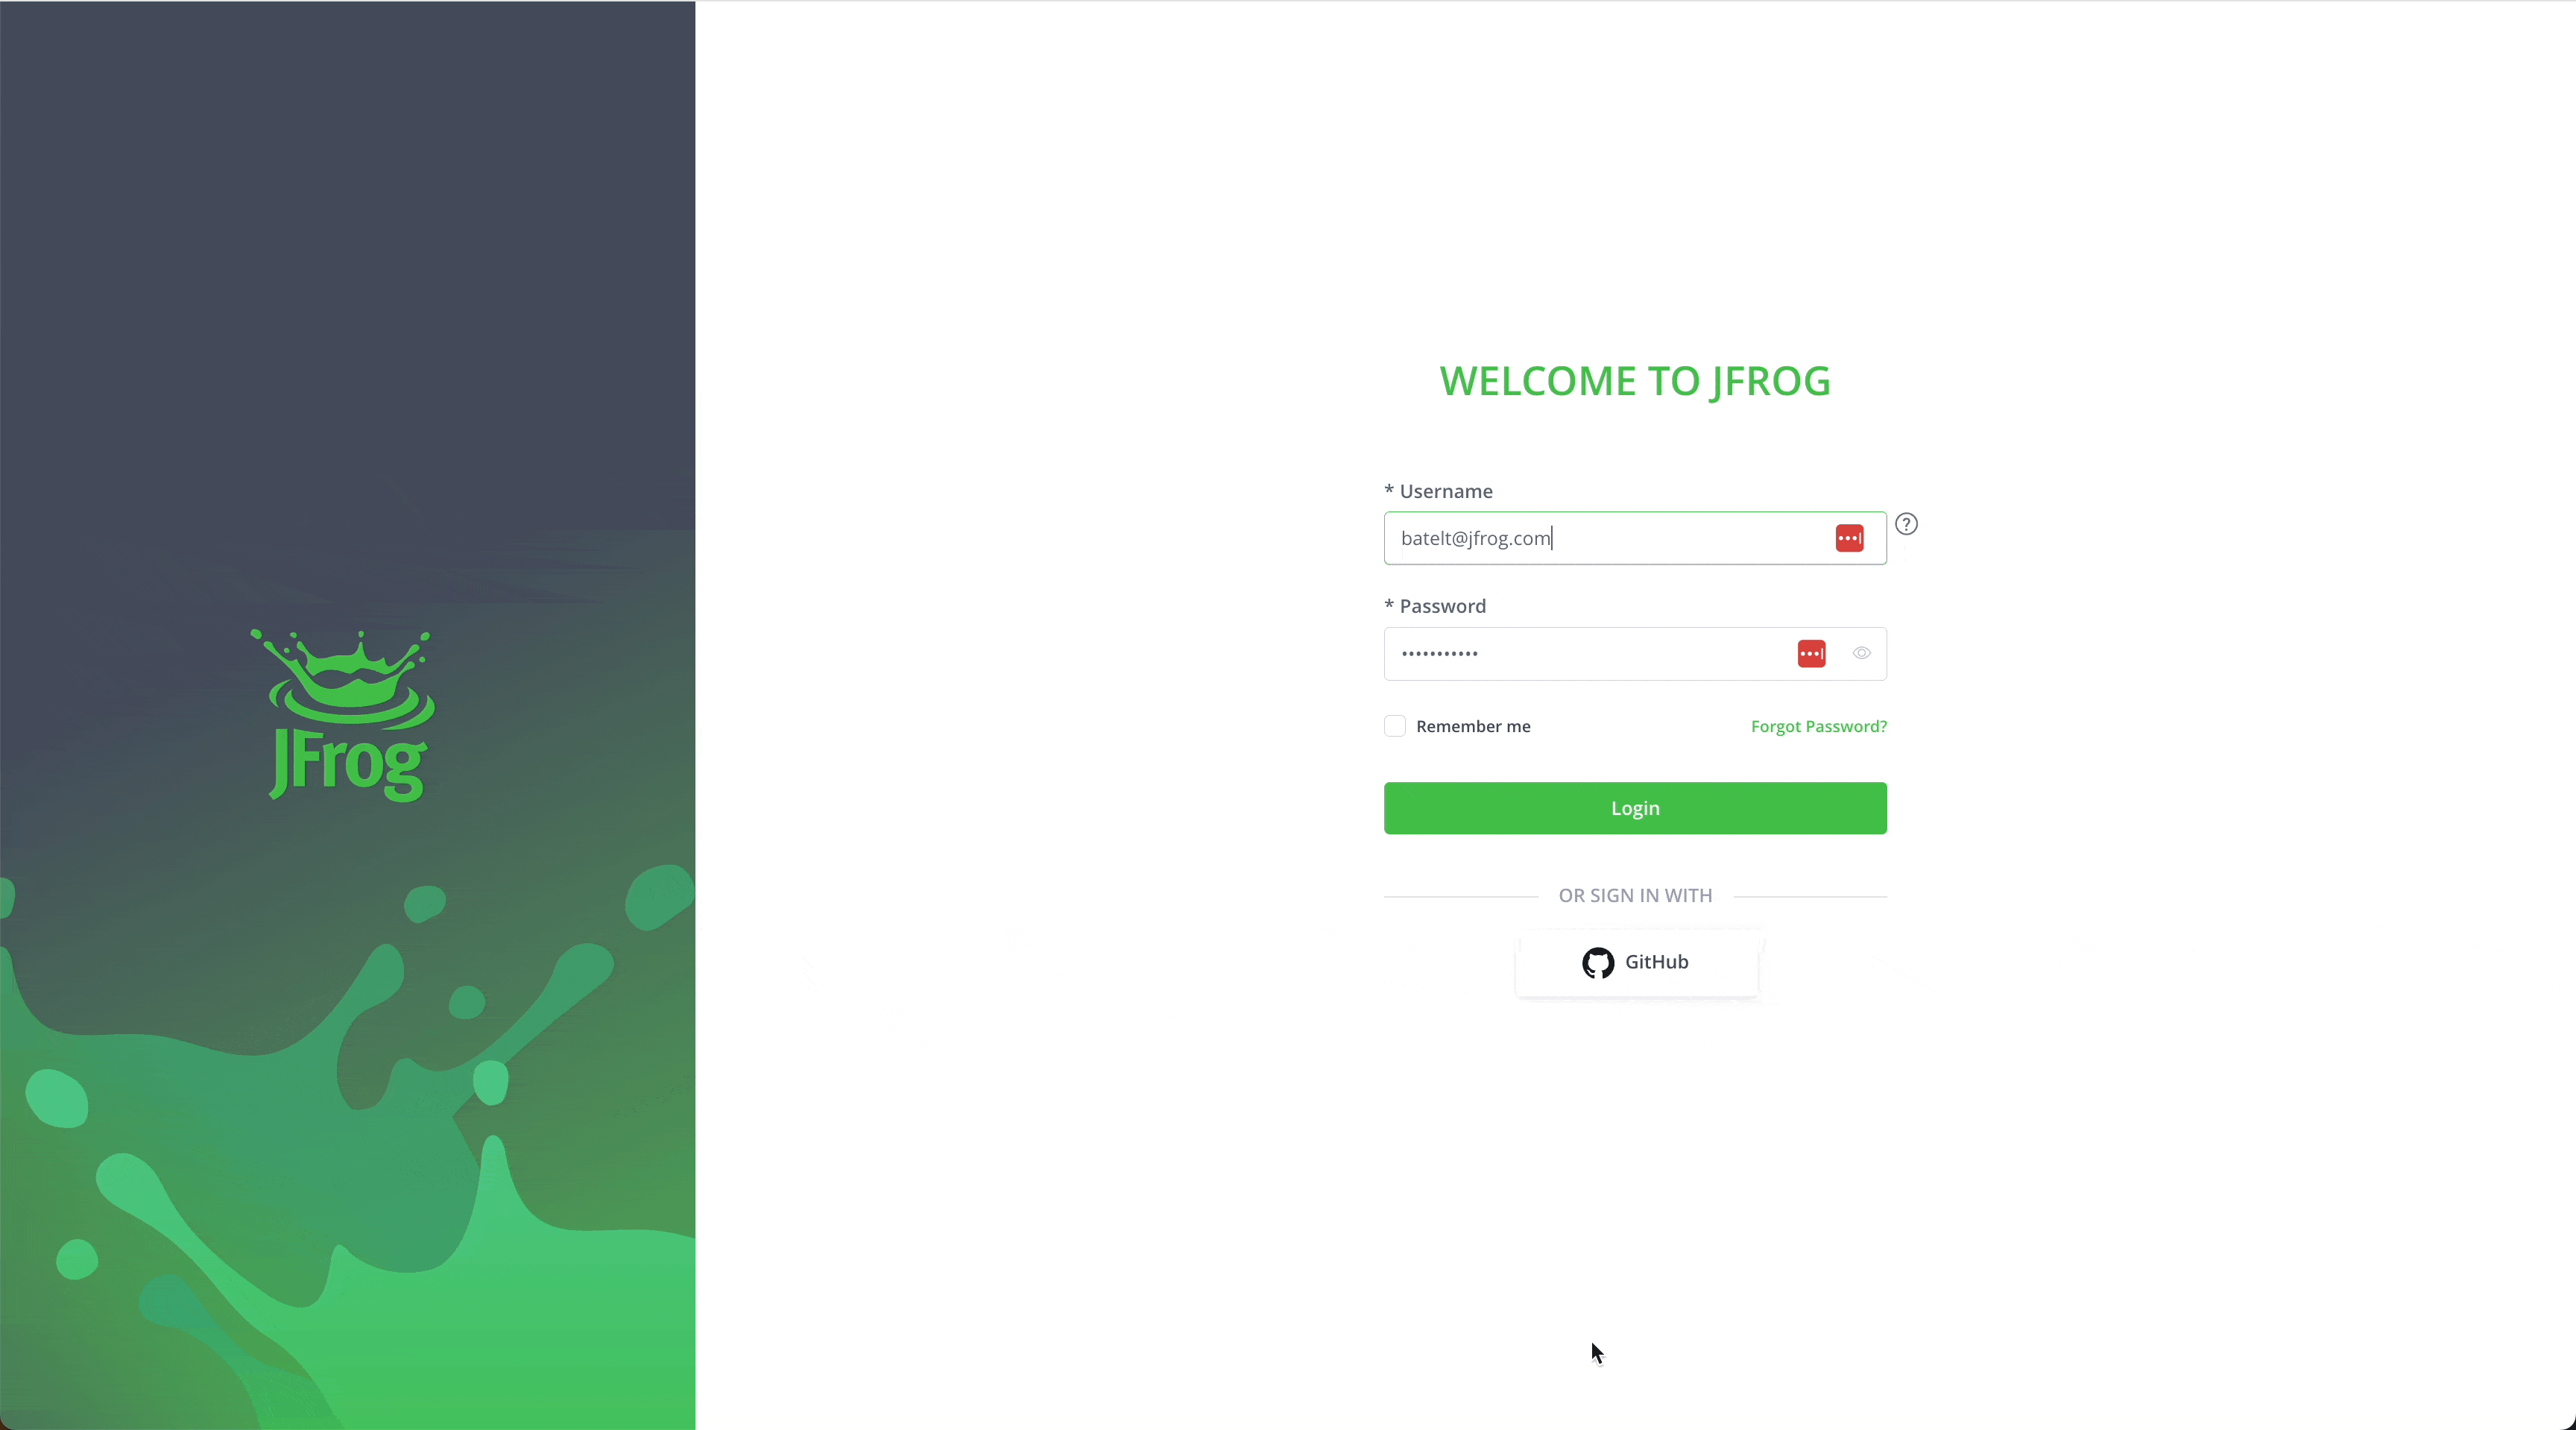
Configure OAuth to sign in to the JFrog Platform based on GitHub authentication GitHub OAuth.
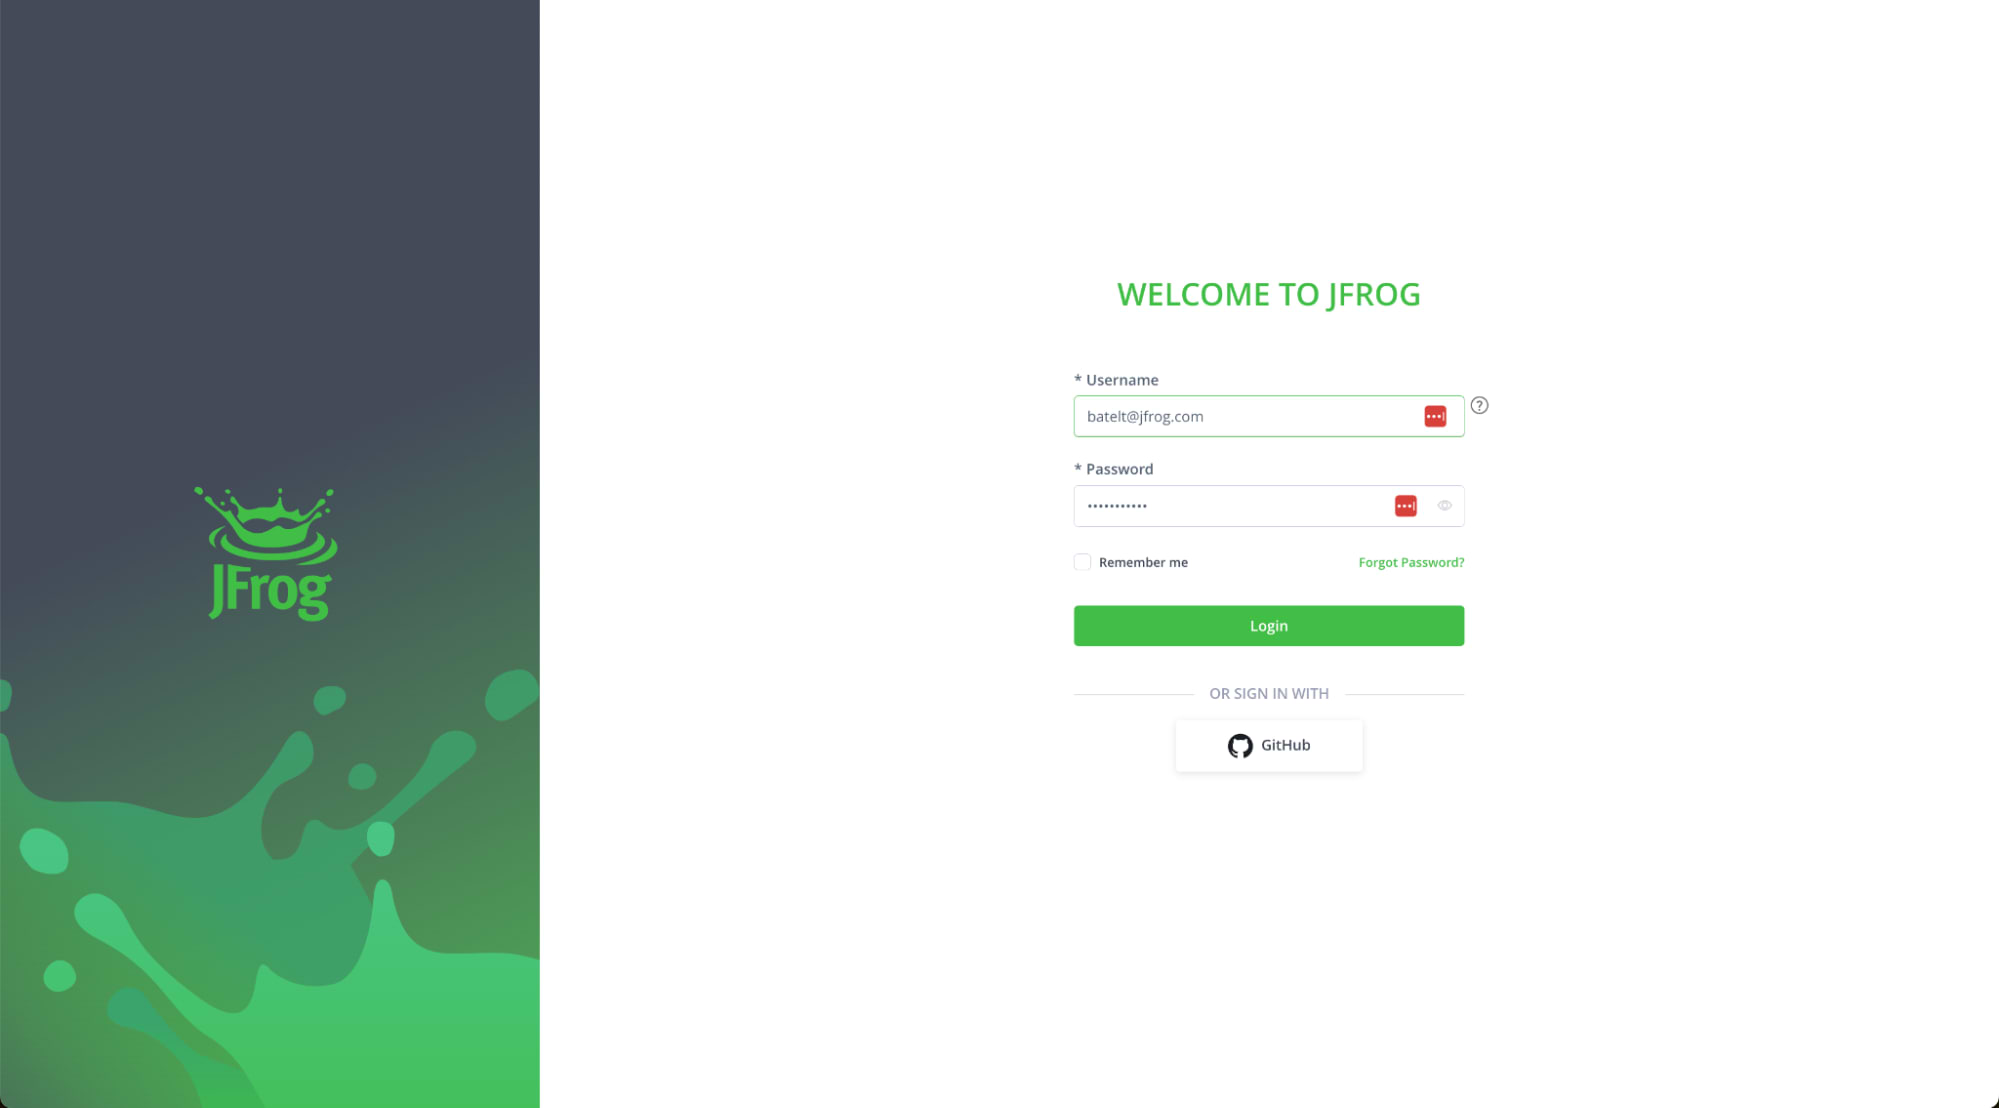 GitHub OAuth Login to the JFrog Platform
OIDC
JFrog’s integration of OIDC with GitHub Actions enables you to establish a trust relationship between your GitHub Actions and the JFrog Platform.
From the JFrog Platform UI, go to the Administration Tab > General > Manage Integrations > New Integration > OpenID Connect
Configure the OIDC integration, and click Save and Continue.
Configure the Identity Mapping:
- Name: identity mappings name
- Description: preferably should identify the original repository and mapped identity
- Priority: order of priority by which the identity mappings are evaluated
- Claims json: a json file containing any claims to be verified for this mapping to evaluate as true
- iss: set to https://token.actions.githubusercontent.com to verify claims were produced by Github
- Enterprise: optional claims restriction for the enterprise name the repository belongs to
- Repository: your Github repository name
- Optional claims: environment, actor, runner_environment, sub, repository_owner, repository_visibility, workflow, and more
For example,{"repository":"<repository_name>, "enterprise":"<your_github_enterprise_name>"}
- Token scope: Group / User / Admin: scoped token with a specific group/user
- Service: specific/All JFrog services to allow access
- Token Expiration Time: number of minutes for token expiration
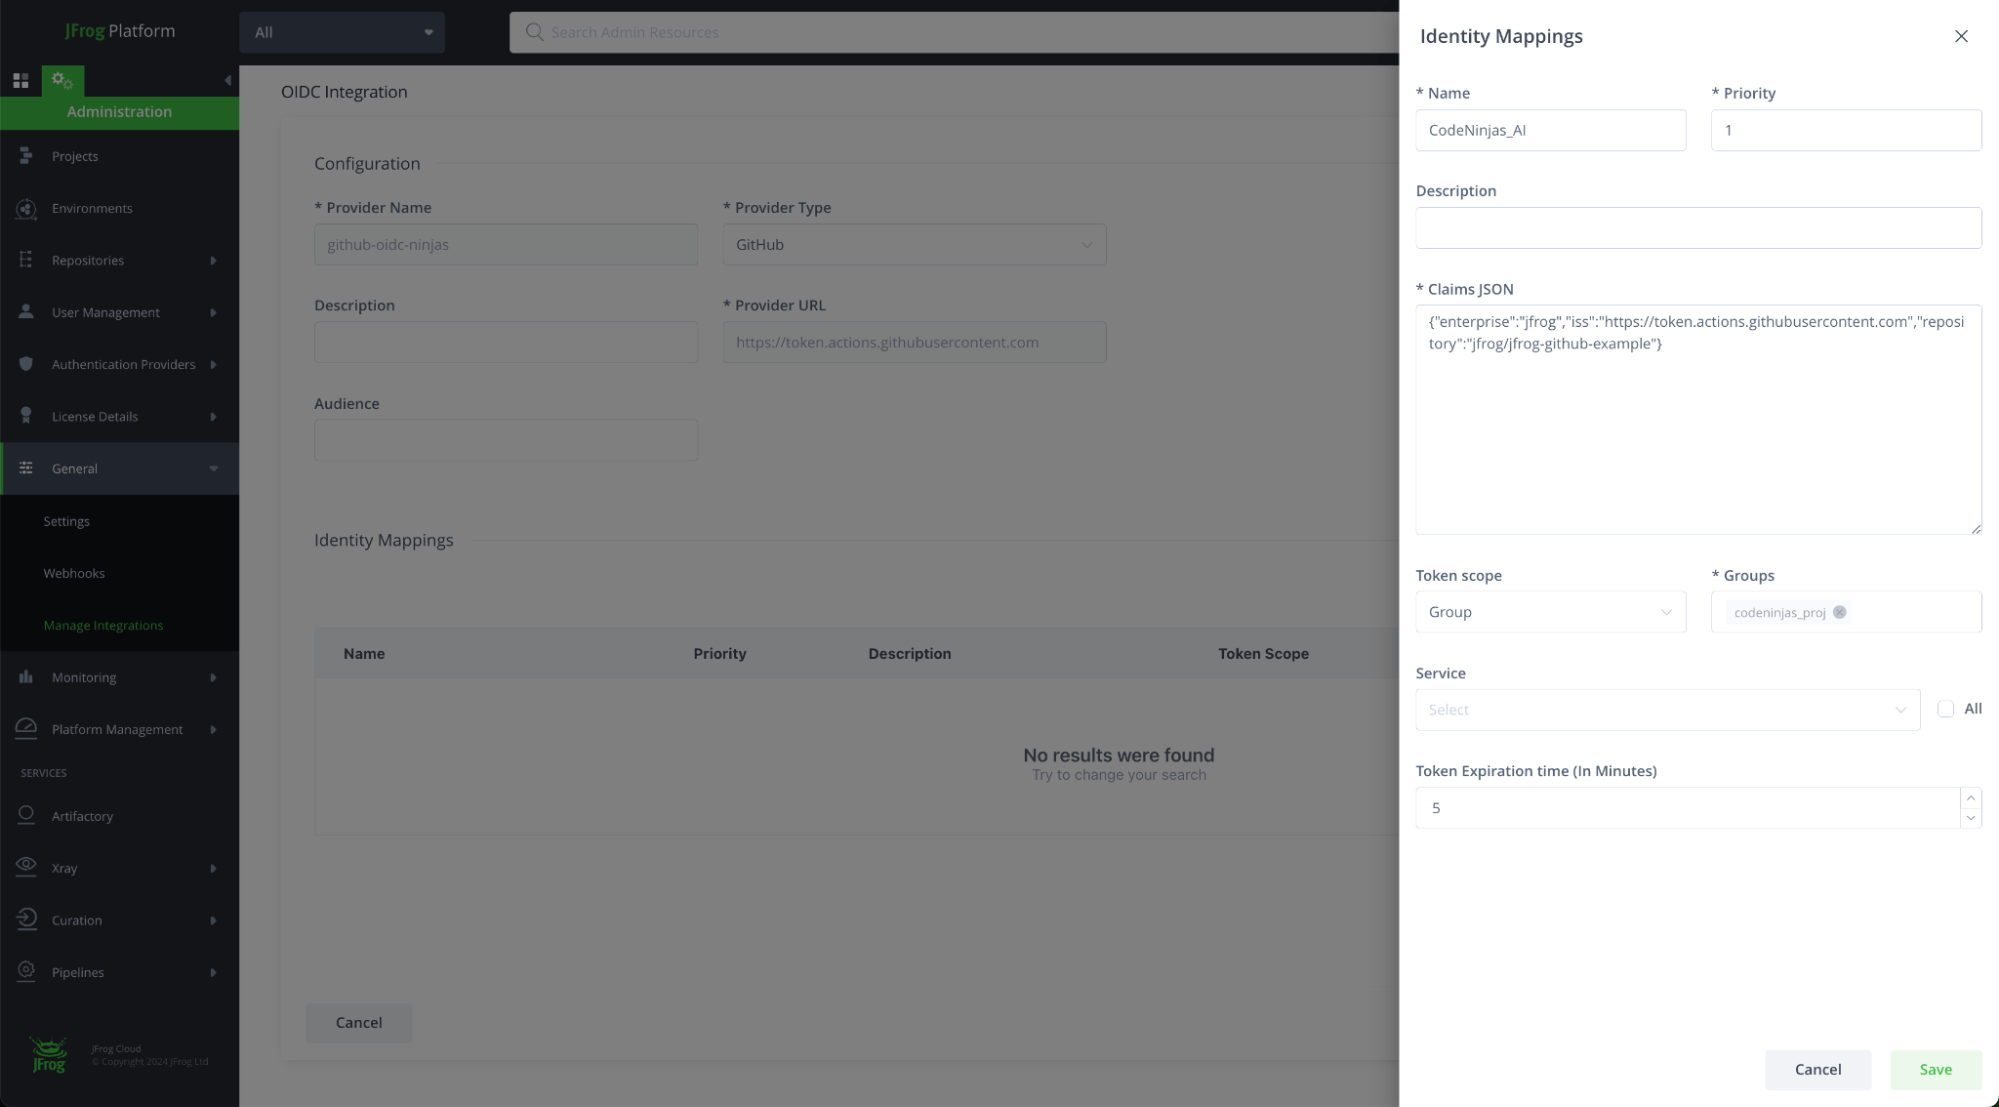 JFrog Platform – Identity Mapping
 JFrog Platform and GitHub – OIDC Integration
GitHub Actions
Create your Github Action configuration to set up JFrog CLI and run JFrog FrogBot.
Configuring JFrog CLI Setup:
- name: Setup JFrog CLI
    uses: jfrog/setup-jfrog-cli@v4
    env:
      JF_URL: https://${{ vars.JF_URL }}/
      JF_PROJECT: ${{ vars.JF_PROJECT }}
    with:
      oidc-provider-name: <OIDC integration name set on JFrog platform>
Configuring Frogbot:
 - uses: jfrog/frogbot@v2
      with:
          oidc-provider-name:
env:
          # JFrog platform URL
          JF_URL: https://${{ vars.JF_URL }}/
          JF_PROJECT: ${{ vars.JF_PROJECT }}
          JF_GIT_TOKEN: ${{ secrets.GITHUB_TOKEN }}
…2. Bi-directional Code and Package Linking
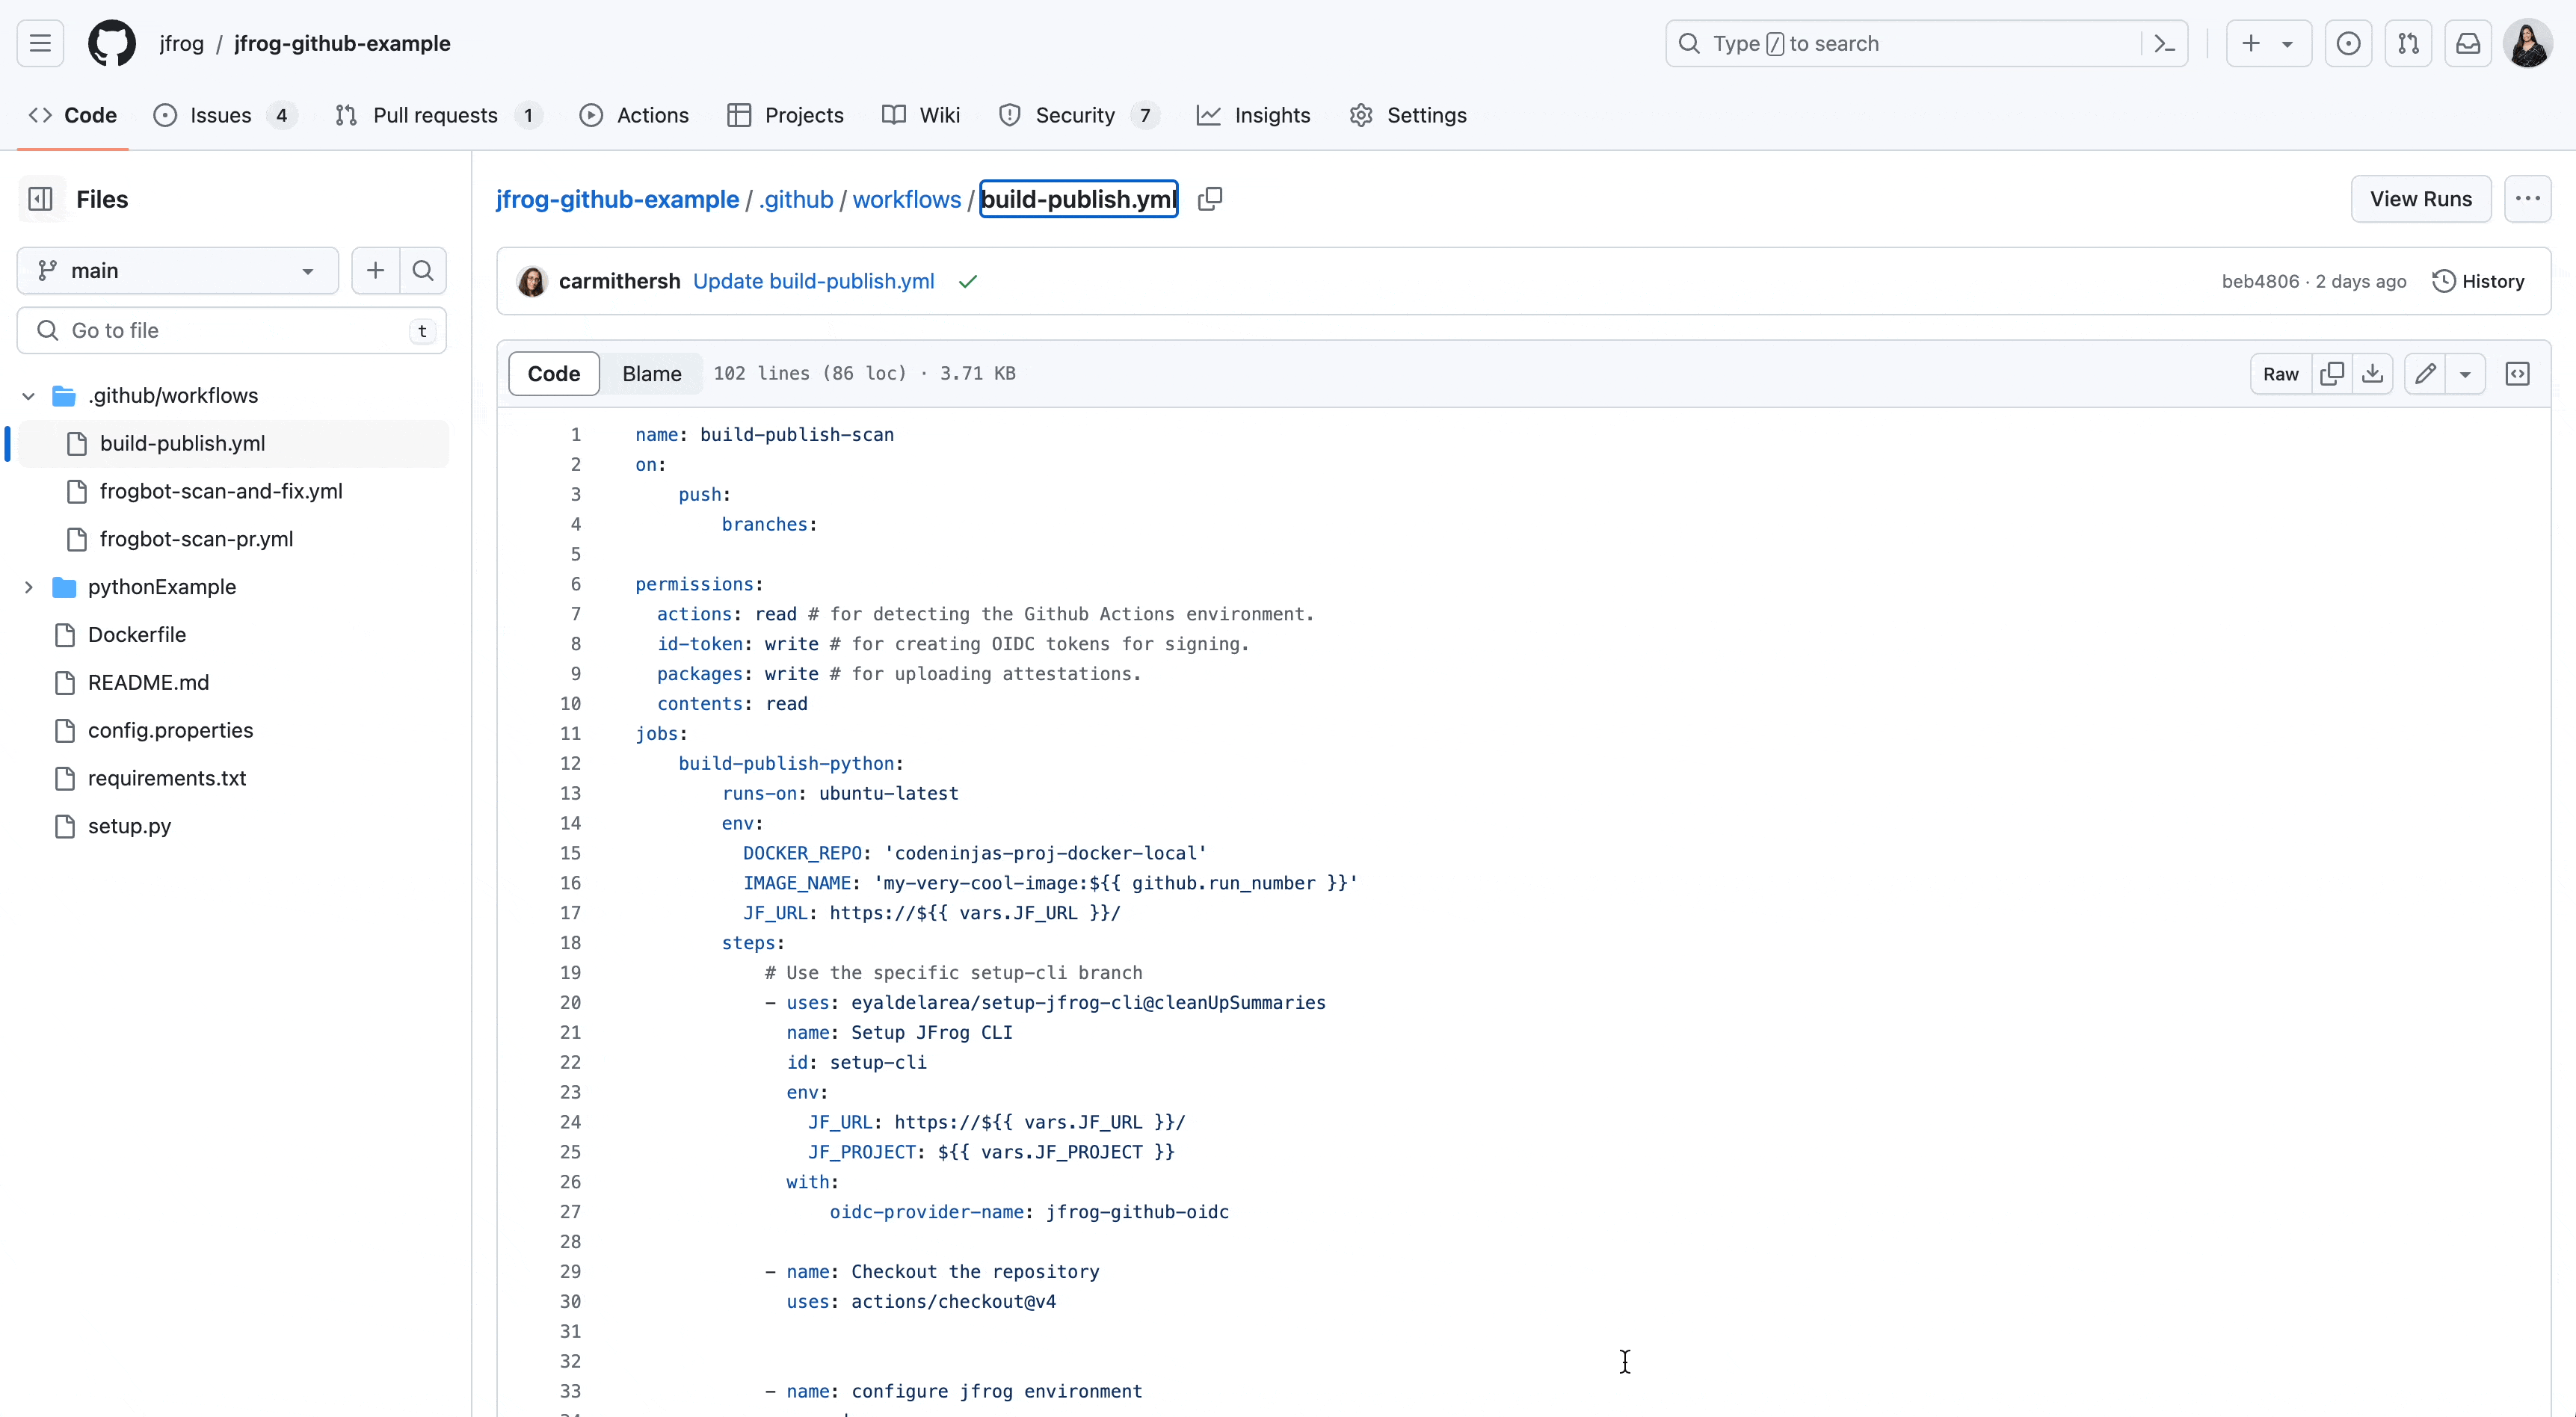
Using JFrog CLI in your GitHub build action connects the build to the relevant build-info, packages, and security scans in JFrog. This integration allows you to combine GitHub Actions and JFrog Artifactory.
This example build job yml is configured to automatically trigger after every pull request/push.
 # setting python to use a curated python repository
- name: configure jfrog environment
    run: |
      jf pip-config --repo-resolve=python-virtual
# configuring python
- name: configure environment
              run: |
                python3 -m pip install --upgrade pip setuptools wheel sigstore
                wheel -h
                pip show setuptools
                echo $VIRTUAL_ENV
# building the python package
- name: build project
    run: |
      jf pip install -r requirements.txt
python setup.py sdist bdist_wheel
cd dist && echo "hashes=$(sha256sum * | base64 -w0)" >> $GITHUB_OUTPUT

# uploading the python package int the JFrog platform
- name: publish python package
    run: |
      jf rt upload dist/ python-virtual/example-projects/

# setting docker
- name: Setup Docker Buildx
  uses: docker/setup-buildx-action@v3

# docker authentication using the oidc short lived credentials
- name: Authenticate Docker
    uses: docker/login-action@v3
    with:
      registry: ${{ vars.JF_URL }}
      username: ${{ steps.setup-cli.outputs.oidc-user }}
      password: ${{ steps.setup-cli.outputs.oidc-token }}
# docker image build
- name: Build Docker image
    uses: docker/build-push-action@v5
    id: build
    with:
      push: true
      platforms: linux/amd64 #, linux/arm64
      tags: ${{ vars.JF_URL }}/${{ env.DOCKER_REPO }}/${{ env.IMAGE_NAME }}
# docker xray scanning
- name: docker scan
     run: |
       jf docker pull ${{ vars.JF_URL }}/${{ env.DOCKER_REPO }}/${{ env.IMAGE_NAME }}
       jf docker scan ${{ vars.JF_URL }}/${{ env.DOCKER_REPO }}/${{ env.IMAGE_NAME }}

# adding the built docker into the JFrog build info
- name: add docker package to build
    run: |
      echo "${{ vars.JF_URL }}/${{ env.DOCKER_REPO }}/${{ env.IMAGE_NAME }}@${{ steps.build.outputs.digest }}" > metadata.json
      jf rt build-docker-create ${{ env.DOCKER_REPO }} --image-file metadata.json

# publishing and scanning a build info for the build
- name: publish build info
    run: |
      jf rt build-collect-env      # Collect environment variables
      jf rt build-publish       # Publish build info
      jf build-scan  # Xray Scan Build info
JFrog Job Summary in GitHub
Once the build run is complete, a job summary that includes the build and security information is generated. You can easily navigate to and from the JFrog and GitHub platforms. This allows you to see the Xray security scan data, project build details such as the build diff, environment variables, build json information, and much more. You can also get additional information on your artifacts and security scan by clicking on the project package link, which will navigate you to the JFrog project packages view.
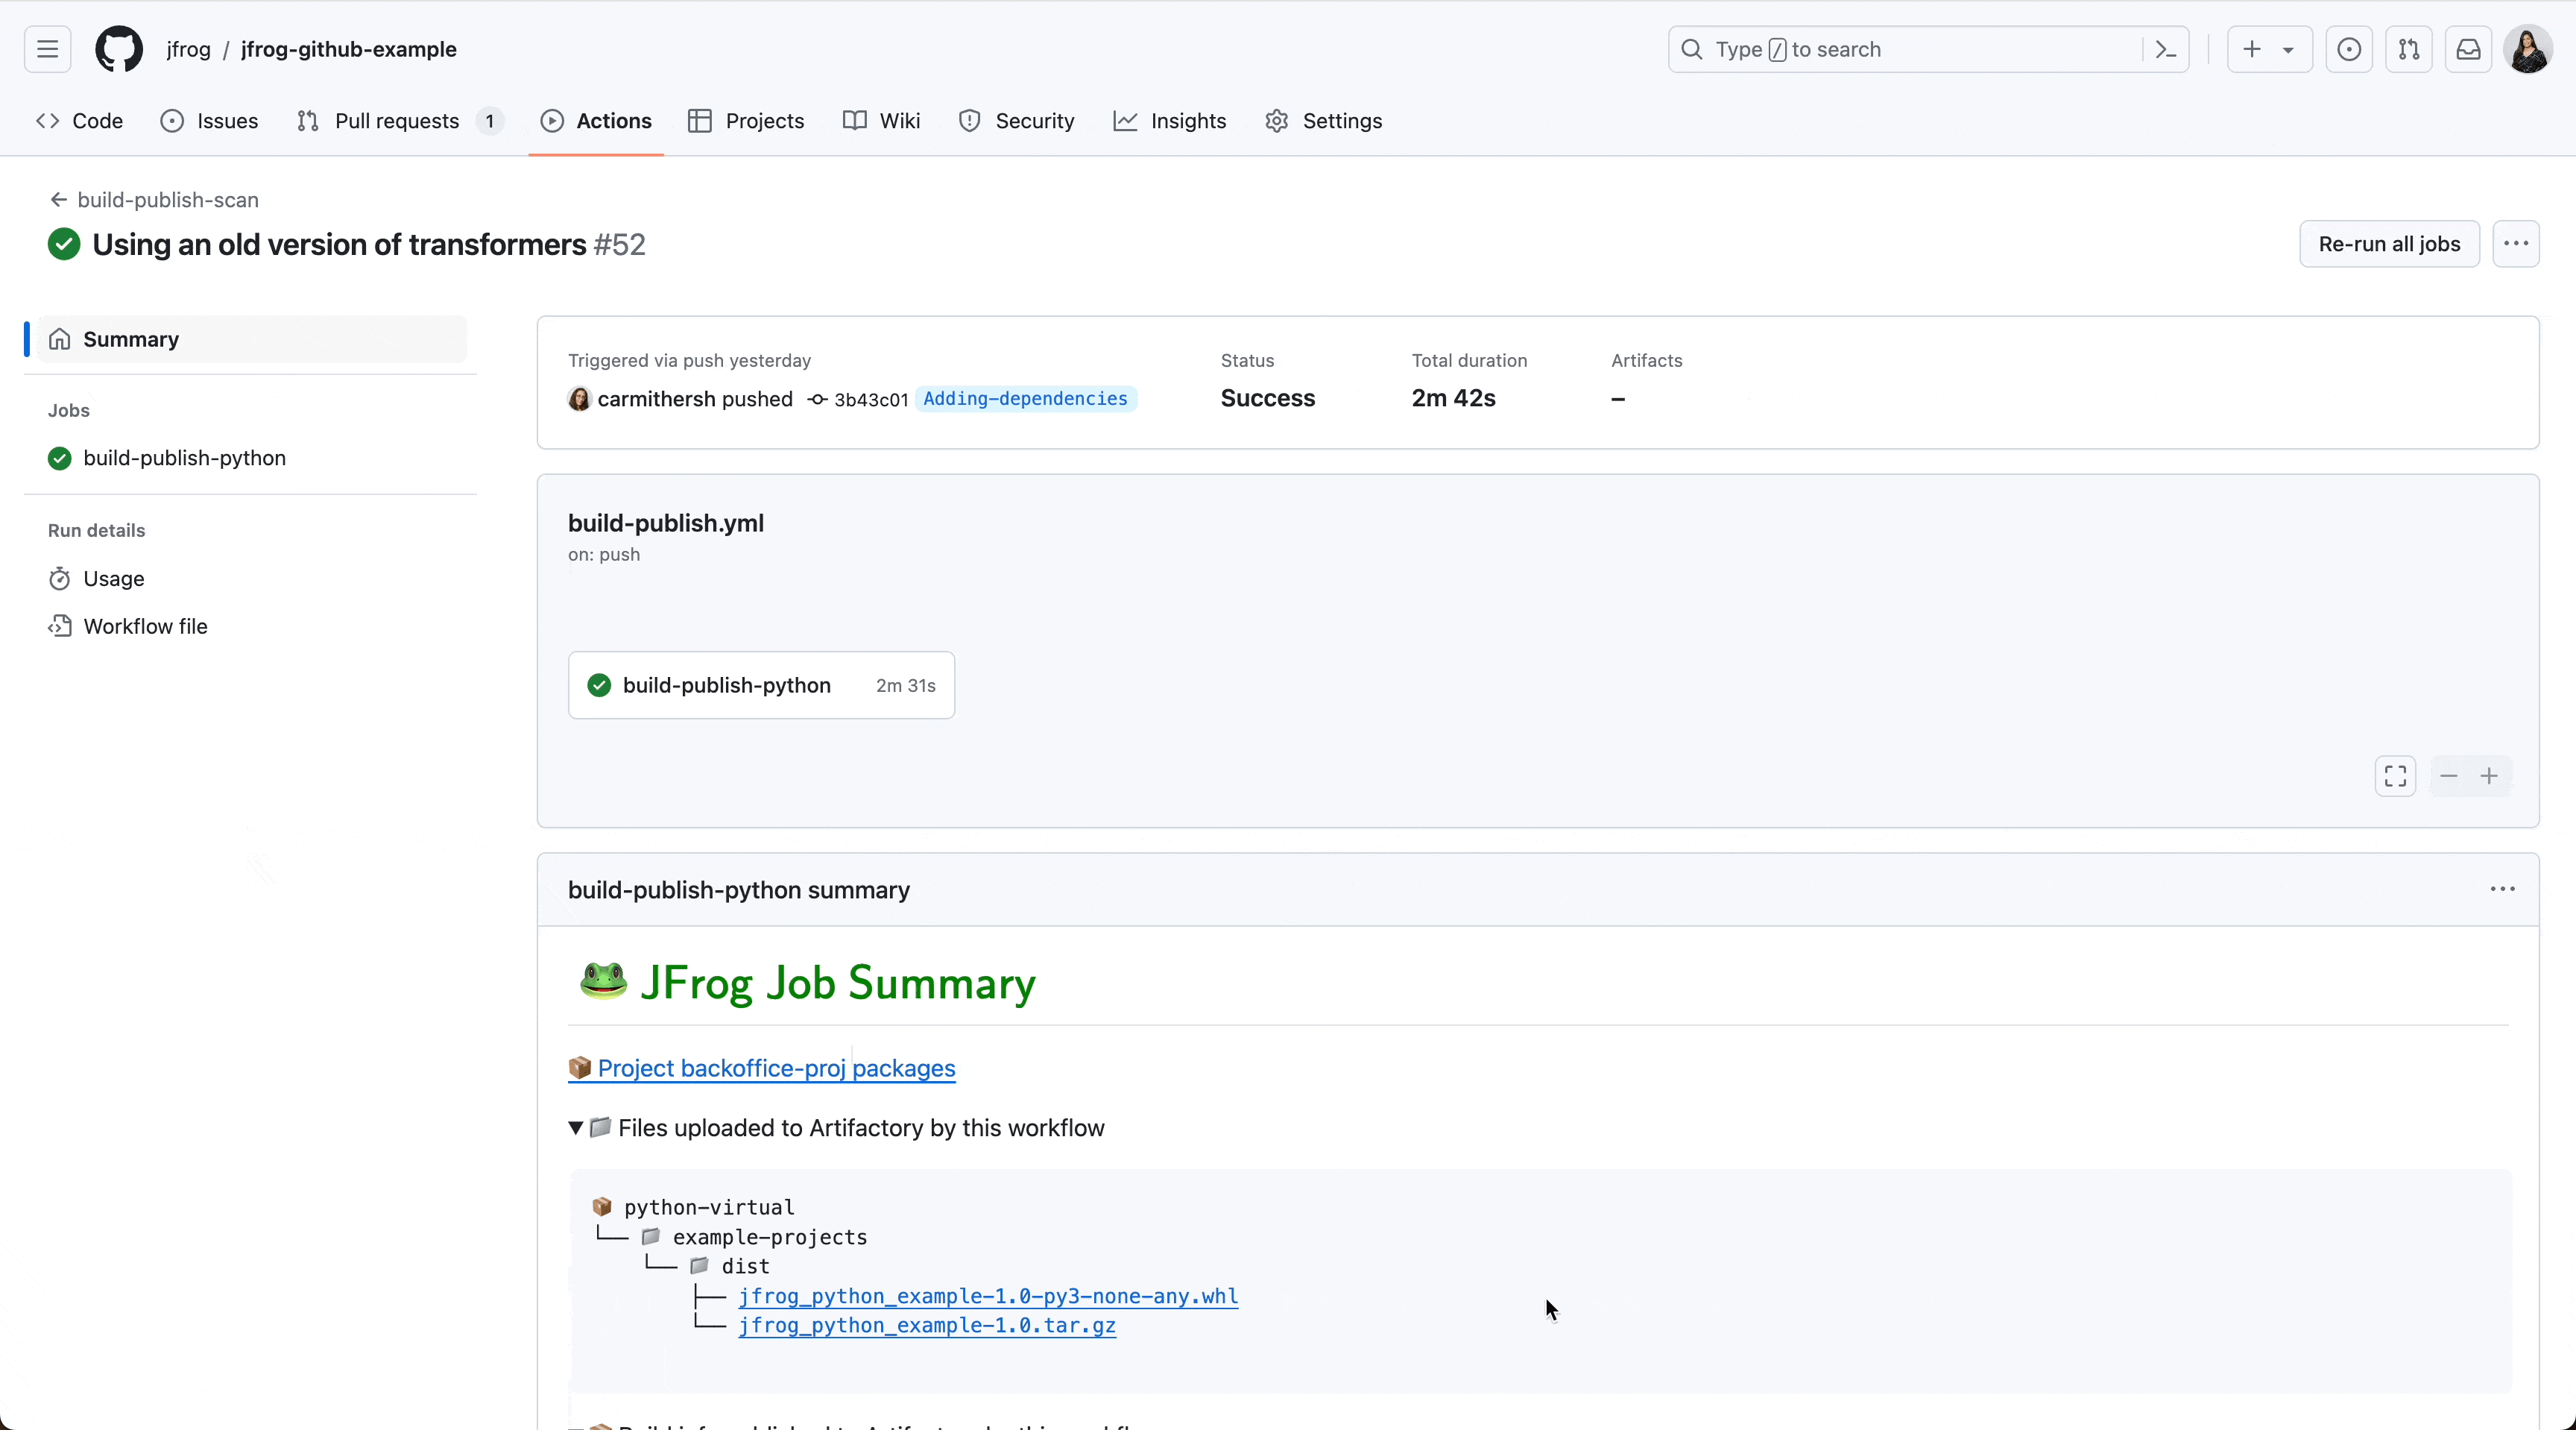 JFrog Job Summary, Packages, Vulnerabilities and Build-Info SBOM pointing back to GitHub Job
3. Unified Security
JFrog Frogbot automatically scans your repositories for potential vulnerabilities, exposed secrets, and malwares in your dependencies. When vulnerabilities are detected, Frogbot not only alerts you, but can also automatically open pull requests with suggested fixes, streamlining the remediation process. These checks can prevent any non-authorized or risky code changes from being merged into your repository.
It also provides detailed reports and dashboards that can help with compliance requirements and give insights into the security posture of your projects.
Setup Frogbot using GitHub actions >
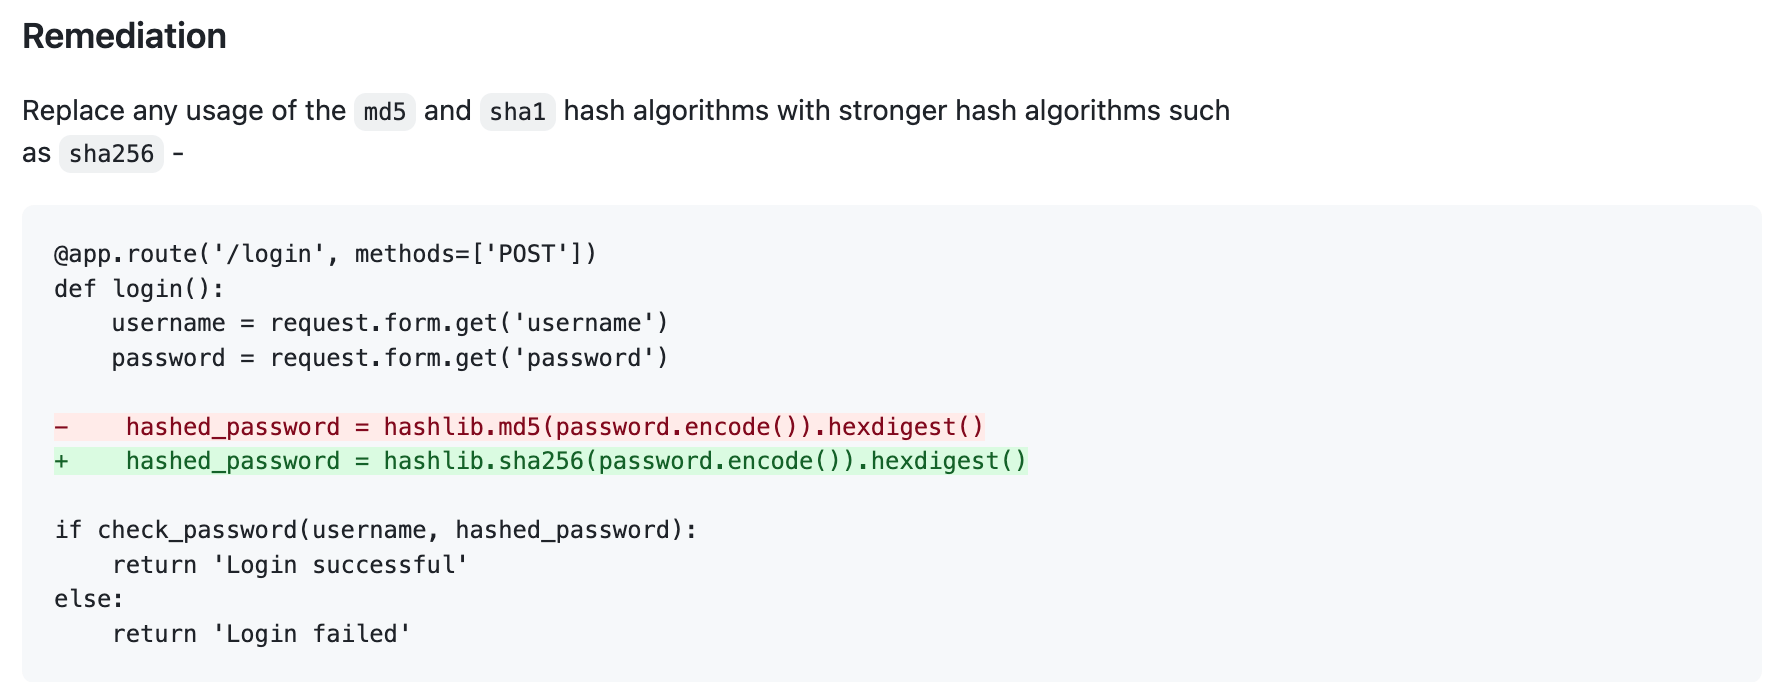
In this example, we can see that Frogbot detected an Unsafe Hash Algorithm:
| An unsafe hash algorithm vulnerability occurs when using a known insecure hash algorithm. A hash algorithm accepts arbitrary input and generates a hash value – a fixed-length output that can be used to verify the integrity of data, such as passwords or files. An insecure hash algorithm in an algorithm that an attacker can use to generate the same hash value for different input data within a reasonable amount of time (“hash collision attack”). |
And provided the following remediation so we can easily fix the problem:
That’s it!
Now, all that’s left is for you to try it for yourself.
Witness the power of GitHub and JFrog together by taking the online Integration Tour
Experience
JFrog Today
Discover how the JFrog Platform unites DevOps, DevSecOps and MLOps for secure, rapid software delivery.


