

A Guide to Installing the JFrog Platform on Amazon EKS

Amazon Elastic Kubernetes Service — or Amazon EKS — is a managed service that enables you to run Kubernetes on AWS without having to manage your own Kubernetes clusters. The JFrog Platform is available on AWS, making it super simple to deploy applications reliably and predictably, scale them quickly, roll out new features easily, and make the most of hardware resources.
Did You Know?
Artifactory can serve as your Kubernetes Docker Registry.
It can provision your k8s cluster with the charts and images needed to orchestrate your application. Learn more on how you can easily configure Artifactory as your Kubernetes registry for EKS.
This blog post outlines the prerequisites and steps required to install and configure the JFrog Platform in Amazon EKS, including setting up two AWS systems: IAM Roles for Service Accounts (IRSA) and Application Load Balancer (ALB). By following the sequence laid out here, you can standardize Artifactory installation and ensure compliance with your internal rules. And since the configuration is based on official JFrog Helm Charts, you’re always supported in case you run into any issues.
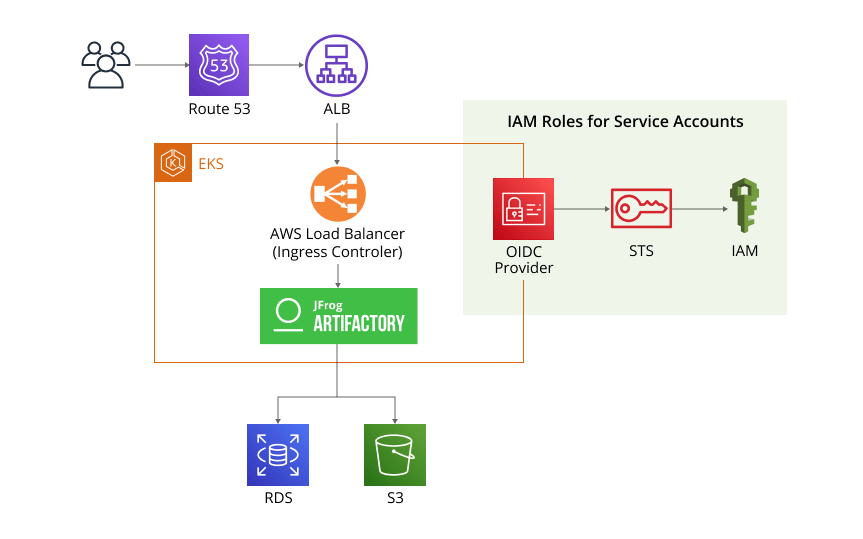 Workflow to use Artifactory in Amazon EKS
Overview
- Prerequisites
- Step 1: Set up the IRSA
- Step 2: Set up the ALB
- Step 3: Configure the JFrog Platform Helm Chart
- Step 4: Set up the storage
- Step 5: Deploy the JFrog Platform Helm Chart
Prerequisites
Before you’re ready to configure ALB and IRSA in AWS, you’ll need the following requirements:
- An up and running Elastic Kubernetes Service cluster.
- TLS Certificate stored in AWS Certificate Manager (optional)
- Amazon S3 bucket configured with a role and policy
- JFrog Platform subscription
Docker subdomain access
The Docker subdomain method requires URL rewriting, which isn’t supported by the ALB, so you’ll have to set up a reverse proxy such as Nginx. In order to perform as intended, the ALB will have to redirect the HTTP/S requests to the Nginx Server. This set-up process isn’t covered in this blog post. Find out more about accessing a Docker registry hosted in Artifactory here >
Once these prerequisites are in place, you’re ready to get started!
Step 1: Set up the IRSA
To enable the IRSA, you’ll first need to configure an Open ID Connect provider in your Amazon EKS cluster. Then, configure it to “trust” the Artifactory service account (which you’ll create later).
Note: make sure to decide upon the name of the K8S namespace that Artifactory will be deployed to.
Example configuration that you can apply to your OIDC connector via the AWS CLI – you’ll need to update the parameters per your specifications:
{
  "Version": "2012-10-17",
  "Statement": [
      {
          "Sid": "",
          "Effect": "Allow",
          "Principal": {
               "Federated": "arn:aws:iam:::oidc-provider/oidc.eks.<AWS_REGION>.amazonaws.com/id/"
          },
          "Action": "sts:AssumeRoleWithWebIdentity",
          "Condition": {
              "StringEquals": {
                  "oidc.eks..amazonaws.com/id/:aud": "sts.amazonaws.com",
                   "oidc.eks..amazonaws.com/id/:sub": "system:serviceaccount:<K8S_NAMESPACE>:artifactory"
              }
          }
      }
  ]
}
Step 2: Set up the ALB
For the ALB, you’ll use the AWS Load Balancer Helm Chart to create an Ingress Controller in the EKS cluster. An Ingress Controller is a load balancer that’s specialized for Kubernetes and other containerized environments. You can find the AWS Load Balancer instructions here.
Step 3: Configure the JFrog Platform Helm Chart
Once the Load Balancer Controller is deployed, you can configure the JFrog Platform Helm Chart to spin up the ALB via the ingress section.
Use this values.yaml file to deploy the Helm Chart:
global:
...
artifactory:
 ...
 artifactory:
 ...
 ingress:
   enabled: true
   routerPath: /
   artifactoryPath: /artifactory/
   className: alb
   annotations:
     alb.ingress.kubernetes.io/scheme: internet-facing
     alb.ingress.kubernetes.io/target-type: ip
     alb.ingress.kubernetes.io/listen-ports: '[{"HTTP": 80}, {"HTTPS":443}]'
     alb.ingress.kubernetes.io/ssl-redirect: '443'
     alb.ingress.kubernetes.io/ssl-policy: ELBSecurityPolicy-2016-08
     # name of the future ALB
     alb.ingress.kubernetes.io/load-balancer-name: yann-demo-lab-eks
     # consume the TLS certificates in AWS Cert Manager
      alb.ingress.kubernetes.io/certificate-arn: arn:aws:acm:<AWS_REGION>:
<AWS_ACCOUNT_ID>:certificate/<CERT_ID>
Step 4: Set up the storage
Artifactory requires a license to store artifacts in an Amazon S3 bucket.
First, store your license(s) in a text file. In the case of multiple licenses (i.e. when configuring an Artifactory HA cluster), make sure each license is separated by a new line.
Configure the chart to consume the secret.
License section in the values.yaml file:
global:
...
artifactory:
 ...
 artifactory:
   license:
     secret: artifactory-licenses
     dataKey: artifactory.cluster.lic
Next, you’ll configure the Helm Chart to create the Artifactory K8S service account and attach a role with an annotation.
The storage configuration will use the s3-storage-v3-direct filestore template which is recommended on AWS. Make sure to set the useInstanceCredentials to “true”, which means that you don’t have to specify the credentials in the binarystore.xml. See the authentication mechanism.
Storage section in the values.yaml file to configure the Helm Chart:
global:
...
artifactory:
 ...
 serviceAccount:
   create: true
   annotations:
     eks.amazonaws.com/role-arn: arn:aws:iam::<ACCOUNT_ID>:role/<ROLE_NAME>
   automountServiceAccountToken: true
 artifactory:
   license:
     secret: artifactory-licenses
     dataKey: artifactory.cluster.lic
   persistence:
...
     type: s3-storage-v3-direct
     awsS3V3:
       bucketName:<BUCKET_NAME>
       endpoint: s3.<REGION>.amazonaws.com
       region:
        path: artifactory/filestore
       maxConnections: 50
       # in order to not specify identity and credential fields
       useInstanceCredentials: true
       testConnection: true
Step 5: Deploy the JFrog Platform Helm Chart
There are three sub-steps for deploying the JFrog Platform Helm Chart.
Sub-step 1: Create a namespace for where to deploy the JFrog Platform Helm Chart. Make sure to set the same name as the one configured in the OpenID Connect (OIDC) provider.
kubectl create ns <K8S_NAMESPACE>
Sub-step 2: Deploy the license as a secret.
kubectl create secret generic artifactory-licenses --from-file=artifactory.cluster.lic=license.txt -n <K8S_NAMESPACE>
Sub-step 3: Deploy the Helm Chart.
helm upgrade artifactory --install -n <K8S_NAMESPACE> jfrog/jfrog-platform
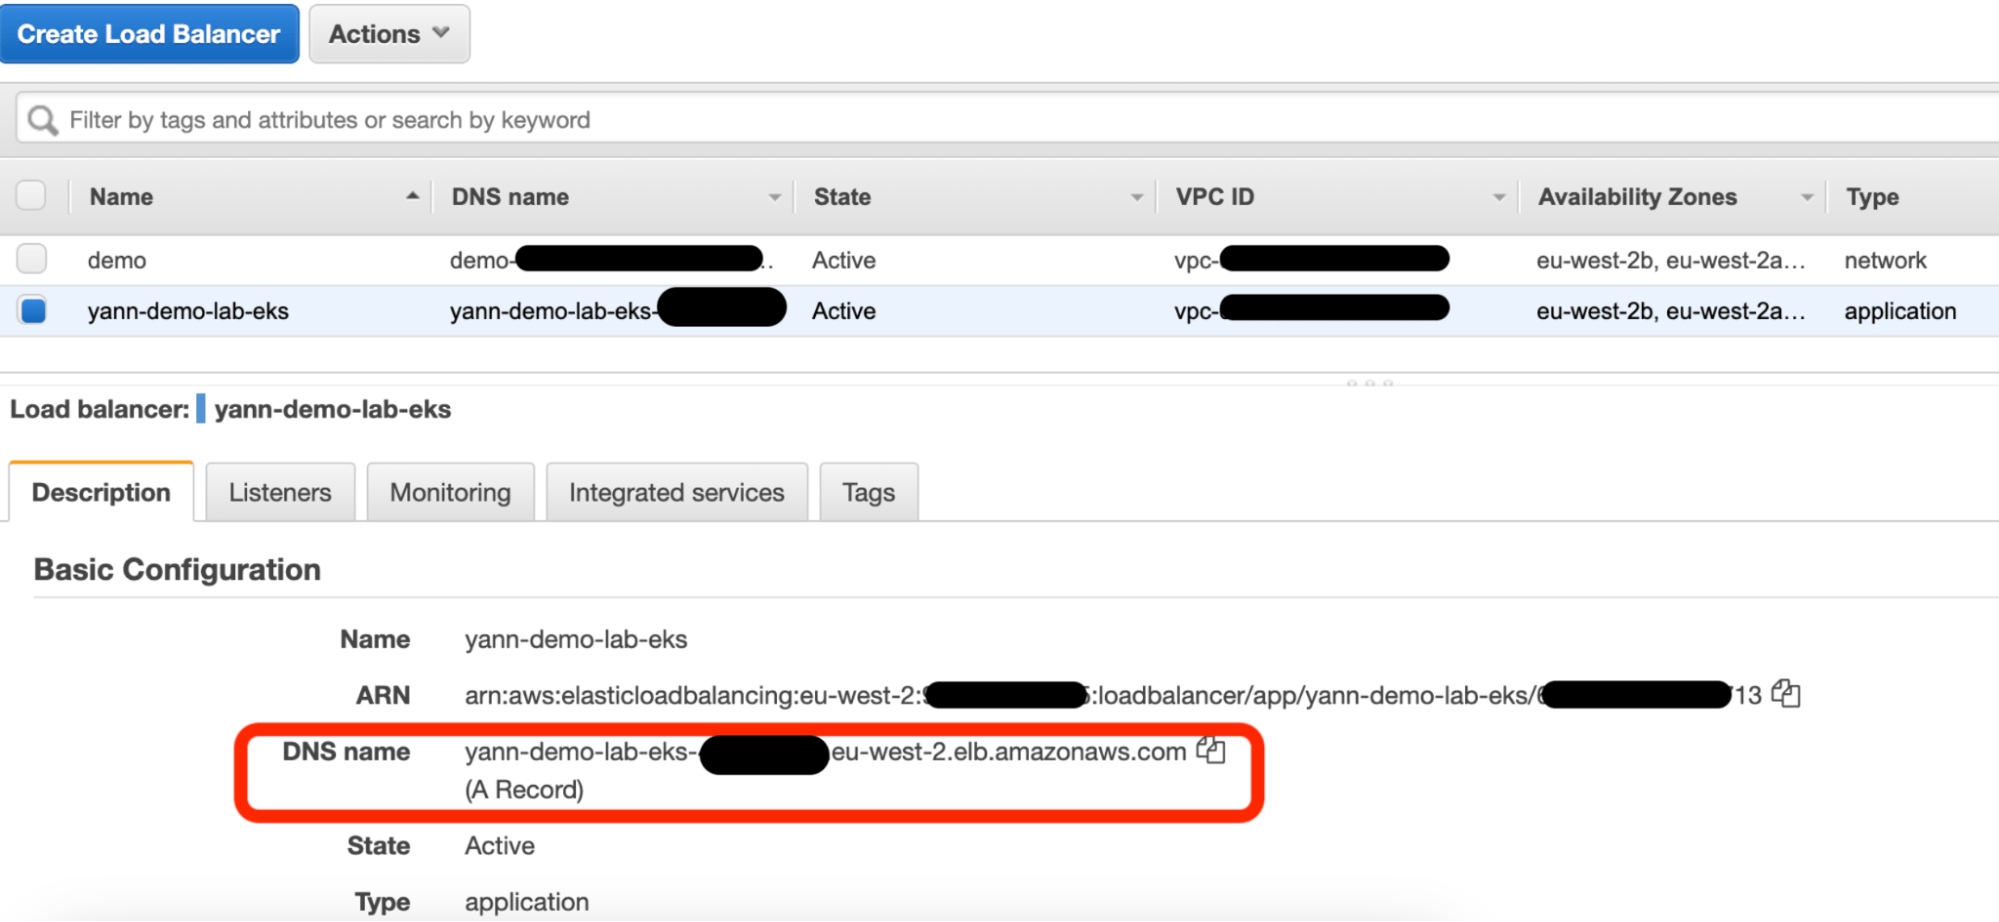
This final sub-step will deploy both Artifactory and the ALB with an auto-generated DNS (A record). If you’ve attached a TLS certificate, you’ll also want to add a new CNAME record in Route 53 that points to the auto-generated DNS. This will link your Load Balancer to your DNS, enabling you to access Artifactory.
Experience
JFrog Today
Discover how the JFrog Platform unites DevOps, DevSecOps and MLOps for secure, rapid software delivery.


