

Use JFrog Artifactory to Deliver Software with Confidence to Amazon EKS

By
8 min read

AWS is launching the Amazon Elastic Container Service for Kubernetes (Amazon EKS) and is announcing JFrog as a proud integration partner. Over the past year, it seems that even companies that weren’t in the first phase of Kubernetes adoption are now joining the party. JFrog has been a key part of the container movement, launching an enterprise-grade Docker registry back in 2015. Now, nearly three years later, we offer a robust Kubernetes Registry that is compatible with a growing list of Kubernetes cluster providers.
Based on our experience with customers and the community adopting Kubernetes, you need to combine these 3 Kubernetes essentials to create the new infrastructure abstraction smoothly:
- A k8s cluster (which EKS has incredibly simplified).
- A pipeline (which you can get from many sources including our partners, and soon to be available on AWS CodeStar).
- JFrog Artifactory serving as your Kubernetes registry.
In this blog post, we’ll show you how to quickly and easily configure Artifactory as your Kubernetes registry for EKS.
Provisioning and configuring Artifactory as your Kubernetes Registry
Choices for deploying Artifactory
Artifactory can run from a number of possible locations. Our example is based on subscribing to JFrog through the AWS Marketplace.
Additional available options are:
- Subscribing to Artifactory on AWS through JFrog.
- Deploying Artifactory to the EKS cluster (HA or single node) using a Helm chart.
- Using an existing Artifactory instance.
Let’s get started!
-
- Subscribe to JFrog through the AWS Marketplace.
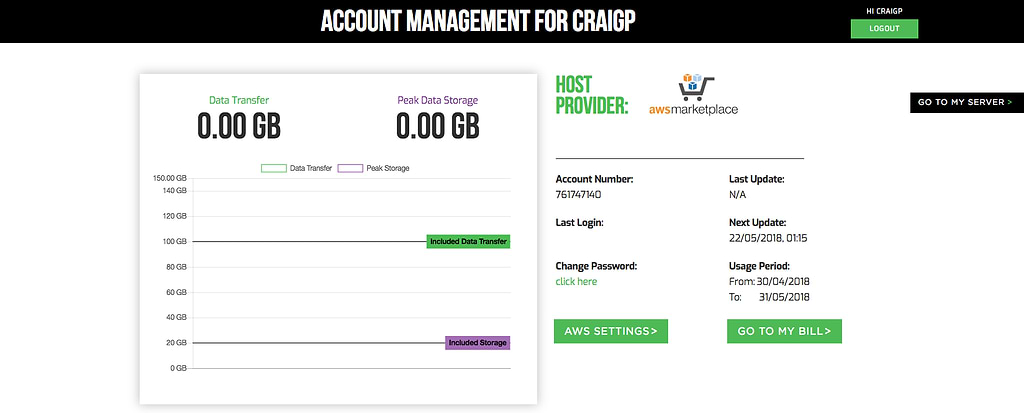
- Following your subscription to AWS Marketplace, JFrog generates and sends you an email with your account details and user credentials. Use your assigned credentials to log in to the JFrog Artifactory Account Management Dashboard to view and control your account information.

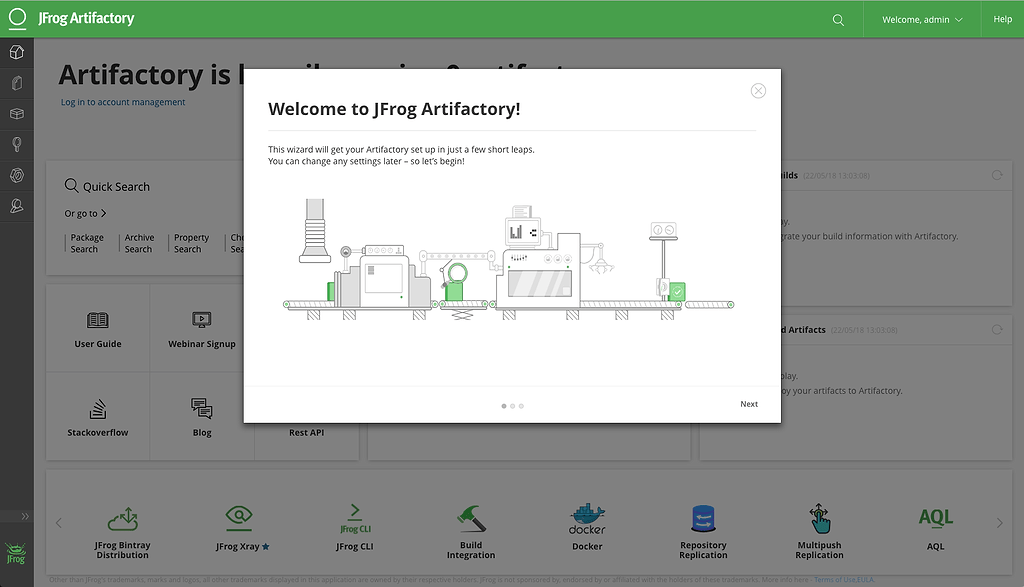
Figure 1 – JFrog Account Management Dashboard - Click GO TO MY SERVER to launch the Artifactory onboarding wizard.

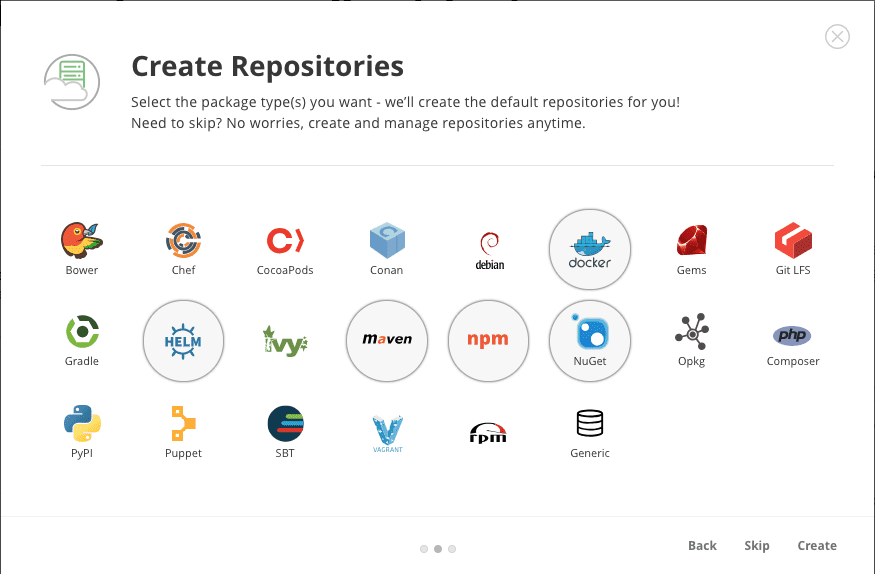
Figure 2 – JFrog Artifactory onboarding wizard - Select the software repositories you want to manage. In this example, we have only selected a handful of repositories including Docker, Helm, Maven, NPM, and NuGet.

Figure 3 – Supported package types in Artifactory
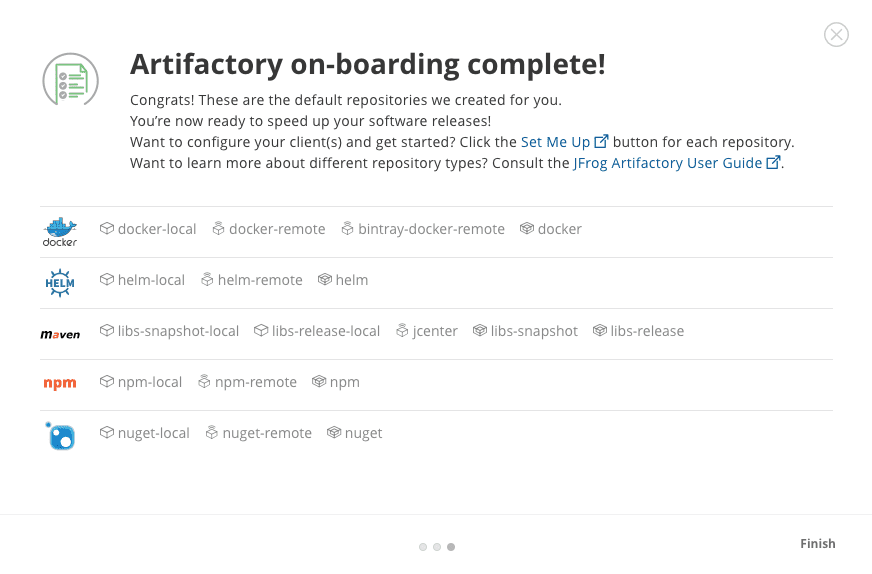
A configuration summary is displayed when you complete the wizard displaying all the handy things that were configured to make your life easier including local, remote, and virtual repositories.
 Figure 4 – Artifactory configuration settings summary
To learn more about how to plan for production, see Best Practices for Structuring and Naming Artifactory Repositories.
Creating an Artifactory private Docker registry
Now let’s configure Docker to use Artifactory as your private Docker registry.
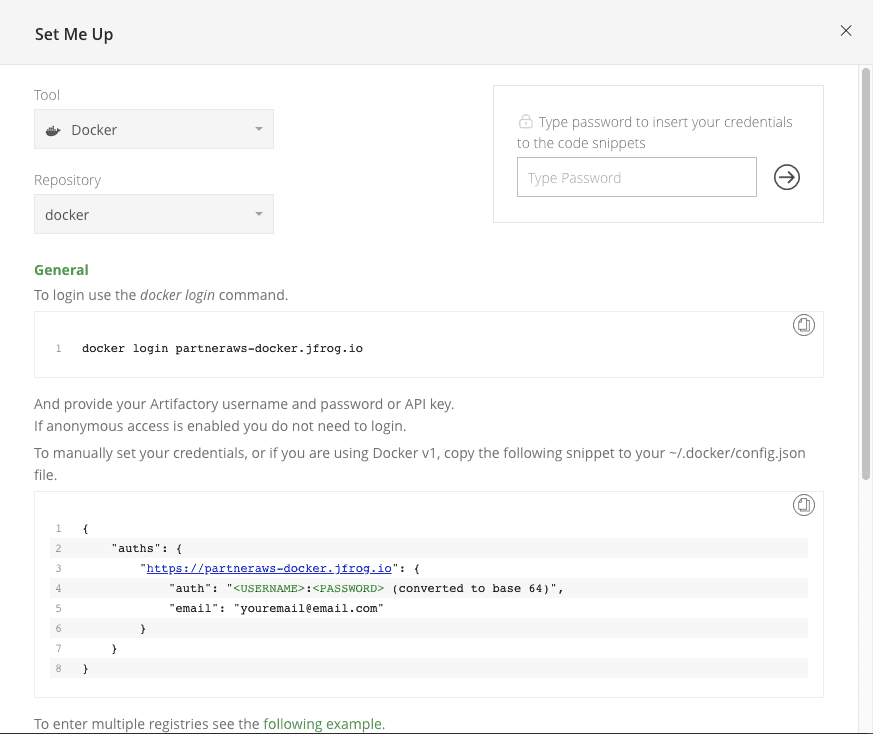
- From the Artifactory Home page, click the Docker virtual repository in the Set Me Up panel.
The command to log in to your Docker registry is displayed.

Figure 5 – Docker Set Me Up in Artifactory - Copy the docker login command to log in to the Docker client. Use your Admin username and password, as we have not enabled anonymous access.
- Proceed to use the Docker client.
docker pull partneraws-docker.jfrog.io/nginx
Using default tag: latest
Latest: Pulling from nginx
Digest:sha256:e4f-47a75c510f40b37b6b7dc6b7dc2516241ffa8vde5a442vde3d3372c9519c84d90
Status: Downloaded newer image for partneraws-docker.jfrog.io/nginx:latest
- In the Artifactory Package Viewer search for nginx to view it in Artifactory.
- Click the image to view the tag details.

Figure 6 – Artifactory Package Viewer

Provisioning EKS
Provisioning a Kubernetes cluster using EKS is just as easy.
- Access the AWS Amazon EKS console and click Create Cluster.

Figure 7 – Creating a cluster in the AWS Amazon EKS console - Configure your master cluster.
The settings in our example are the default settings used for the EKS trials. Your settings may vary.
 Figure 8 – Configure the master cluster in AWS Amazon EKS console
As the cluster is provisioned, the EKS progress is displayed.


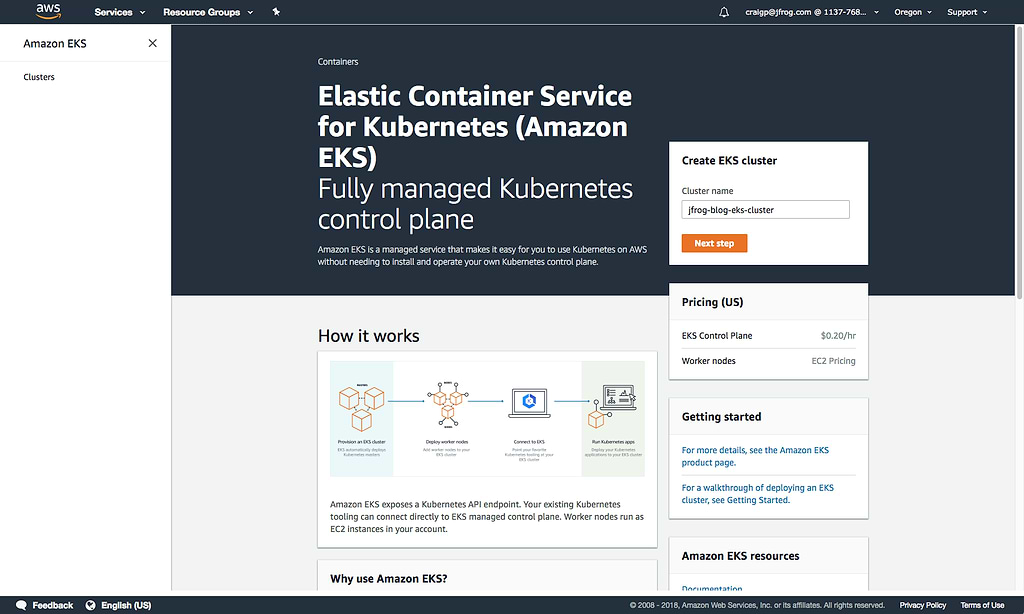
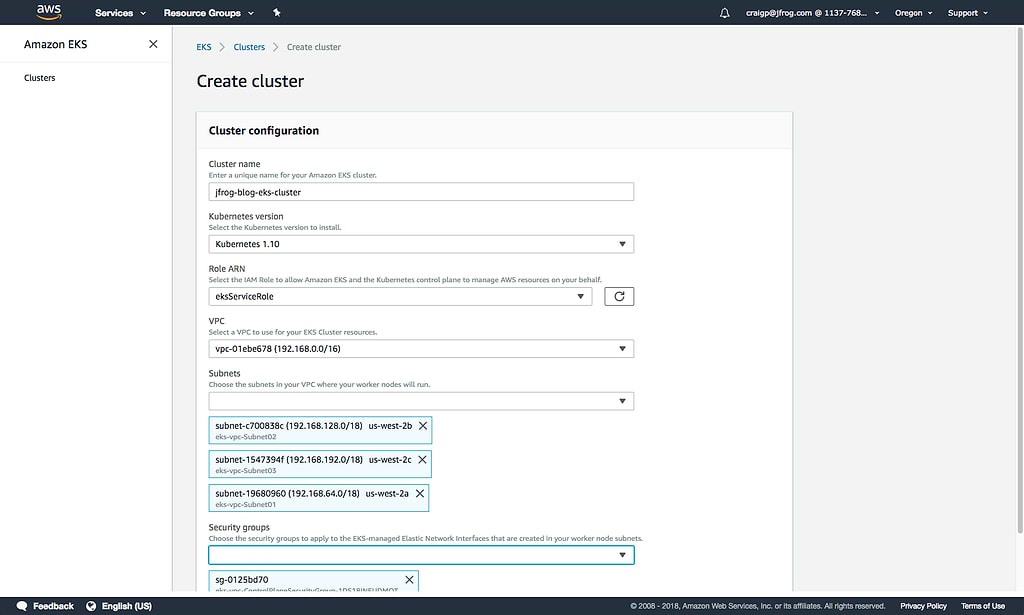
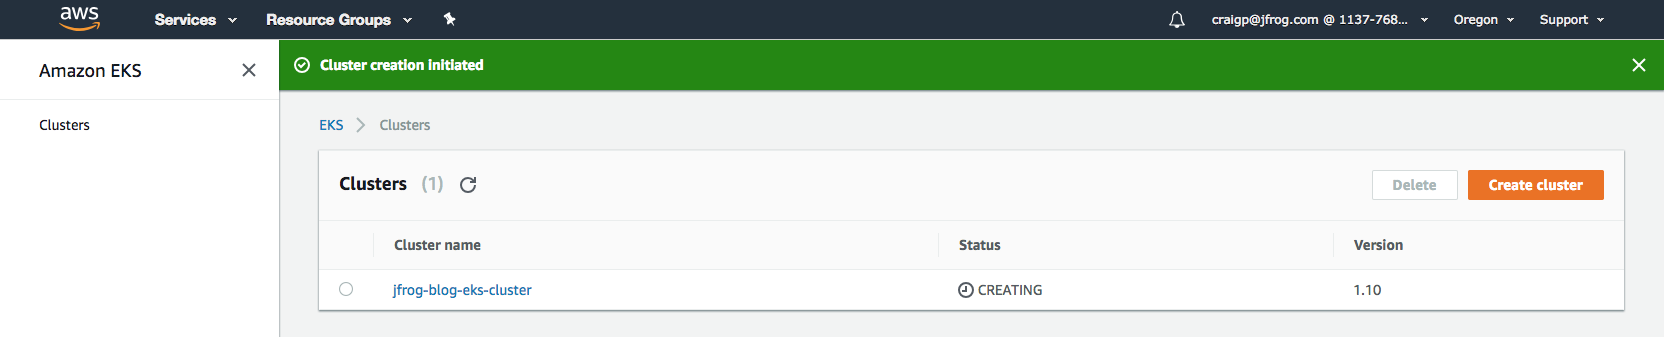
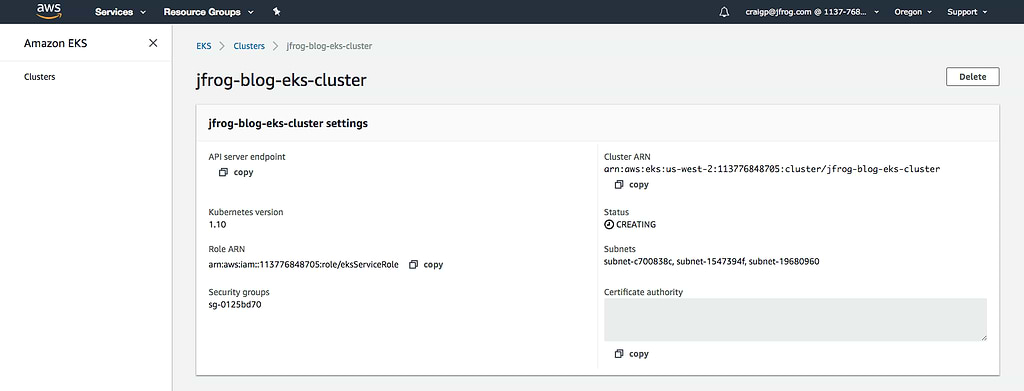
Figure 9 – The cluster is provisioned in EKS
The endpoint is displayed when the process ends.
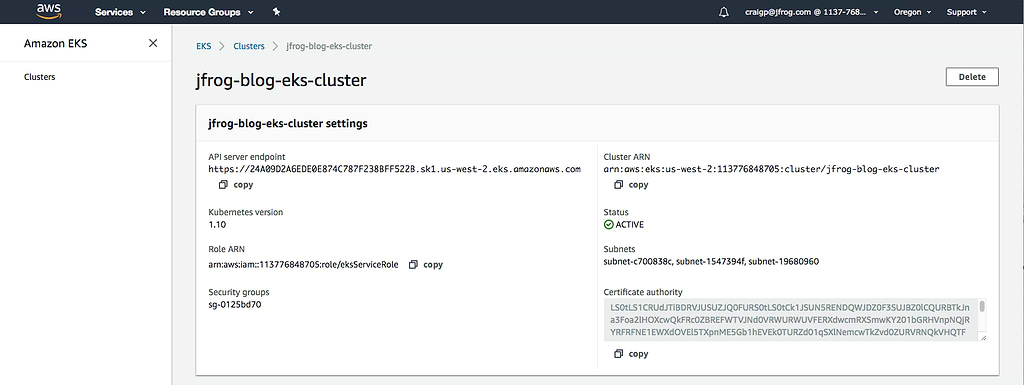
Figure 10 – The endpoint is created
- Configure the worker nodes as described in the AWS EKS documentation.
- Make sure that kubectl is setup as per the AWS EKS documentation.
- Verify that the pods are not deployed.
kubectl get pods
No resources found.
Running a simple nginx deployment on the EKS cluster
Now let’s run a simple nginx deployment on the EKS cluster using the Docker image from Artifactory.
- Create a Kubernetes secret to authenticate with your private Artifactory hosted Docker registry.
kubectl create secret docker-registry regcred--docker-server=parneraws-docker.jfrog.io--docker-username=admin --docker-password=[your_password] --docker-email=[your_email] - Create a simple Kubernetes .yaml file to run two pods of nginx. Referenced from the Kubernetes Deployment Example.
craigp-mac:~ craiggp$ cat run-nginx.yaml
apiVersion: apps/v1 # for versions before 1.9.0 use apps/v1beta2
kind: Deployment
metadata:
   name: nginx-deployment
spec:
 selector:
    matchLabels:
       app: nginx
  replicas: 2 # tells deployment to run 2 pods matching the template
  template: # create pods using pod definition in this template
    metadata:
       # unlike pod-nginx.yaml, the name is not included in the metadata as a unique
       name is
       # generated from the deployment name
       labels:
          app: nginx
    spec:
       containers:
       - name: nginx
       - image: partneraws-docker.jfrog.io/nginx:1.7.9
       ports:
      - containerPort: 80
   imagePullSecrets:
      - name: regcred
- Create the deployment using kubectl.
kubectl apply -f run-nginx.yaml
deployment.apps “nginx-deployment” created
And now you can view two pods running the images pulled from your private Docker
registry.kubectl get pods NAME READY STATUS RESTARTS AGE Nginx-deployment-74d975fb86-4vtxt 1/1 Running 0 51s Nginx-deployment-74d975fb86-T771n 1/1 Running 0 36s
Try it and let us know what you think!
Creating a safe and effective way to run cloud-native applications has never been safer or easier than before using Artifactory as your Kubernetes registry for clusters managed by AWS using EKS.
We’d appreciate your feedback. Please provide me your feedback at https://www.twitter.com/peterscraig.
Experience
JFrog Today
Discover how the JFrog Platform unites DevOps, DevSecOps and MLOps for secure, rapid software delivery.


