

Doing DevOps Your Way On SaaS Solutions: Connecting JFrog CLI to Your JFrog Workers
How to configure your JFrog Workers and GitHub Actions using JFrog CLI
October 2024 Update: JFrog Workers is now available for all Enterprise+ and Enterprise X customers! For more information, review our Help Center documentation.
If you have further questions, speak to a JFrog team member.

In our previous blog post, we explored JFrog Workers, a JFrog Cloud Platform service that allows you to create customized workers that can respond to events in the platform. These workers can perform various tasks, from running code to adjusting functions, giving you more flexibility and control over your workflows. Allowing you to automate processes and streamline your development pipeline in a serverless execution environment.
Managing your worker code in a source configuration manager such as git provides us with the following advantages:
- Version Control: Track your file changes. This enables you to revert back to previous versions, compare changes, and understand the history of your project. This is invaluable for collaboration and for debugging issues.
- Testing: Manage your test suites along with your codebase. The ability to version control your testing, ensures that any changes made to your code correspond to your test results.
- CI/CD integration: Integrate seamlessly with various CI/CD tools such as Jenkins, Travis CI, CircleCI, and GitLab CI/CD. These tools monitor the code repository for changes and trigger automated build, test, and deployment processes based on predefined rules and configurations.
The JFrog Workers service is now integrated with JFrog CLI, allowing you to automate the creation and managing of workers using your CI/CD. In this blog post we’ll demonstrate how to initialize, test and deploy your workers using GitHub Actions.
Note: available from JFrog version CLI 2.57.0
Before you start
Here’s what you’ll need as prerequisites:
curl -fL https://getcli.jfrog.io/v2-jf | sh
mv jf /usr/local/bin
Here’s how you can quickly get started and configure your GitHub Actions with JFrog Workers
Step 1: Initialize your worker repository
Create a new repository called my-worker-repo.
git init my-worker-repo
cd my-worker-repo
Step 2: Initialize your worker
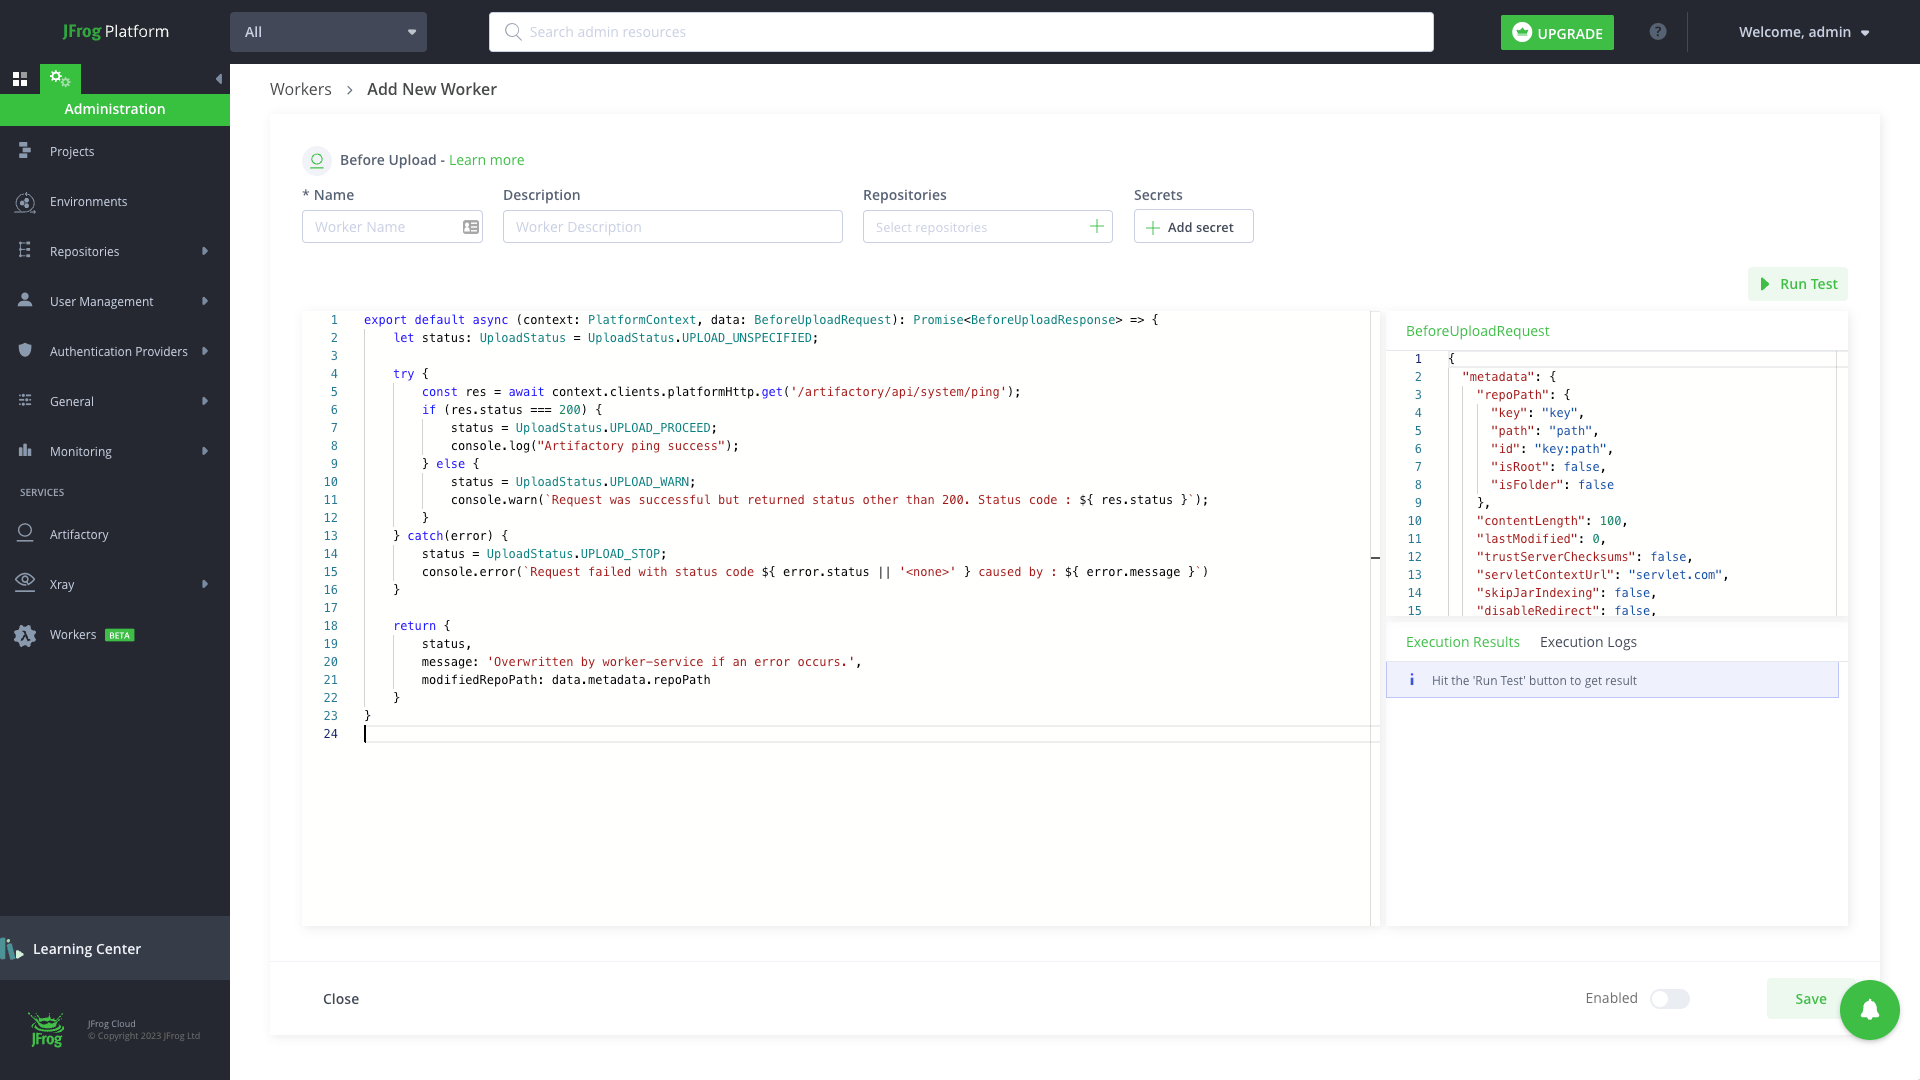
Create a new worker called my-worker, by running the worker init JFrog CLI command.
jf worker init BEFORE_DOWNLOAD my-workerExample Response:

The following files will be created in your directory:
- manifest.json – The worker specification which includes its name, the code location, the secrets and all the data that is useful to the worker.
- package.json – The file describing the development dependencies of the worker, this will not be used when executing your worker in our runtime
- worker.ts – The worker code source, here it will be our sample code for BEFORE_DOWNLOAD event
- worker.spec.ts – The source code of the worker unit tests
- Tsconfig.json – The Typescript configuration file
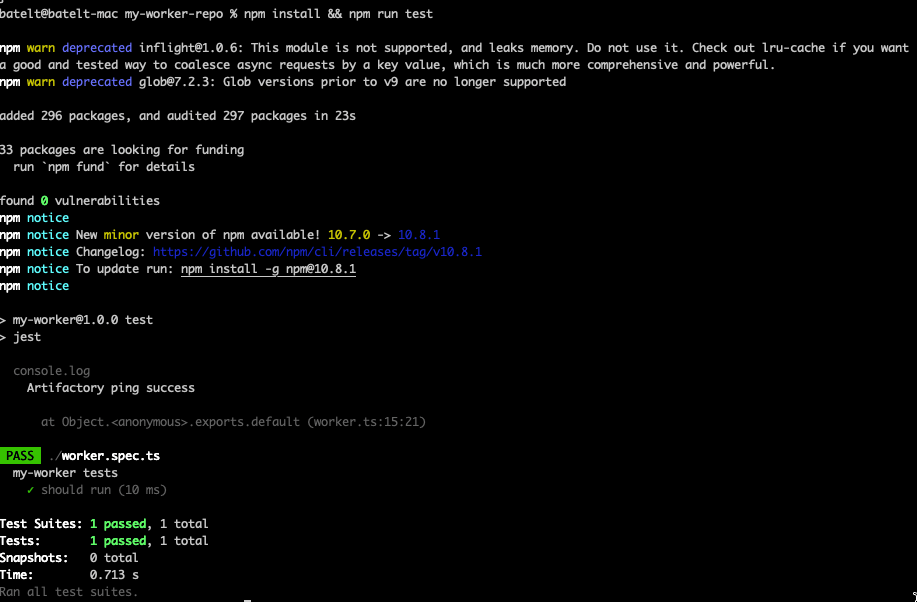
Step 3: Run your first test
Install and run your test, by running this npm command.
npm install && npm run testExample Response:
Step 4: Authenticate your CLI requests
Create a JFrog Platform Access Token to authenticate your CLI requests, by running this REST API command:
curl -H "Authorization: Bearer " -XPOST "<platform-url>/access/api/v1/tokens" -d "scope=applied-permissions/roles:project-key:developer,qa"Or via the UI User Management > Access Tokens > Generate Token.
Step 5: Manual deployment
Deploy the worker by connecting your target JFrog Platform with the JFrog CLI.
jf config add --url=<platform-url> --access-token="<platform-access-token>" --interactive=false <server-id>After configuring the worker, run a test before deploying.
jf worker dry-run --server-id <server-id> '{}'This command will use the server-id declared in the platform configuration to run your worker, in runtime, without deploying it.

Now that all the checks passed, deploy your worker, by running the worker deploy JFrog CLI command.
jf worker deploy --server-id <server-id>
Now that we have our worker, it will trigger the Before Download event before an artifact is downloaded from JFrog Artifactory.
Step 6: Automation
Create a CI/CD workflow that tests, executes and deploys the worker.
Start by creating a .github/workflows/ci.yml file that contains the following:
name: CI
permissions:
   id-token: write

on:
   workflow_dispatch:
   push:
       branches:
         - main
jobs:
 test-and-deploy:
   name: Test and Deploy
   runs-on: ubuntu-latest
   steps:
       - name: Checkout
         uses: actions/checkout@v4

       - name: Setup Node
         uses: actions/setup-node@v4
         with:
           node-version: 20

       - name: Setup JFrog CLI
         uses: jfrog/setup-jfrog-cli@v4
         env:
           JF_URL:
         with:
           oidc-provider-name:

       - name: Test
         run: npm install && npm run test

       - name: Dry Run
         run: jf worker dry-run '{}'

       - name: Deploy
         run: jf worker deploy
Here are the workflow steps:
- The workflow is triggered either manually on worker_dispatch or on every push to the main branch.
on: workflow_dispatch: push: branches: - main - The workflow has only one job: Test and Deploy
- Checkout the repository.
- Install node version 20.
- Install and set up the latest JFrog CLI.
- name: Setup JFrog CLI uses: jfrog/setup-jfrog-cli@v4 - The CLI will authenticate the platform using OIDC.
env: JF_URL: <YOUR_JFROG_INSTANCE_URL> with: oidc-provider-name: <CONFIGURED_PROVIDER_NAME_ON_JFROG_PLATFORM> - Setup the CLI to use the JFrog Platform
- Run your dry-run test and deploy
- name: Dry Run
run: jf worker dry-run '{}'

- name: Deploy
run: jf worker deploy
For more on workers, visit our technical documentation.


