Cruise Safely on IBM Cloud’s Road to DevOps
When you’ve chosen IBM Cloud for your DevOps platform, trust was certainly part of your decision. Like other public clouds, IBM Cloud offers a quick, flexible on-ramp to cloud native development. Their expertise, support, and a catalog of proven tools like IBM Cloud Kubernetes Service (IKS) gives you confidence.
So trust is important to you. It ought to be, since that’s what allows DevOps to move your code through quality gates to production at freeway speed.
Fortunately, to reach the road to trusted DevOps, it only takes a little steering to merge JFrog Artifactory onto IBM Cloud and IKS. We’ll get you there, turn by turn.
Trusted Name, Trusted DevOps
Placing your DevOps pipeline into IBM’s publicly shared cloud provides immediate, elastic infrastructure that’s accessible anytime, from anywhere. As a certified K8s provider, IKS makes it easy to deploy container technology.
And when paired with IBM Cloud Private, the public IBM Cloud can be part of a powerful hybrid cloud system.
So you can trust the IBM platform you’re running. What you need for a successful DevOps strategy is to be as confident in the software you produce as the cloud you produce it on.
JFrog Artifactory provides that confidence by bringing control of and visibility to all the components that go into the software you produce. Whether from package repositories like npm and Maven, code from other departments or your own team, Artifactory collects vital knowledge about them the many assets used and produced in your continuous integration and delivery (CI/CD) system. That metadata helps ensure the artifacts moving through the many stages of your development pipeline are expected, compliant, and secure.
With that trust in place, Artifactory can deliver release software directly to IKS clusters through a container repository that serves as your Kubernetes registry. Unlike a simple Docker registry, Artifactory’s K8s registries provide the ability to fully trace content, dependencies, and relationships with other container images, giving you insight into and control of your entire container process from code to cluster. That’s among the many reasons for cloud DevOps to use Artifactory.
Enterprise Ready
To support development across your entire organization, you’ll need your artifact repositories to be highly available to ensure zero downtime in even the most demanding of workloads. For that reason, this how-to demonstrates an installation of Artifactory HA, the version appropriate for enterprise-level work.
A High Availability (HA) installation of Artifactory in IBM Cloud operates with an array of at least three work nodes in the cluster, each containing an Artifactory server instance. This helps provide five nines reliability, and can accommodate larger load bursts with minimal compromise to performance.
Your installation will also include NGIX as a load balancer, to optimally distribute requests to the Artifactory server nodes.
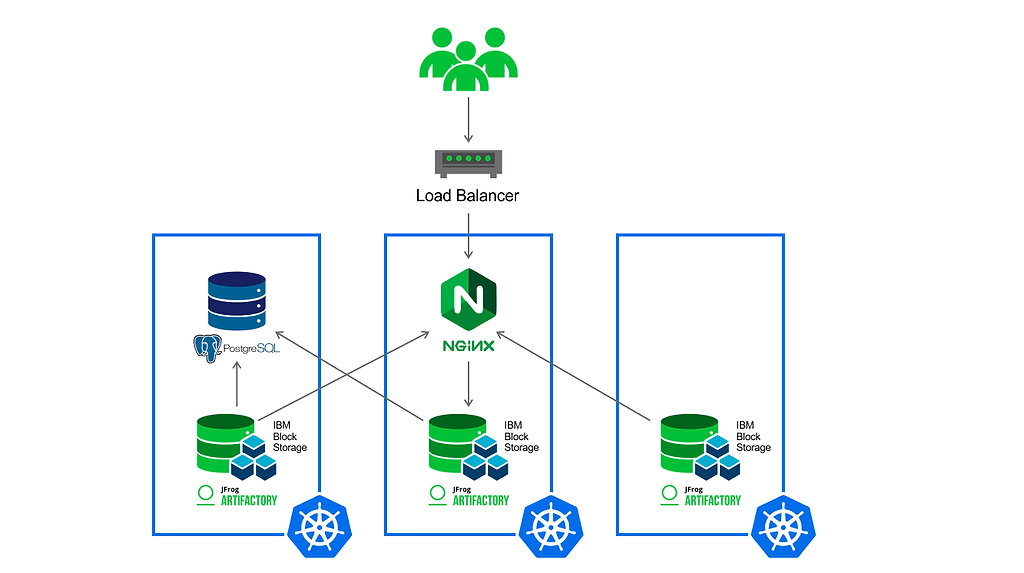
The HA configuration helps ensure zero downtime through this redundant set of Artifactory servers running in multiple pods within the K8s cluster. In this way, at least one instance of Artifactory will be available to serve requests even if one or more pods are blocked, crashed, or taken offline for service. This high reliability helps assure your builds will always complete.
Installing Artifactory in IBM Cloud
Getting Artifactory set up and running on IBM Cloud is easily done through JFrog’s Helm chart. But there are some important things you need to do first.
Before You Start
Prepare for this installation of Artifactory to IBM Cloud by making sure you have these things ready:
- You will need to have a billable account for IBM Cloud, in order to create Kubernetes clusters.
- You must have the IBM Cloud CLI and tools installed.
- You will need an Artifactory Enterprise license to run the high-availability Artifactory configuration this procedure installs. For testing and evaluation purposes, you can request a set of 30-day trial licenses.
Steps to Follow
Step 1: Create a Kubernetes Cluster
You will need to create a K8s cluster on IBM Cloud for your Artifactory HA to run in. The cluster will need at least 3 worker nodes to accommodate each of the Artifactory servers that provide high availability.
- Log into your cloud account using your account credentials.
- From the Menu on the right side of the navigation bar, select Kubernetes.
- On the resulting Kubernetes Overview page, click Create a cluster.
- On the resulting Create a New Cluster display, select your settings for a standard cluster.
Your flavor selection should be for a b2c.4×16 machine type that allocates 4 cores and 16GB of RAM, with a minimum of 3 worker nodes.
When all selections are made, click Create Cluster. - When cluster creation is complete, the IBM Cloud Console will present the Gain access to your cluster page.
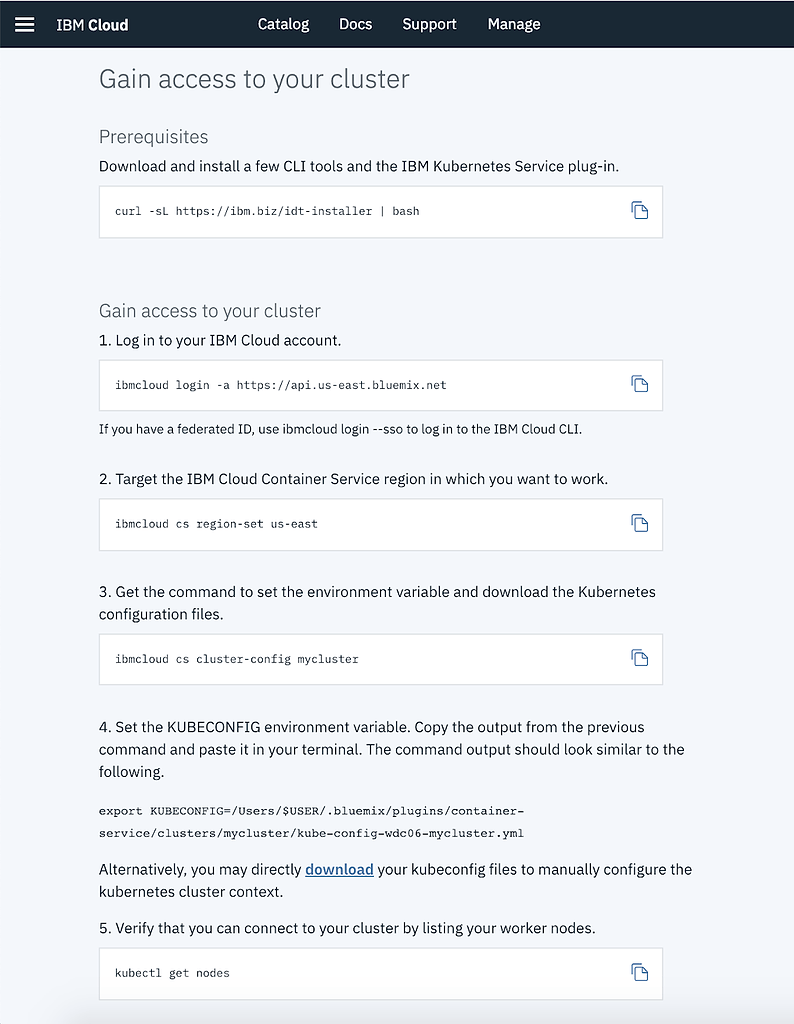
Perform the steps shown to gain access to your Kubernetes cluster.
For detailed information on the procedures to create a K8s cluster, see the IBM documentation on Setting up clusters and worker nodes.
Step 2: Install IBM Block Storage Plugin
Artifactory makes use of block storage features provided by the IBM Block Storage Plugin, so that must be installed and configured for the needed storageclass before Artifactory is installed.
- Install and initialize Helm client:
# Initialize Helm client
helm init
- Add the IBM Helm chart repository:
helm repo add ibm https://registry.bluemix.net/helm/ibm
- Install the Block Storage plugin from the IBM Helm chart and configure ibmc-block-bronze as default storageclass.
# Install plugin to create storageclass for block storage
helm install ibm/ibmcloud-block-storage-plugin

# Check if pod is deployed and healthy
kubectl get pod -n kube-system | grep block

# Check for storageclasses created by plugin
kubectl get storageclasses | grep block

# Set ibmc-block-bronze as default storageclass
kubectl patch storageclass ibmc-block-bronze -p '{"metadata": {"annotations":{"storageclass.kubernetes.io/is-default-class":"true"}}}'

# Unset ibmc-file-bronze as default storageclass
kubectl patch storageclass ibmc-file-bronze -p '{"metadata": {"annotations":{"storageclass.kubernetes.io/is-default-class":"false"}}}'

# Make sure only one default storageclass is set
kubectl get storageclass
Step 3: Install Artifactory HA
Once a cluster and worker nodes have been created with the block storage features needed, a a High Availability configuration of Artifactory can be installed from the JFrog Helm chart repository.
- Add the JFrog Helm chart repository:
# Add JFrog Helm chart repository
helm repo add jfrog https://charts.jfrog.io
- Install Artifactory Enterprise using the Helm chart
# Install Artifactory-ha
helm install --name artifactory-ha jfrog/artifactory-ha
- When installation is complete, you can confirm and get further setup instruction by issuing the following command:
# Command to check status of helm artifactory-ha deployment
helm status artifactory-ha
The status command will respond with instructions telling you how to:
- Set the master key or secret
- Extract the database password
- Get the Artifactory IP and URL
- Open Artifactory in your browser
- Activate Artifactory HA with licenses
What’s Next
WIth Artifactory successfully installed and activated in your IBM Cloud cluster, you’re ready to integrate Artifactory’s power into your DevOps pipeline. You can get started setting up your repositories:
- Create proxies for your package managers to better control your outside dependencies
- Set up build integration for a popular CI server, or integrate build tools with the JFrog CLI
- Set up your Docker registries in Artifactory
These Artifactory services will help you forge a trusted continuous delivery pathway from code to IKS cluster in IBM Cloud.
Look for our next blog post, where we’ll demonstrate the procedures for installing Artifactory in IBM Cloud Private.


