Claude
  Cursor
  Codex
Codex  Hugging Face
  NVIDIA
  Visual Studio Code
  Devin
Devin  Kiro
Kiro  Open Code
  NanoClaw
 Docker
  npm
npm  PyPy
PyPy  Wiz
Wiz 
 Financial Services
  Gaming
  Public Sector
  Automotive
  Technology
  Healthcare


Propagating User Identity From AI Agents to Your Tools: Amazon Bedrock AgentCore Gateway and JFrog Artifactory
AI agents are becoming real users of internal systems. They open pull requests, run queries, and pull and publish artifacts in repositories like JFrog Artifactory. The moment an agent touches a system with per-user permissions, one question decides whether the setup is safe: when the agent acts, who is it acting as?
This post answers that question end to end. It explains what Amazon Bedrock AgentCore Gateway is, walks through the ways to propagate a user’s identity to the JFrog Software Supply Chain Platform, and gives a complete, API-driven procedure for the option that carries per-user identity across that boundary: On-Behalf-Of (OBO) token exchange between AgentCore Gateway and JFrog Artifactory.
By the end, you will understand OBO (Amazon Bedrock AgentCore: On-behalf-of token exchange with AgentCore Identity) and be able to reproduce the integration with CLI commands against the JFrog Platform.
What is Amazon Bedrock AgentCore Gateway?
AgentCore Gateway gives an agent a single, managed MCP (Model Context Protocol) endpoint that fronts many backend tools. Instead of teaching each agent how to reach each system, you register targets on the Gateway, and the agent calls them through one place. The Gateway handles inbound authentication, connects to each target with the right outbound credential, and adds observability and policy centrally.
A target can be a Lambda function, an OpenAPI or Smithy API, or another MCP server. The agent connects through an MCP client, and the Gateway provides tool creation, tool search, and inbound and outbound authentication, with AgentCore Identity and Amazon CloudWatch alongside.
Amazon Bedrock AgentCore Gateway overview
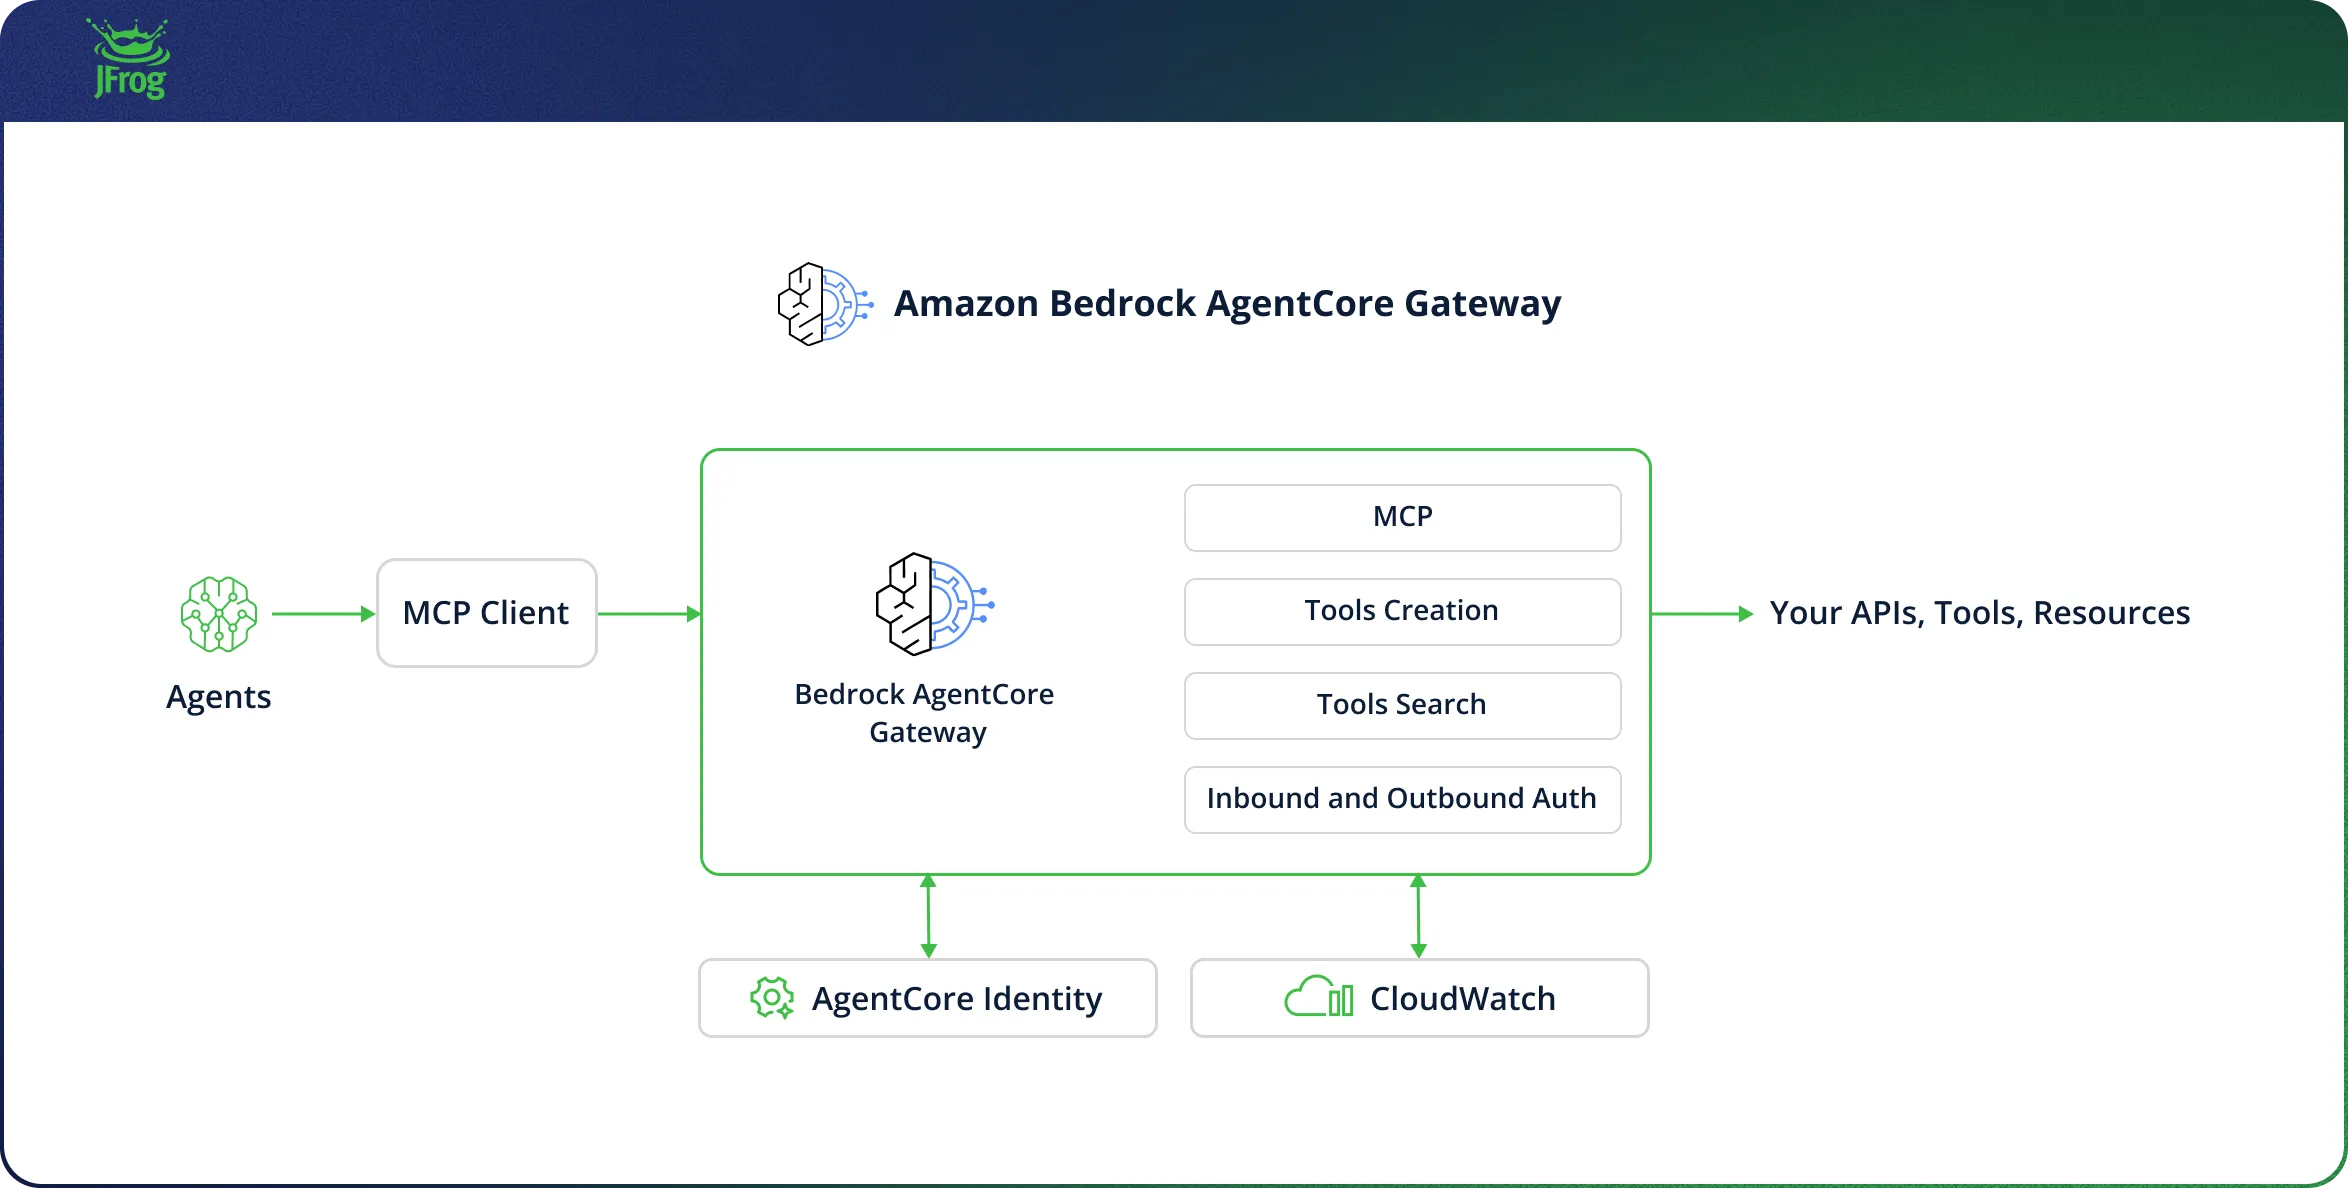 Figure 1: Amazon Bedrock AgentCore Gateway. Agents connect through an MCP client; the Gateway provides MCP, tool creation, tool search, and inbound and outbound authentication, backed by AgentCore Identity and Amazon CloudWatch.
Two capabilities in Figure 1 allow for user identity propagation:
- Inbound and Outbound Auth — The Gateway validates the caller’s token (a JWT from your identity provider) on the way in, and obtains the right credential for the target on the way out.
- AgentCore Identity — This is the managed broker and vault behind outbound auth. It stores the credential the Gateway uses to reach a target and can perform an OBO token exchange, so the outbound call carries the user’s identity rather than a shared one.
The Gateway also offers cached tool search. This integration uses dynamic tool listing instead, so tool discovery runs with the user’s token (see Step 4 below).
In this post, we show how to set up JFrog Artifactory’s MCP server as an AgentCore target, with OBO token exchange so each call reaching Artifactory authenticates as the signed-in user rather than a single shared credential.
This allows the use of JFrog’s authorization system, even when working with the AgentCore gateway, keeping the correct owner’s accountability on agentic operations.
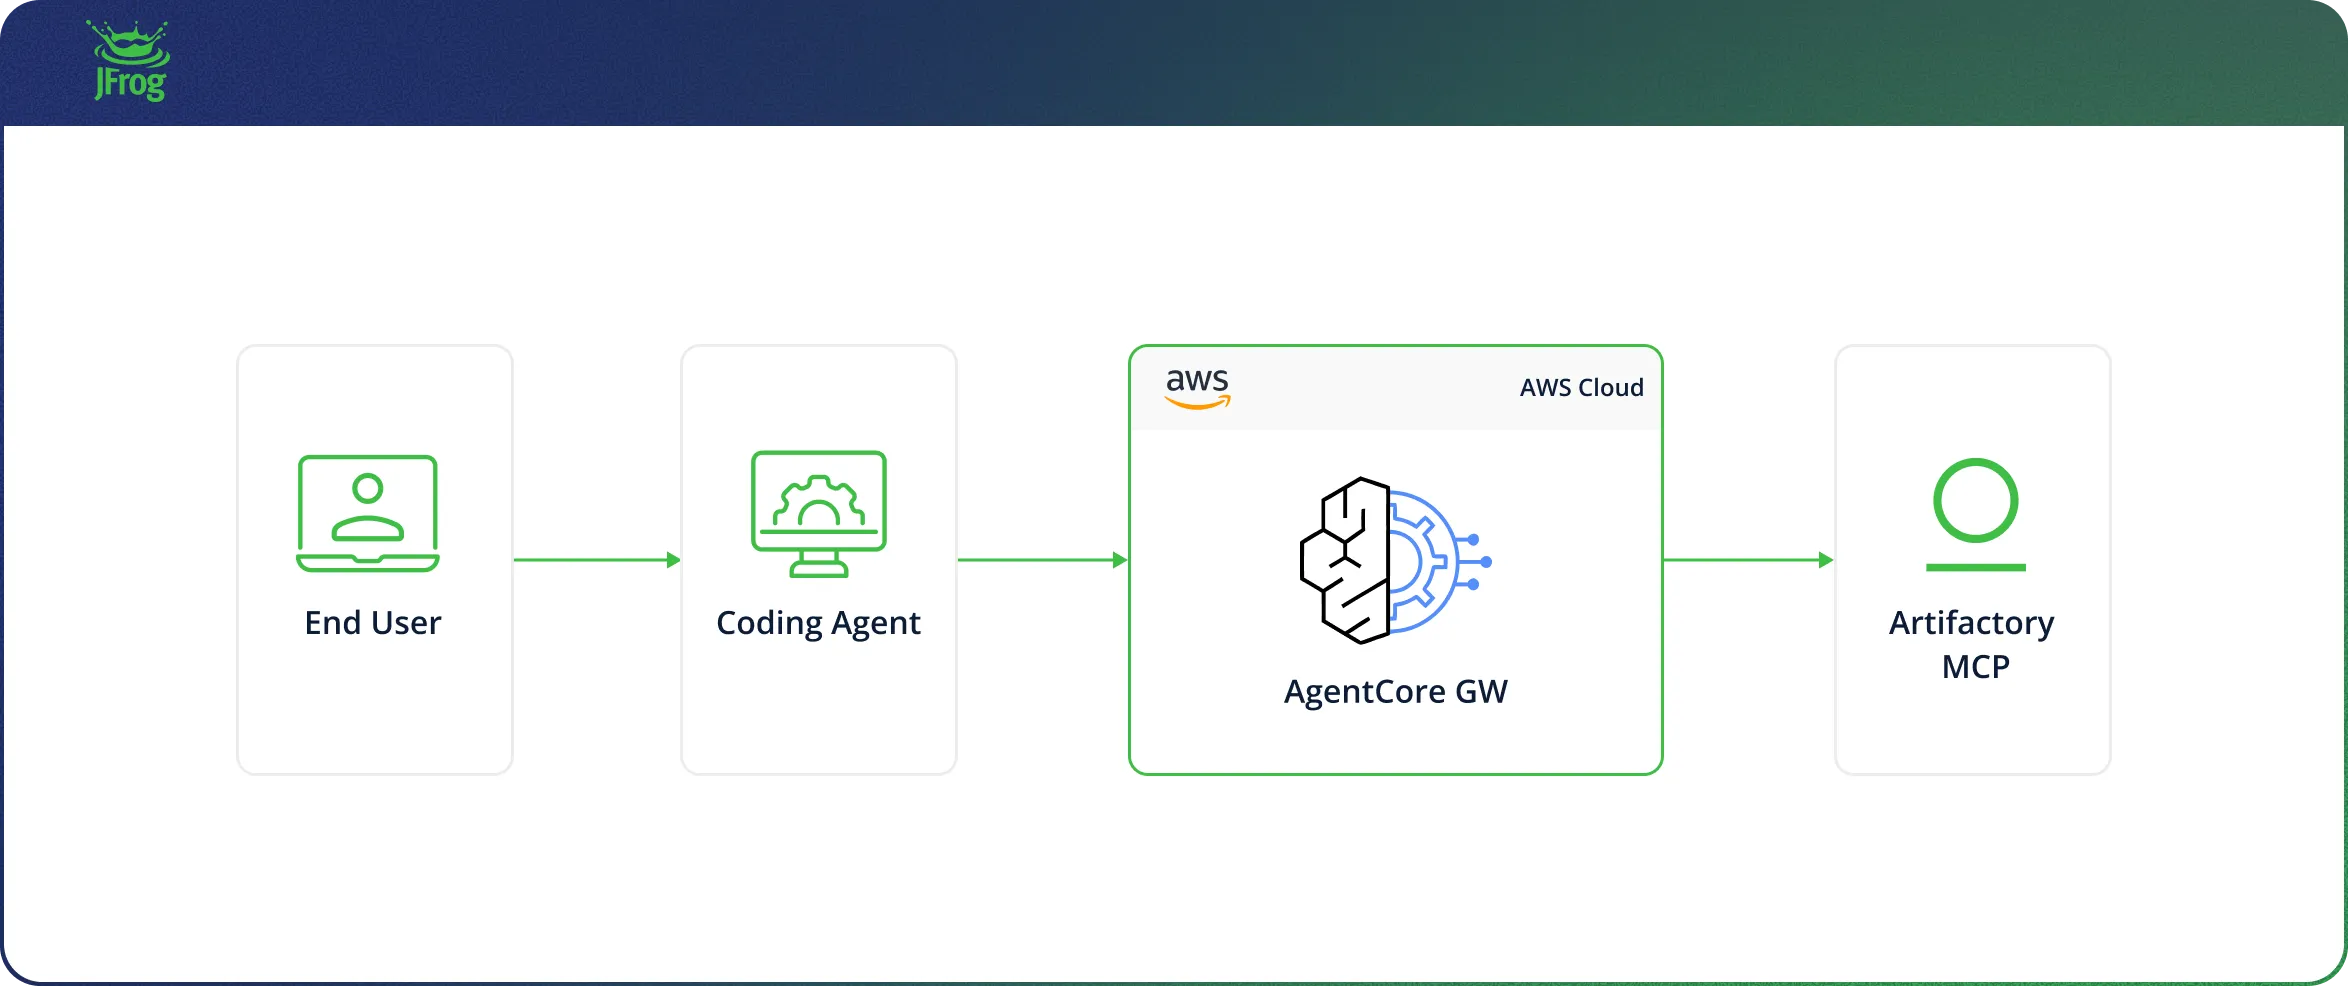 Figure 2: The integration in this post. An end user’s coding agent calls Artifactory’s MCP server through the AgentCore Gateway; with OBO, the request reaches Artifactory as the end user.
Foundations: Identity Across the Second Hop
Every agent-to-tool request travels at least two hops:
| agent | ||||
| ● User | ────▶ | ● AgentCore Gateway | ────▶ | ● JFrog Artifactory |
| hop 1 | hop 2 |
Hop 1 is well understood. The user signs in with an identity provider (IdP) and the agent presents that identity to the Gateway. Hop 2 is trickier. When the Gateway calls Artifactory, what identity does it use?
If the answer is a single shared credential, you lose three things at the boundary:
- Audit fidelity — Actions are recorded against one service account, not the person who triggered them.
- Least privilege — That credential usually has broader access than any one user, so the agent can act beyond a user’s permissions.
- Containment — One leaked long-lived credential exposes everything the agent can reach.
Identity propagation carries the user’s identity across that second hop, so the request lands downstream as the user, with their permissions and under their name. AgentCore Gateway supports three ways to do it. These are general mechanisms, not JFrog-specific; the goal here is to place on-behalf-of among the alternatives before applying it to Artifactory.
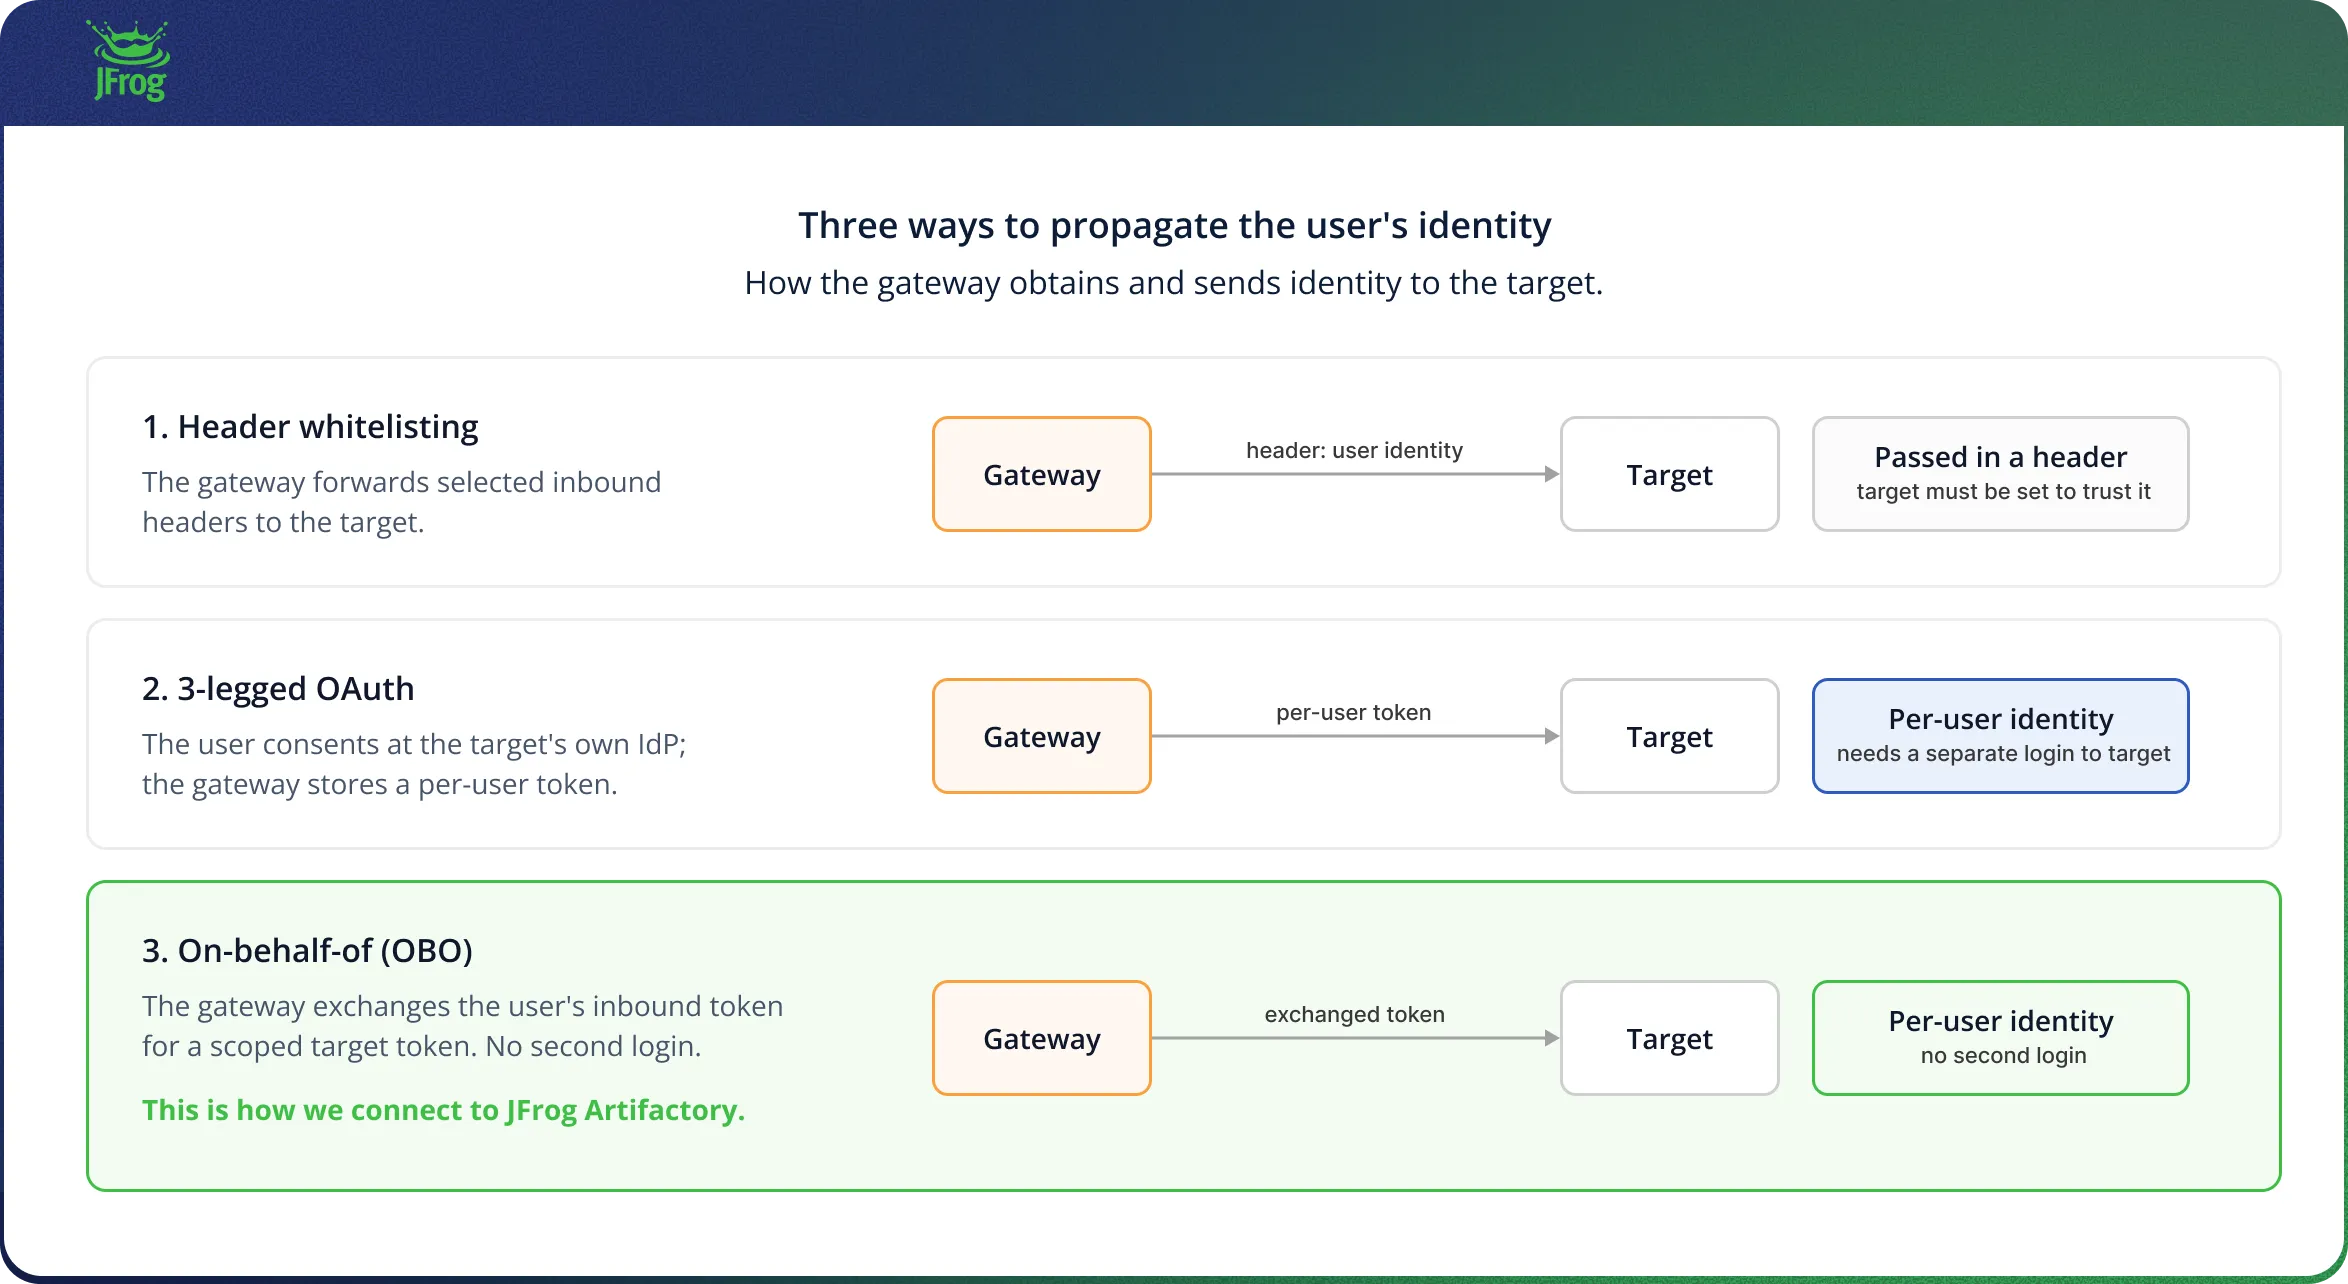 Figure 3: Three ways the Gateway can carry identity to a target. Header whitelisting forwards identity in a request header the target must be set up to trust. Three-legged OAuth has the user log in to the target separately, and the Gateway stores a per-user token. On-behalf-of exchanges the inbound token for a scoped target token with no second login. This integration uses on-behalf-of for JFrog.
1. Header whitelisting
The Gateway forwards a selected set of inbound headers to the target, so it can pass the caller’s identity in a header such as X-Authenticated-User. AgentCore calls this header propagation.
This only propagates identity if the target is built to read and trust that header, and the path between Gateway and target is locked down so the header cannot be spoofed. Many token-based systems, JFrog Artifactory among them, do not consume an identity header at all; they authenticate the bearer token and ignore anything else. Header propagation is a fit for passing context to a target you control, not for authenticating to a system that expects a token.
2. Three-legged OAuth
The user logs in to the target’s own identity provider and consents, and AgentCore Identity stores the resulting per-user token in its vault. Later calls use that stored token, so the request reaches the target as the user. AWS documents this as user-delegated access using the authorization-code grant.
This gives real per-user identity, but it is a second, separate login: the user authenticates once to reach the Gateway and again to authorize the target. It fits when the target is a distinct identity domain with its own consent screen and you want the user to grant access explicitly.
3. On-behalf-of token exchange
The Gateway exchanges the user’s inbound token for a new token that the target mints from a trust relationship it already has with your identity provider. The new token still represents the user, and there is no second login. This is OAuth 2.0 Token Exchange (RFC 8693); on-behalf-of is using that exchange to preserve the caller’s identity rather than replace it.
You get per-user identity end to end, least privilege at each hop, short-lived downstream tokens, and honest audit, with no shared long-lived secret on the path. The cost is setup: a trust relationship on both sides, and a target that supports token exchange. JFrog Artifactory does, which is why on-behalf-of is the approach for the rest of this post.
Comparing the 3 configuration options at a glance
| Header whitelisting | Three-legged OAuth | On-behalf-of exchange | |
| Verifiable per-user identity at the target | Only if the target trusts the header | Yes | Yes |
| Second login to the target | No | Yes | No |
| Works when the target expects a token, not a header | No | Yes | Yes |
This is where the two platforms meet. JFrog Artifactory’s Access service implements a mature OIDC token exchange (JFrog: OpenID Connect Authentication) and identity mappings to mint a short-lived, per-user/group/project token from a trusted external login. AgentCore Gateway and AgentCore Identity provide the other half: a managed endpoint that validates the inbound user token and brokers the exchange, holding the provider credential in a managed vault so the Gateway keeps no static downstream secret. The rest of this post connects the two.
On-Behalf-Of Token Exchange
How the exchange works
Three systems participate alongside the agent:
- The identity provider authenticates the user and issues a signed token whose audience is the Gateway.
- AgentCore Gateway validates that token and performs the exchange through AgentCore Identity.
- JFrog plays two roles. Its Access service issues JFrog tokens from a trusted external login, and its /mcp server hosts the tools the agent calls.
On-Behalf-Of token exchange sequence:
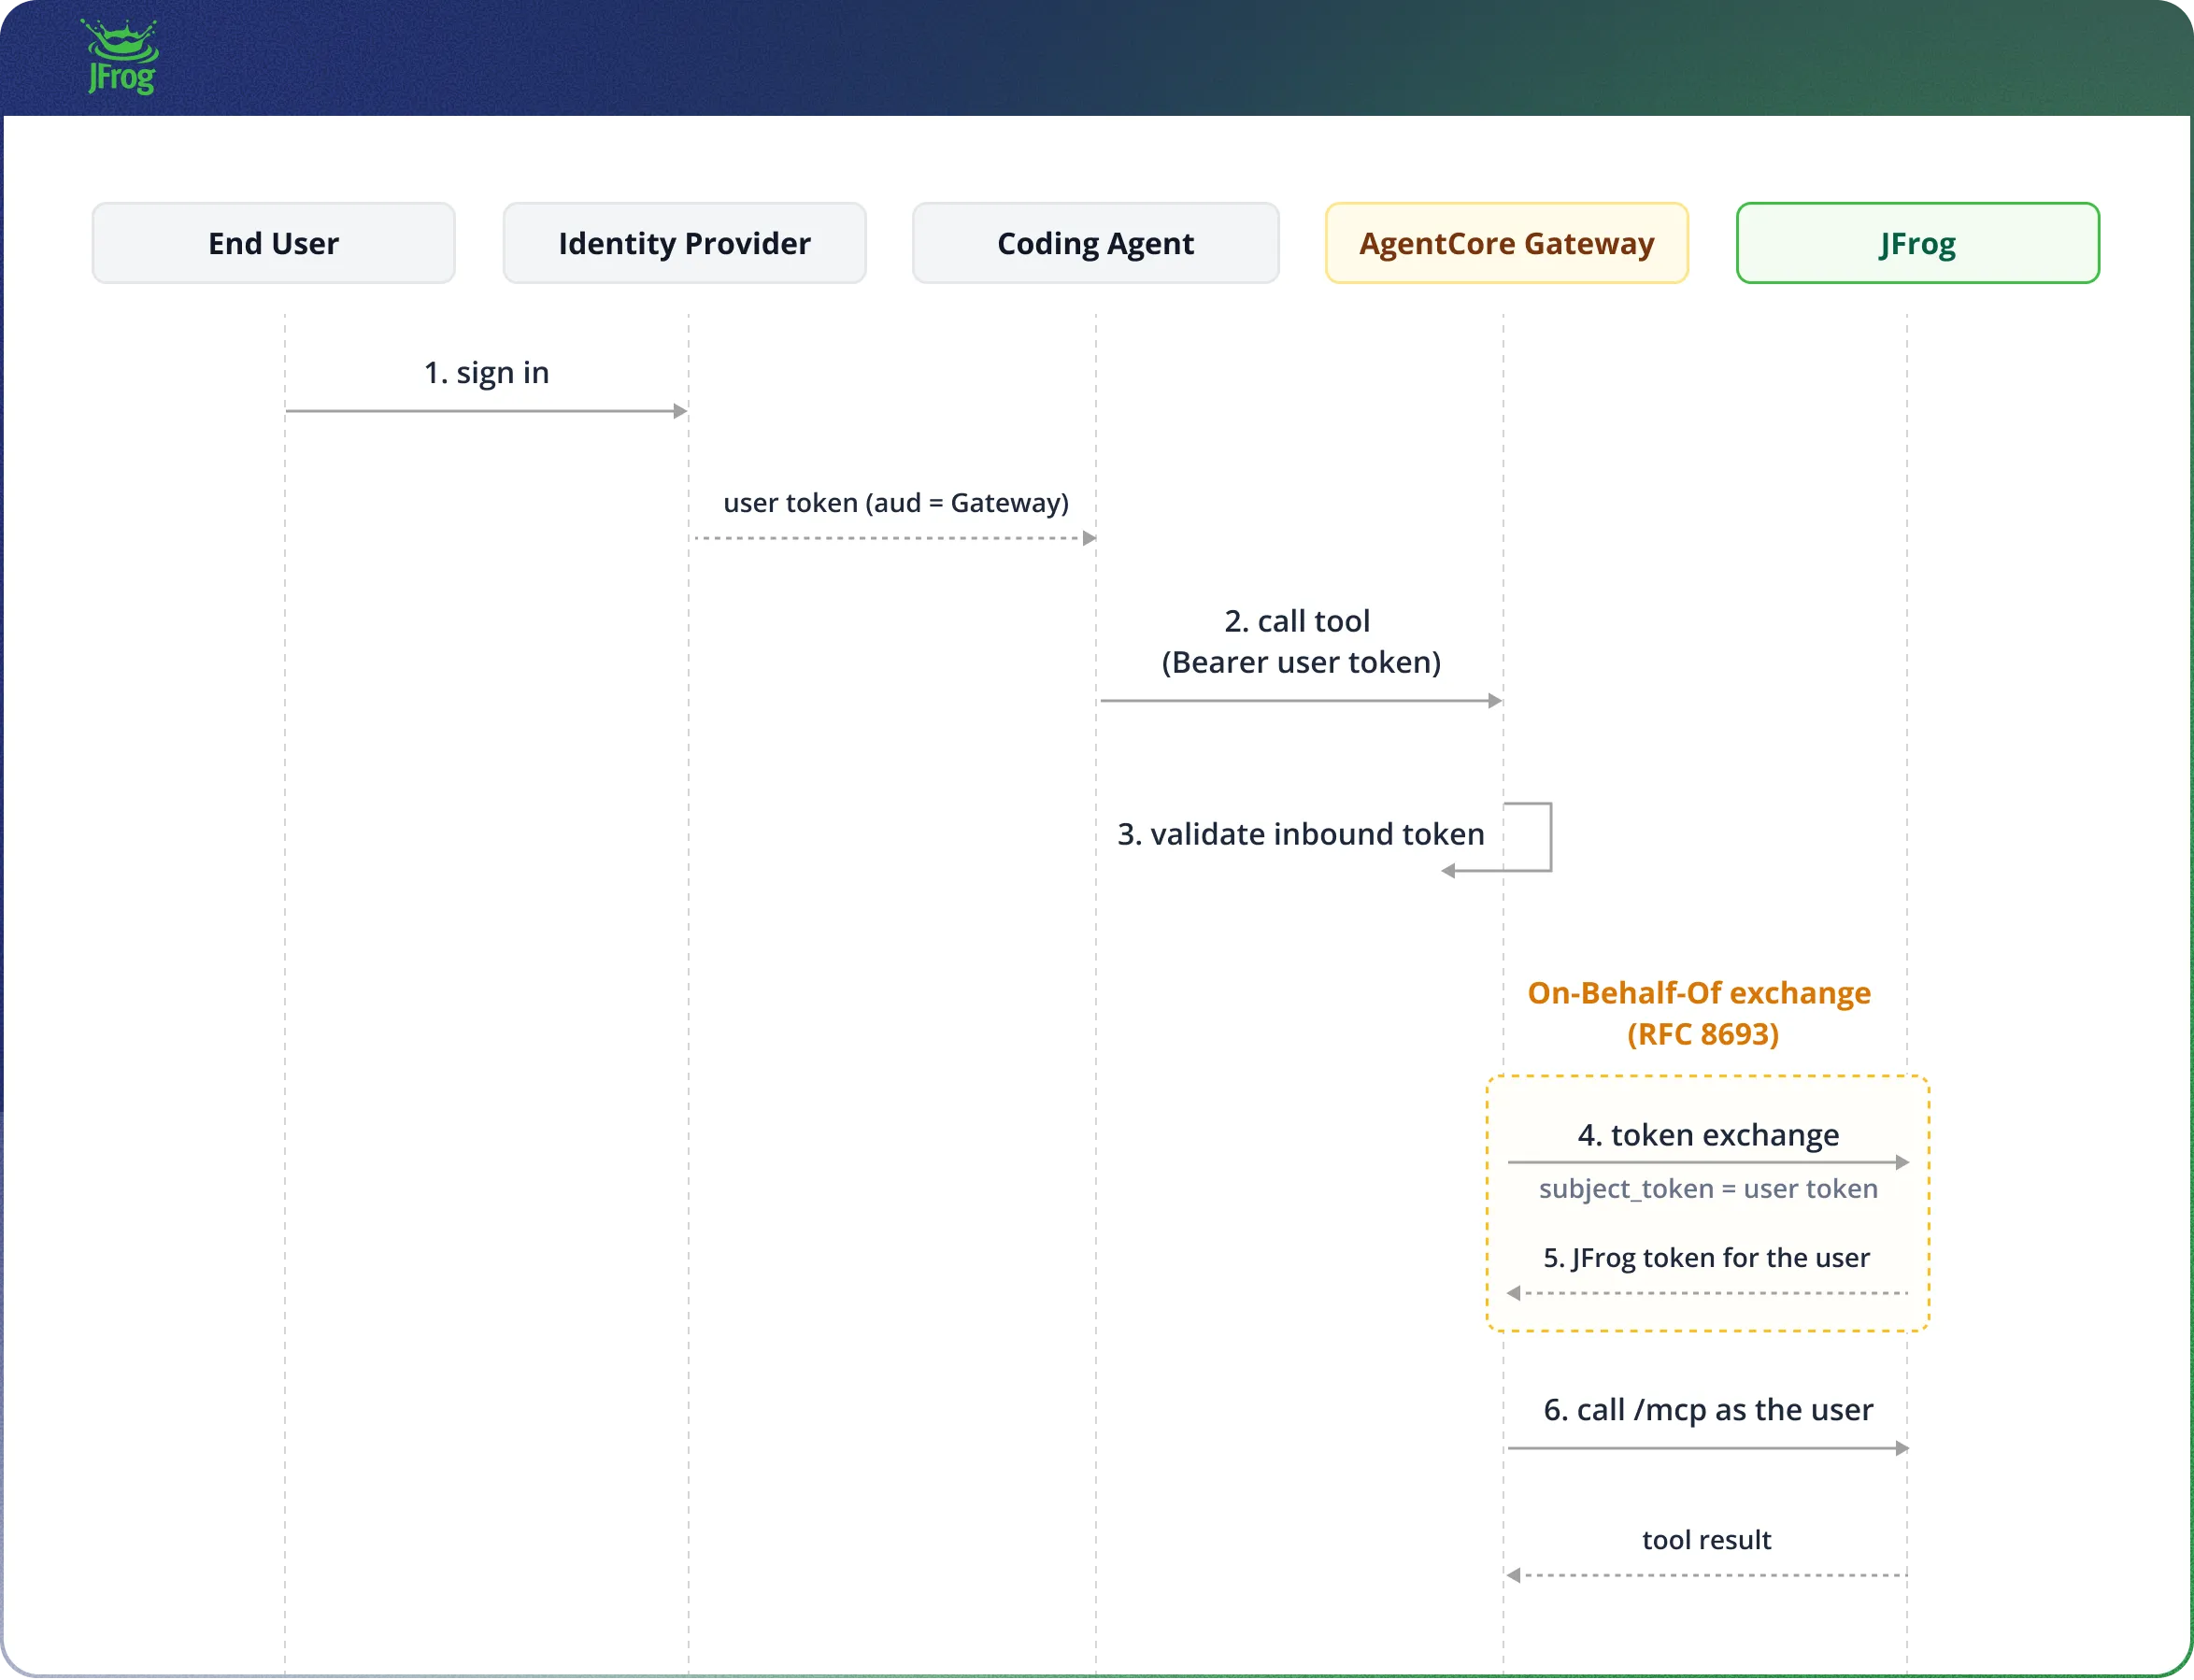 Figure 4: The on-behalf-of exchange. The user signs in once; the agent calls a tool through the Gateway carrying the user token; the Gateway validates it and exchanges it at JFrog Access for a JFrog token that represents the user; the Gateway then calls the JFrog MCP server as that user.
You configure the trust ahead of time: JFrog is told to trust logins from your identity provider, and a mapping rule turns a verified login into a specific JFrog identity.
What you configure
You work with four systems. The identity provider is a set of requirements to meet (Step 1 below); the other three are configured with CLI commands.
| System | What you do | Purpose |
| Identity provider | Meet the token requirements (Step 1) | Issue a user token the Gateway and JFrog can consume |
| JFrog | Access API: OIDC integration and identity mapping | Trust the provider and map a login to a JFrog user |
| AgentCore | AWS CLI: credential provider and gateway target | Perform the token exchange and reach /mcp |
| AWS IAM | AWS CLI: gateway execution-role permissions | Allow the Gateway to run the exchange at run time |
Prerequisites
- An OIDC identity provider with an application your agent uses to sign users in.
- A JFrog instance with OIDC support (EnterpriseX or up) with administrator access and an admin token.
- An AgentCore Gateway already created, with your provider configured as its inbound (JWT) authorizer, and with semantic tool search disabled (see Step 4).
- Permission to edit the Gateway’s AWS IAM execution role.
- The AWS CLI and curl installed. Use a recent AWS CLI as listingMode (Step 4) and onBehalfOfTokenExchangeConfig (Step 3) are newer API fields that older CLI versions reject as unknown.
Conventions
The commands below use these variables. Set them once for your environment.
export AWS_REGION="us-east-1"
export AWS_ACCOUNT="111122223333"
export GATEWAY_ID="your-gateway-id"
export GATEWAY_ROLE="your-gateway-execution-role"
export GATEWAY_URL="https://your-gateway-id.gateway.bedrock-agentcore.us-east-1.amazonaws.com/mcp"
export JFROG_URL="https://your-org.jfrog.io"
export JFROG_ADMIN_TOKEN="your-jfrog-admin-token"
export IDP_ISSUER="https://your-idp-issuer/"
Step 1: Identity provider requirements
This integration works with any OIDC-compliant identity provider. Configuring the provider is out of scope here; follow your provider’s own documentation. What matters is that the token your agent obtains and sends to the Gateway meets these requirements:
- Audience. The token’s aud claim equals your Gateway URL ($GATEWAY_URL). JFrog’s mapping (Step 2) matches on this value, and the Gateway’s inbound authorizer requires it. The Gateway URL exists only after the Gateway is created; if your provider pins token audiences (Okta, for example), create the Gateway first, then set the audience.
- Issuer. The token’s iss claim is your provider’s issuer URL ($IDP_ISSUER). JFrog trusts this issuer in Step 2 and uses it to fetch the provider’s public signing keys.
- A mappable identity claim on the access token. The token forwarded to JFrog is the access token, not the ID token. Standard profile claims such as email usually appear only on the ID token, which the agent keeps. Make sure the access token carries a claim you can map to a JFrog username/group/project role, under a simple, non-namespaced key (for example preferred_username, team). Most providers add this through a token-customization rule; consult your provider’s documentation for adding a custom claim to the access token.
- Discovery. The provider exposes standard OIDC discovery and a JWKS endpoint so JFrog can verify token signatures.
If Gateway sign-in already works, the audience and issuer requirements are met. The claim requirement is the one to verify, because it is the piece the JFrog mapping depends on. See “Choosing the claim to map on” in Step 2 for why the key must be simple and live on the access token.
Step 2: Trust the provider in JFrog and map the login
JFrog’s Access service exposes an API for both parts. You need your JFrog admin token.
2a. Create the OIDC integration
curl -sS -X POST "$JFROG_URL/access/api/v1/oidc" \
    -H "Authorization: Bearer $JFROG_ADMIN_TOKEN" \
    -H "Content-Type: application/json" \
    -d '{
         	"name": "agentcore",
         	"issuer_url": "'"$IDP_ISSUER"'",
         	"token_issuer": "'"$IDP_ISSUER"'",
  	"provider_type": "generic",
         	"description": "AgentCore Gateway via OBO"
    }'
- name (agentcore): the handle for this trust. It must match the provider_name you set on the AgentCore target in Step 4.
- issuer_url / token_issuer: your provider’s issuer URL. This is the iss JFrog requires, and where JFrog fetches the provider’s public signing keys.
- provider_type (generic): validate tokens with standard OIDC rather than a vendor-specific integration.
2b. Add the identity mapping
In the below example, we map a JFrog user to the preferred_username attribute. More information can be found on JFrog: Create an Identity Mapping.
curl -sS -X POST "$JFROG_URL/access/api/v1/oidc/agentcore/identity_mappings" \
    -H "Authorization: Bearer $JFROG_ADMIN_TOKEN" \
    -H "Content-Type: application/json" \
    -d '{
         	"name": "agentcore-gw",
         	"priority": 1,
         	"claims": { "aud": "'"$GATEWAY_URL"'" },
         	"token_spec": {
    	"username_pattern": "{{preferred_username}}",
         	"audience": "*@*",
         	"expires_in": 86400
         	}
    }'
- claims: the matching rule. {“aud”: “…/mcp”} scopes this mapping to tokens whose audience is your Gateway.
- username_pattern: derives the JFrog username from a token claim. {{preferred_username}} reads the preferred_username claim carried on the access token (Step 1). For a single fixed user instead, replace username_pattern with “username”: “someone@example.com” and add “scope”: “applied-permissions/user”.
- audience (*@*): the JFrog services the resulting token can call. *@* covers all of them.
- expires_in: lifetime in seconds of the minted JFrog token.
Choosing the claim to map on. A pattern can only reference a claim that is present in the access token JFrog receives, and whose key JFrog’s {{ }} engine can parse. Two traps to avoid: {{email}} often fails because email is on the ID token, not the access token; a namespaced claim like {{https://your.ns/email}} fails because JFrog cannot parse a URL-shaped key. The reliable approach is a simple, non-namespaced claim on the access token (Step 1), mapped as {{preferred_username}}. For multi-user setups, make sure each value resolves to a real JFrog user, or map to groups or project roles instead by adding a groups claim and using a groups pattern.
More information on JFrog’s OIDC token exchange can be found here: https://docs.jfrog.com/administration/reference/oidctokenexchange
Step 3: Create the AgentCore credential provider
This describes how the Gateway reaches JFrog’s token endpoint, and declares the on-behalf-of exchange it performs there. The onBehalfOfTokenExchangeConfig block is required: without it, the Gateway cannot run the exchange, and every tool call fails at runtime with a generic internal error. The target in Step 4 selects this provider and adds the JFrog-specific parameters.
aws bedrock-agentcore-control create-oauth2-credential-provider \
    --region "$AWS_REGION" \
    --name jfrog-obo \
    --credential-provider-vendor CustomOauth2 \
    --oauth2-provider-config-input '{
      "customOauth2ProviderConfig": {
    	"oauthDiscovery": {
          "authorizationServerMetadata": {
        	"issuer": "'"$JFROG_URL"'",
        	"tokenEndpoint": "'"$JFROG_URL"'/access/api/v1/oidc/token",
            "authorizationEndpoint": "'"$JFROG_URL"'/access/api/v1/oidc/token",
        	"responseTypes": []
      	}
    	},
    	"clientId": "agentcore-obo",
    	"clientSecret": "unused",
        "onBehalfOfTokenExchangeConfig": {
      	"grantType": "TOKEN_EXCHANGE",
          "tokenExchangeGrantTypeConfig": { "actorTokenContent": "NONE" }
    	}
  	}
    }'
- tokenEndpoint: JFrog Access at /access/api/v1/oidc/token, where the exchange request goes.
- authorizationEndpoint: not used by a token-exchange flow, but the config requires a value, so it points at the token endpoint.
- clientId / clientSecret: placeholders. JFrog authenticates this exchange with the provider_name and the signed subject token, not these client credentials, so they are not validated here.
- onBehalfOfTokenExchangeConfig: declares that this provider performs an RFC 8693 token exchange. actorTokenContent (NONE) sends no actor token: JFrog authenticates the exchange with the provider_name and the signed subject token alone. Omitting this block is not caught at creation time; it surfaces later as “An internal error occurred” on every tool call (see Troubleshooting).
Capture the provider ARN for the next step:
export PROVIDER_ARN=$(aws bedrock-agentcore-control get-oauth2-credential-provider \
    --region "$AWS_REGION" --name jfrog-obo \
    --query credentialProviderArn --output text)
Step 4: Add the gateway target
This target points at JFrog’s MCP server and tells the Gateway to reach it with an OBO exchange.
aws bedrock-agentcore-control create-gateway-target \
    --region "$AWS_REGION" \
    --gateway-identifier "$GATEWAY_ID" \
    --name artifactory-mcp \
    --target-configuration '{
  	"mcp": { "mcpServer": { "endpoint": "'"$JFROG_URL"'/mcp", "listingMode": "DYNAMIC" } }
    }' \
    --credential-provider-configurations '[
  	{
        "credentialProviderType": "OAUTH",
    	"credentialProvider": {
          "oauthCredentialProvider": {
        	"providerArn": "'"$PROVIDER_ARN"'",
        	"scopes": [],
        	"grantType": "TOKEN_EXCHANGE",
        	"customParameters": {
          	"provider_name": "agentcore",
              "subject_token_type": "urn:ietf:params:oauth:token-type:id_token"
        	}
      	}
    	}
  	}
    ]'
- grantType (TOKEN_EXCHANGE): the delegation that keeps the user’s identity. This is what makes the call on-behalf-of the user rather than a shared client.
- provider_name (agentcore): selects the JFrog trust you created in Step 2. It must match that integration name.
- subject_token_type (…:id_token): the token type label JFrog requires. AgentCore forwards the inbound user access token as the subject token but labels it …:jwt by default, which JFrog rejects with “Wrong token type was used.” Setting the label to …:id_token is what JFrog accepts. This changes only the label, not which token is sent: JFrog still parses that access token, which is why the Step 2 mapping keys on a claim carried there.
- listingMode (DYNAMIC): defers tool discovery to invocation time, when a real user token exists. The default mode (DEFAULT) indexes tools at target creation and update, which requires an outbound token no user has minted yet, so a token-exchange target created without this field ends up FAILED.
Note: Token-exchange targets require listingMode: DYNAMIC and a Gateway created without searchType set to SEMANTIC. Cached listing cannot work here, because tool discovery would run with no user token.
aws bedrock-agentcore-control get-gateway-target \
--region "$AWS_REGION" --gateway-identifier "$GATEWAY_ID" \
--target-id \
--query 'targetConfiguration.mcp.mcpServer.listingMode'
Step 5: Grant the Gateway permission to run the exchange
The Gateway’s execution role needs permission to obtain the user’s workload token and call the credential provider.
aws iam put-role-policy \
    --role-name "$GATEWAY_ROLE" \
    --policy-name agentcore-jfrog-obo \
    --policy-document '{
         	"Version": "2012-10-17",
         	"Statement": [
         	{
  	   	"Effect": "Allow",
  	   	"Action": [
            "bedrock-agentcore:GetWorkloadAccessToken",
            "bedrock-agentcore:GetWorkloadAccessTokenForJWT",
            "bedrock-agentcore:GetWorkloadAccessTokenForUserId",
            "bedrock-agentcore:GetResourceOauth2Token",
            "bedrock-agentcore:CompleteResourceTokenAuth"
  	   	],
  	   	"Resource": [
            "arn:aws:bedrock-agentcore:'"$AWS_REGION"':'"$AWS_ACCOUNT"':workload-identity-directory/default",
            "arn:aws:bedrock-agentcore:'"$AWS_REGION"':'"$AWS_ACCOUNT"':workload-identity-directory/default/workload-identity/'"$GATEWAY_ID"'",
            "arn:aws:bedrock-agentcore:'"$AWS_REGION"':'"$AWS_ACCOUNT"':token-vault/default",
            "arn:aws:bedrock-agentcore:'"$AWS_REGION"':'"$AWS_ACCOUNT"':token-vault/default/oauth2credentialprovider/jfrog-obo"
  	   	]
         	},
         	{
  	   	"Effect": "Allow",
  	   	"Action": "secretsmanager:GetSecretValue",
  	   	"Resource": "arn:aws:secretsmanager:'"$AWS_REGION"':'"$AWS_ACCOUNT"':secret:bedrock-agentcore-identity!default/oauth2/jfrog-obo-*"
         	}
         	]
    }'
Validate
Validate the JFrog half on its own by performing the exchange with a real user token from your provider, then using the result against /mcp. Set USER_TOKEN to a token your provider issues for a test user, the same token your agent sends to the Gateway, and confirm it carries the claim your mapping expects.
# 1) Exchange the user token for a JFrog token
 export JFROG_TOKEN=$(curl -sS -X POST "$JFROG_URL/access/api/v1/oidc/token" \
    -d grant_type=urn:ietf:params:oauth:grant-type:token-exchange \
    -d subject_token="$USER_TOKEN" \
    -d subject_token_type=urn:ietf:params:oauth:token-type:id_token \
    -d provider_name=agentcore | jq -r '.access_token')
# 2) Call the JFrog MCP server with the returned token
  curl -sS -i -X POST "$JFROG_URL/mcp" \
    -H "Authorization: Bearer $JFROG_TOKEN" \
    -H "Accept: application/json, text/event-stream" \
    -H "Content-Type: application/json" \
    -d '{"jsonrpc":"2.0","id":1,"method":"initialize","params":{"protocolVersion":"2025-03-26","capabilities":{},"clientInfo":{"name":"probe","version":"0"}}}'
A 200 response from the first call confirms the OIDC exchange is correct.
A 200 response from the second call confirms OBO works end to end.
Now start a fresh agent session and ask it to run a JFrog tool, such as listing repositories; the first tool call drives the full sequence and the action is recorded in Artifactory under the signed-in user.
Watch it from JFrog’s side while testing. The exchange hits JFrog’s Access service (/access/api/v1/oidc/token), not the Artifactory request logs. If you see no traffic from your AWS source ranges, then the Gateway never reached JFrog; in that case, check target status and the IAM policy from Step 5 before suspecting the JFrog configuration.
Troubleshooting
| Symptom | Likely cause | Resolution |
| Target stuck in Creating or Synchronizing, or FAILED with “Failed to retrieve OAuth token… during tool synchronization” |
Default listing mode (DEFAULT) builds a cached tool index at sync time, with no user token available | Set “listingMode”: “DYNAMIC” on the MCP target (Step 4) and keep the Gateway without searchType: SEMANTIC |
| “An internal error occurred” on every tool call through the Gateway |
Credential provider missing onBehalfOfTokenExchangeConfig; the real error (ValidationException on GetResourceOauth2Token) appears in CloudTrail and the Gateway’s CloudWatch logs | Add the onBehalfOfTokenExchangeConfig block to the provider (Step 3) |
| Wrong token type was used | Missing subject_token_type on the target | Add the custom parameter (Step 4) |
| Failed to resolve username from claim: {{…}} | Pattern references a claim not on the access token, or a URL-shaped key JFrog cannot parse | Map on a simple claim present in the access token (Step 1) |
| Denied even though the claim resolves | Mapped username is not a real, permissioned JFrog user | Create the user or group, or map to an existing one |
| 401 at /mcp with a JFrog API key | /mcp does not accept API keys | Use the OIDC-exchanged token this integration produces |
| AccessDenied at run time | Gateway role missing permissions | Apply the policy from Step 5 |
Conclusion
Identity propagation is the difference between an agent that acts for your users and one that acts as itself with a borrowed key. On-behalf-of token exchange keeps per-user identity across the second hop without a second login: the user signs in once, and the request reaches JFrog as that user, scoped to their permissions and logged under their name, with no shared long-lived secret on the path.
The configuration comes down to four pieces: configure login exchange in JFrog, define the exchange in AgentCore, grant the Gateway permission to run it, and confirm the result.
Additional resources
- Amazon Bedrock AgentCore Gateway
- On-behalf-of token exchange with AgentCore Identity
- Set up inbound authorization for your gateway
- Set up outbound authorization for your gateway
- Add an OAuth client using a custom provider
- JFrog: OpenID Connect authentication
- JFrog: Identity mappings
- JFrog: OIDC token exchange
- JFrog MCP Server
- RFC 8693: OAuth 2.0 Token Exchange
- Model Context Protocol
 New insights from +1,400 security & DevOps leaders. Get the Full Report.