

*nix libX11: Uncovering and exploiting a 35-year-old vulnerability – Part 1 of 2
CVE-2023-43786 denial-of-service vulnerability

By
14 min read

The JFrog Security research team has recently discovered two security vulnerabilities in X.Org libX11, the widely popular graphics library – CVE-2023-43786 and CVE-2023-43787 (with a high NVD severity CVSS 7.8). These vulnerabilities cause a denial-of-service and remote code execution. X11’s latest versions contain fixes for these vulnerabilities.
The team constantly monitors open-source projects to find new vulnerabilities and malicious packages and shares them with the wider community to help improve their overall security posture.
This 2-part blog series provides details of the inner workings of the vulnerable Xpm file format and deep-dives into exploiting these vulnerabilities.
Part 1 (current post):
- Background on libX11 and the Xpm image format
- CVE-2023-43786 (DoS vulnerability) including a walkthrough and published PoC
Part 2 (next post):
- CVE-2023-43787 (RCE vulnerability) including a walkthrough and PoC demonstration
What’s included in this blog post:
- What is libX11?
- What is libXpm?
- XPM image format – versions
- DoS vulnerability – CVE-2023-43786
- Is the JFrog Platform Vulnerable to CVE-2023-43786 or CVE-2023-43787?
- Contextual Analysis With JFrog Advanced Security
- Stay up-to-date with JFrog Security Research
What is libX11?
Xorg X11, often referred to as X Window System, is an open-source graphical server protocol that enables the creation and management of graphical user interfaces in Unix-like operating systems. It provides a framework for running graphical applications, managing windows, and handling user input in a networked environment.
The libx11 package offers the essential shared libraries that client applications require to render and present data on your desktop.
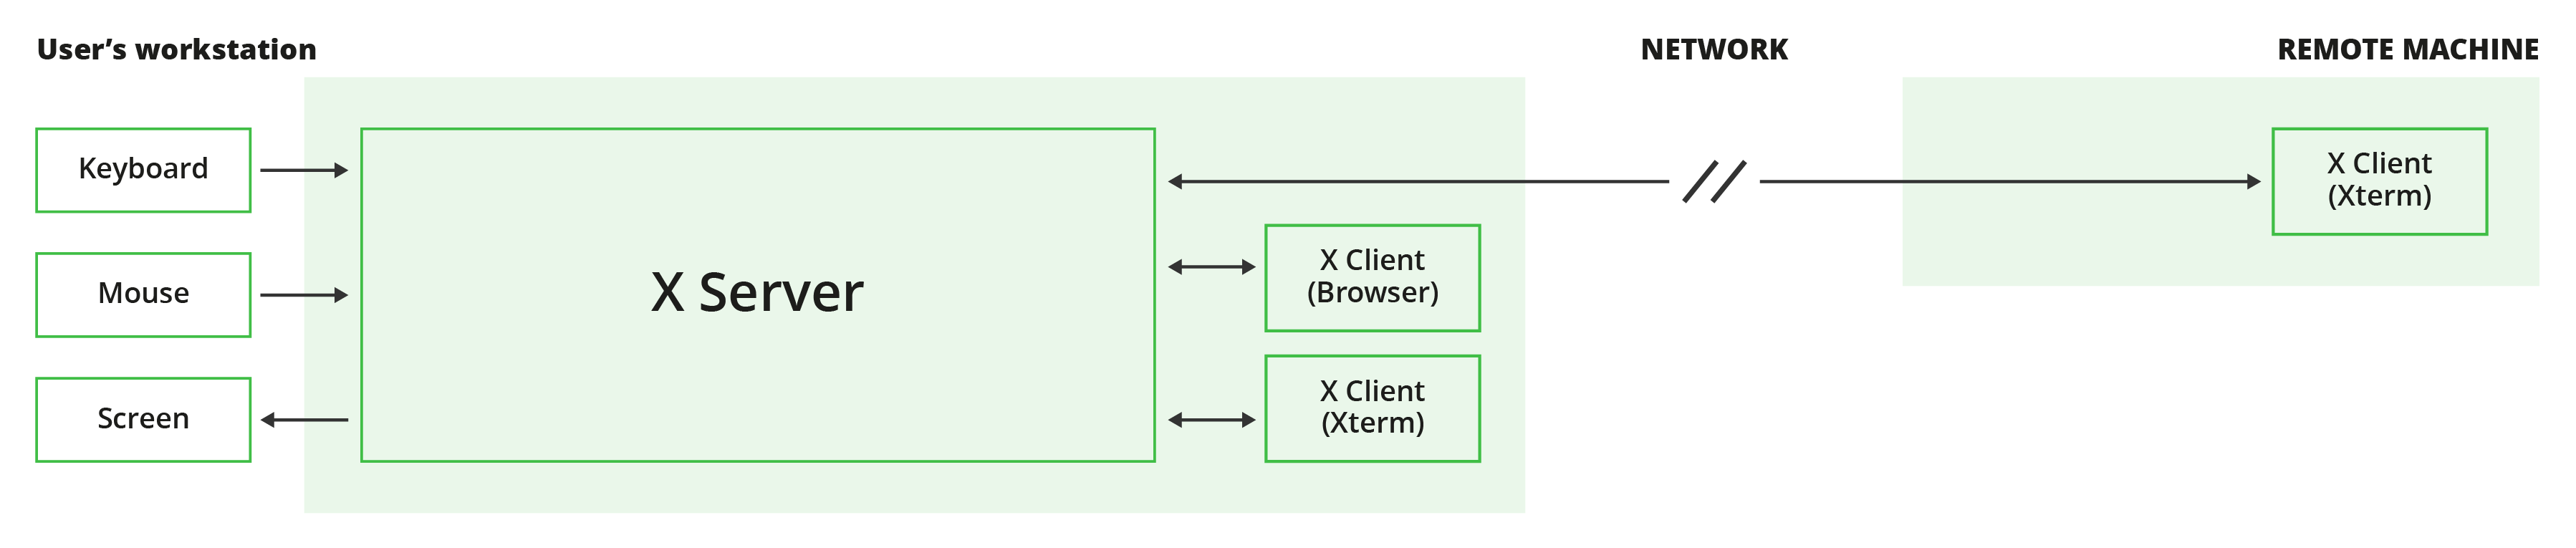 Client/Server X Architecture
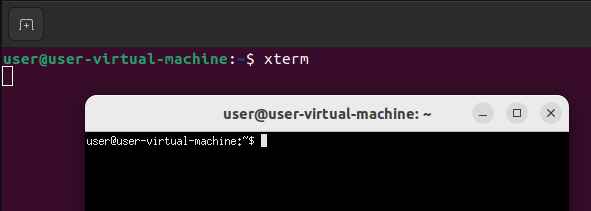 Xterm window – an X11 client (application)
What is libXpm?
libXpm provides functions to read, write, and display images in the X Pixmap (XPM) format.
XPM primarily aims to generate icon pixmaps with support for transparent pixels. It is based on the XBM syntax, and it can be either a plain text file in the XPM2 format or utilize a C programming language syntax, making it suitable for inclusion within a C program file.
XPM image format – versions
Predecessor – XBM
Before XPM (X PixMap) came to be in 1989, there was the XBM format (X BitMap).
A plain-text binary image format, used for storing icon and cursor bitmaps that were used in the X GUI.
XBM files are structured as C source files. This is their main distinction from most image formats around today. That way, they can be incorporated into applications directly. However, due to this and the fact no compression can be employed (1 character to 1-byte mapping), they are also far larger than their raw pixel data.
X BitMap (XBM) data comprises a sequence of static unsigned char arrays that store the raw monochrome pixel information.
For example, the following C code is the XBM file for hello in the image:
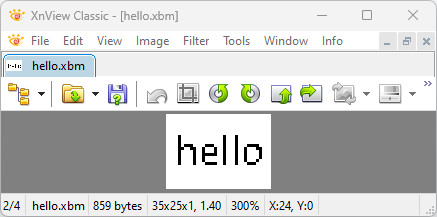 ‘hello’ Xbm image shown in XnView
#define hello_width 35
#define hello_height 25
static char hello_bits[] = {
  0x00, 0x00, 0x00, 0x00, 0x00, 0x00, 0x00, 0x00, 0x00, 0x00, 0x00, 0x00,
  0x00, 0x00, 0x00, 0x00, 0x00, 0x00, 0x00, 0x00, 0x00, 0x00, 0x00, 0x00,
  0x00, 0x00, 0x00, 0x00, 0x00, 0x00, 0x00, 0x00, 0x00, 0x00, 0x00, 0x10,
  0x00, 0x88, 0x00, 0x00, 0x10, 0x00, 0x88, 0x00, 0x00, 0x10, 0x00, 0x88,
  0x00, 0x00, 0xD0, 0xE1, 0x88, 0x78, 0x00, 0x30, 0x13, 0x89, 0xC4, 0x00,
  0x10, 0x12, 0x89, 0x84, 0x00, 0x10, 0xF2, 0x89, 0x84, 0x00, 0x10, 0x12,
  0x88, 0x84, 0x00, 0x10, 0x12, 0x88, 0x44, 0x00, 0x10, 0xE2, 0x89, 0x38,
  0x00, 0x00, 0x00, 0x00, 0x00, 0x00, 0x00, 0x00, 0x00, 0x00, 0x00, 0x00,
  0x00, 0x00, 0x00, 0x00, 0x00, 0x00, 0x00, 0x00, 0x00, 0x00, 0x00, 0x00,
  0x00, 0x00, 0x00, 0x00, 0x00, 0x00, 0x00, 0x00, 0x00, 0x00, 0x00, 0x00,
  0x00, 0x00, 0x00, 0x00, 0x00
};
Instead of the usual image file-format headers, XBM files have #define statements. The first pair of values defines the pixel dimensions of the bitmap, indicating its height and width.
X BitMap (XBM) image data is structured as a continuous sequence of pixel values, which are stored within a static array. Given that each pixel is symbolized by a single bit (with 0 indicating white and 1 representing black), each byte in the array encompasses the data for eight individual pixels. Notably, the first byte’s least significant bit serves as the anchor for the upper-left pixel within the bitmap.
XPM1
Meet XPM version 1.
First released in 1989, it shares a lot of similarities with the XBM format outlined above. While XBM was monochrome, XPM1 introduced colors to the images.
It uses additional macros and variables for colors and replaces bytes with characters for pixel data.
For example, here is the same hello black-and-white picture in the XPM1 format:
/* XPM */
static char *_hello[] = {
/* columns rows colors chars-per-pixel */
"35 25 2 1 ",
"  c white",
"b c black",
/* pixels */
"                                   ",
"                                   ",
"                                   ",
"                                   ",
"                                   ",
"                                   ",
"                                   ",
"    b              b   b           ",
"    b              b   b           ",
"    b              b   b           ",
"    b bbb    bbb   b   b   bbbb    ",
"    bb  bb  b   b  b   b  b   bb   ",
"    b    b  b   b  b   b  b    b   ",
"    b    b  bbbbb  b   b  b    b   ",
"    b    b  b      b   b  b    b   ",
"    b    b  b      b   b  b   b    ",
"    b    b   bbbb  b   b   bbb     ",
"                                   ",
"                                   ",
"                                   ",
"                                   ",
"                                   ",
"                                   ",
"                                   ",
"                                   "
};
XFACE_ncolors here denotes the number of colors in the image, and XFACE_chars_per_pixel denotes the number of characters per pixel.
Each a will be replaced by the white color “#ffffff”, and each b will be replaced by the black color “#000000”.
XPM2
A year later, in 1990, the second version of the format was set to improve things. It simplified things and removed all C code from the image format.
The simplified structure:
! XPM2
<Header>
<Colors>
<Pixels>
The header line denotes the image dimensions similar to XPM1’s #define statements.
The colors section defines the character values.
A new type concept was introduced:
c – is for color pixel
m – is for monochrome
g – is for grayscale
s – is for symbolic
The symbolic feature is used to assign colors by context, and to create variable names for them for easier reading.
Example of an XPM2 image, with the same hello as shown in the previous examples:
! XPM2
35 25 2 1
a c #000000
b c #ffffff
aaaaaaaaaaaaaaaaaaaaaaaaaaaaaaaaaaa
aaaaaaaaaaaaaaaaaaaaaaaaaaaaaaaaaaa
aaaaaaaaaaaaaaaaaaaaaaaaaaaaaaaaaaa
aaaaaaaaaaaaaaaaaaaaaaaaaaaaaaaaaaa
aaaaaaaaaaaaaaaaaaaaaaaaaaaaaaaaaaa
aaaaaaaaaaaaaaaaaaaaaaaaaaaaaaaaaaa
aaaaaaaaaaaaaaaaaaaaaaaaaaaaaaaaaaa
aaaabaaaaaaaaaaaaaabaaabaaaaaaaaaaa
aaaabaaaaaaaaaaaaaabaaabaaaaaaaaaaa
aaaabaaaaaaaaaaaaaabaaabaaaaaaaaaaa
aaaababbbaaaabbbaaabaaabaaabbbbaaaa
aaaabbaabbaabaaabaabaaabaabaaabbaaa
aaaabaaaabaabaaabaabaaabaabaaaabaaa
aaaabaaaabaabbbbbaabaaabaabaaaabaaa
aaaabaaaabaabaaaaaabaaabaabaaaabaaa
aaaabaaaabaabaaaaaabaaabaabaaabaaaa
aaaabaaaabaaabbbbaabaaabaaabbbaaaaa
aaaaaaaaaaaaaaaaaaaaaaaaaaaaaaaaaaa
aaaaaaaaaaaaaaaaaaaaaaaaaaaaaaaaaaa
aaaaaaaaaaaaaaaaaaaaaaaaaaaaaaaaaaa
aaaaaaaaaaaaaaaaaaaaaaaaaaaaaaaaaaa
aaaaaaaaaaaaaaaaaaaaaaaaaaaaaaaaaaa
aaaaaaaaaaaaaaaaaaaaaaaaaaaaaaaaaaa
aaaaaaaaaaaaaaaaaaaaaaaaaaaaaaaaaaa
aaaaaaaaaaaaaaaaaaaaaaaaaaaaaaaaaaa
Apart from hexadecimal color codes, the colors can also be specified using any of the X11 color names (e.g. red), with None indicating transparency.
XPM3
This is the current version of the XPM format.
The version, released in 1991, brought back the C code, but instead of using a pure C code style, the values inside are essentially the same as in the XPM2 format.
Example:
/* XPM */
static char *_hello[] = {
/* columns rows colors chars-per-pixel */
"35 25 2 1 ",
"  c white",
"b c black",
/* pixels */
"                                   ",
"                                   ",
"                                   ",
"                                   ",
"                                   ",
"                                   ",
"                                   ",
"    b              b   b           ",
"    b              b   b           ",
"    b              b   b           ",
"    b bbb    bbb   b   b   bbbb    ",
"    bb  bb  b   b  b   b  b   bb   ",
"    b    b  b   b  b   b  b    b   ",
"    b    b  bbbbb  b   b  b    b   ",
"    b    b  b      b   b  b    b   ",
"    b    b  b      b   b  b   b    ",
"    b    b   bbbb  b   b   bbb     ",
"                                   ",
"                                   ",
"                                   ",
"                                   ",
"                                   ",
"                                   ",
"                                   ",
"                                   "
};
As discussed, the XPM format can also represent more sophisticated images, like the JFrog logo:
![]() JFrog logo depicted using XPM3
JFrog logo depicted using XPM3
DoS vulnerability – CVE-2023-43786
The CVE-2023-43786 vulnerability is essentially an endless loop resulting from an incorrect recursion stop condition calculation.
Fix commit: https://gitlab.freedesktop.org/xorg/lib/libx11/-/commit/204c3393c4c90a29ed6bef64e43849536e863a86
XPutImage is a function in libX11 that lets you place images onto an X Drawable, usually an X Window. With this function, one can transfer pixel information from an XImage structure to a designated drawable, like a window or a pixmap, and position it as needed.
xpmCreatePixmapFromImage
The xpmCreatePixmapFromImage libXpm function calls for this XPutImage function:
void
xpmCreatePixmapFromImage(
    Display	*display,
    Drawable	 d,
    XImage	*ximage,
    Pixmap	*pixmap_return)
{
    GC gc;
    XGCValues values;

    *pixmap_return = XCreatePixmap(display, d, ximage->width,
				   ximage->height, ximage->depth);
    /* set fg and bg in case we have an XYBitmap */
    values.foreground = 1;
    values.background = 0;
    gc = XCreateGC(display, *pixmap_return,
		   GCForeground | GCBackground, &values);

    XPutImage(display, *pixmap_return, gc, ximage, 0, 0, 0, 0,
	      ximage->width, ximage->height);

    XFreeGC(display, gc);
}
In this function, ximage is the source image pixel data to be displayed and is copied to the X Drawable object (in this case pixmap_return).
XPutImage
Here is the XPutImage libX11 function:
int
XPutImage (
    register Display *dpy,
    Drawable d,
    GC gc,
    register XImage *image,
    int req_xoffset,
    int req_yoffset,
    int x,
    int y,
    unsigned int req_width,
    unsigned int req_height)

{
                 .....
	    PutSubImage(dpy, d, gc, &img, 0, 0, x, y,
			(unsigned int) width, (unsigned int) height,
			dest_bits_per_pixel, dest_scanline_pad);
	    UnlockDisplay(dpy);
	    SyncHandle();
	    Xfree(img.data);
	    return 0;
	}
    }

    LockDisplay(dpy);
    FlushGC(dpy, gc);

    PutSubImage(dpy, d, gc, image, req_xoffset, req_yoffset, x, y,
		(unsigned int) width, (unsigned int) height,
		dest_bits_per_pixel, dest_scanline_pad);

   .........
}
It calls to the PutSubImage function:
static void
PutSubImage (
    register Display *dpy,
    Drawable d,
    GC gc,
    register XImage *image,
    int req_xoffset,
    int req_yoffset,
    int x, int y,
    unsigned int req_width,
    unsigned int req_height,
    int dest_bits_per_pixel,
    int dest_scanline_pad)
{
    int left_pad, BytesPerRow, Available;

    if ((req_width == 0) || (req_height == 0))
	return;

    Available = ((65536 < dpy->max_request_size) ? (65536 << 2)
                        : (dpy->max_request_size << 2)) - SIZEOF(xPutImageReq);
    if ((image->bits_per_pixel == 1) || (image->format != ZPixmap)) {               [1]
        left_pad = (image->xoffset + req_xoffset) & (dpy->bitmap_unit - 1);
        BytesPerRow = (ROUNDUP((long)req_width + left_pad,
                                dpy->bitmap_pad) >> 3) * image->depth;
    } else {                                                                        [2]
        left_pad = 0;
        BytesPerRow = ROUNDUP((long)req_width * dest_bits_per_pixel,                [3]
                                dest_scanline_pad) >> 3;
    }

    if ((BytesPerRow * req_height) <= Available) {                                  [4]
        PutImageRequest(dpy, d, gc, image, req_xoffset, req_yoffset, x, y,
                        req_width, req_height,
                        dest_bits_per_pixel, dest_scanline_pad);
    } else if (req_height > 1) {
        int SubImageHeight = Available / BytesPerRow;

        if (SubImageHeight == 0)
            SubImageHeight = 1;

        PutSubImage(dpy, d, gc, image, req_xoffset, req_yoffset, x, y,
                    req_width, (unsigned int) SubImageHeight,
                    dest_bits_per_pixel, dest_scanline_pad);

        PutSubImage(dpy, d, gc, image, req_xoffset,
                    req_yoffset + SubImageHeight, x, y + SubImageHeight,
                    req_width, req_height - SubImageHeight,
                    dest_bits_per_pixel, dest_scanline_pad);
    } else {                                                                        [5]
        int SubImageWidth = (((Available << 3) / dest_scanline_pad)                 [6]
                                * dest_scanline_pad) - left_pad;

        PutSubImage(dpy, d, gc, image, req_xoffset, req_yoffset, x, y,
                    (unsigned int) SubImageWidth, 1,
                    dest_bits_per_pixel, dest_scanline_pad);

        PutSubImage(dpy, d, gc, image, req_xoffset + SubImageWidth,
                    req_yoffset, x + SubImageWidth, y,
                    req_width - SubImageWidth, 1,
                    dest_bits_per_pixel, dest_scanline_pad);
    }
}
Technical Vulnerability Details
Let’s take the following example image:
Available [the requested size] = (65,536 * 4) - 28 = 262,116
bits_per_pixel = 32
width = 90,000 pixels
height = 1 pixel
Since the image bits_per_pixel is 32, the conditional statement at [1] will not pass, leading us to enter the alternative code block defined in [2].
It then calculates the BytesPerRow on [3] then divides it by 8. In our example: BytesPerRow = 90000 * 32 / 8 = 360,000
In the example, the check on [4] would not pass, as 360000 is not less than the requested size 262116, and is not able to fit a single line of the requested width into a single request – this initiates the else on [5].
This determines the number of pixels that can be included in a single request. It then initiates a recursive call to the PutSubImage function to pass just that subset, followed by a subsequent recursive call to manage the remaining portion of the line. If needed, this remaining part may also be divided further through additional recursive calls.
However, the calculation on [6] fails to take into account the bits per pixel, and the recursive call makes requests sending 2096928 pixels instead of 2096928 bits – which is larger than can be fit in a single request.
This leads to an endless loop of attempting to split the line of pixels, consistently resulting in a number too large to fit and trying again the process to retry with the same values. This recursion persists until the call stack is exhausted.
The bug fix changed the calculation on [6] and took into account the bits_per_pixel. In the example, it would result in a recursive call requesting to send just 65529 pixels, resulting in a BytesPerRow of 262116 that perfectly fits inside the available space, thus allowing the recursion to make forward progress and finish in just 2 calls.
Example proof-of-concept image to trigger the bug: https://github.com/jfrog/jfrog-CVE-2023-43786-libX11_DoS/blob/main/cve-2023-43786.xpm
How the bug can be triggered
An example of an app that calls the vulnerable libXpm library function is the CLI utility sxpm, which is used to display Xpm images on the screen.
It calls the vulnerable xpmCreatePixmapFromImage Xpm function, which then calls the vulnerable libX11 functions XPutImage then PutSubImage.

Is the JFrog Platform Vulnerable to CVE-2023-43786 or CVE-2023-43787?
After conducting an internal analysis, we can confirm that the JFrog Platform is not vulnerable to CVE-2023-43786 or CVE-2023-43787.
Contextual Analysis With JFrog Advanced Security
The Contextual Analysis feature, included in the JFrog Advanced Security set of capabilities for JFrog Xray, enables users to automatically detect whether these vulnerabilities are applicable in the user’s code base. This process involves running automated contextual scanners on the container image to determine reachable paths and the configuration settings for the analyzed vulnerabilities. Xray automatically validates CVEs that have exploitation prerequisites and provides a contextual analysis report that determines which vulnerabilities are applicable or not. This saves developers a lot of wasted time and effort.
- Save developer time by only remediating vulnerabilities that are applicable
- Analyze the finished code (binary) the same way an attacker would
- Know which CVEs are exploitable and their potential impact
- Test a vulnerability in the context of the complete artifact, build or Release Bundle
- Enable action and remediation in the context of the artifact, build or Release Bundle
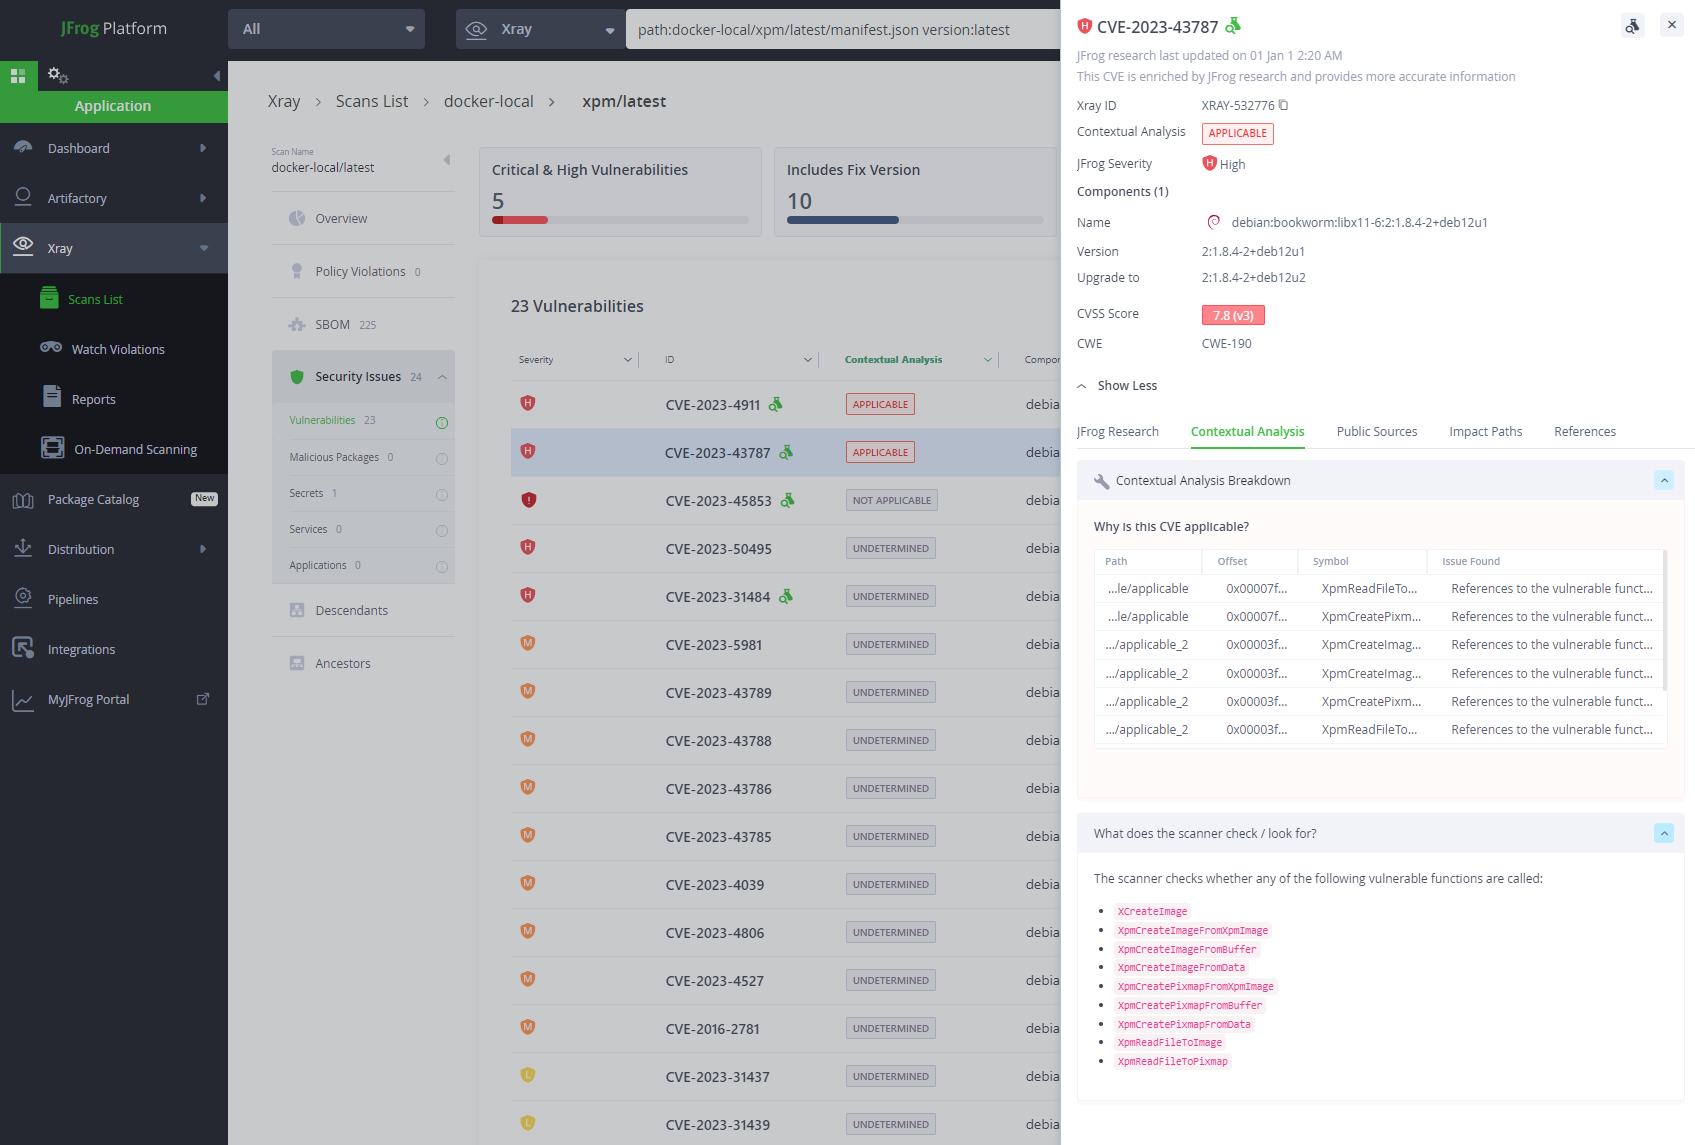 JFrog Platform: JFrog Contextual Analysis for libX11’s CVE-2023-43787 (Click image for full-size)
Stay up-to-date with JFrog Security Research
The JFrog Security Research team findings and research play an important role in improving the JFrog Platform’s application software security capabilities. This manifests in the form of enhanced CVE metadata and remediation advice for developers, DevOps, and security teams in the JFrog Xray vulnerability database, as well as new security scanning capabilities used by JFrog Xray.
Follow the latest discoveries and technical updates from the JFrog Security Research team in our research website, additional blog posts and on X at @JFrogSecurity.
Experience
JFrog Today
Discover how the JFrog Platform unites DevOps, DevSecOps and MLOps for secure, rapid software delivery.


