Jenkins and JFrog Pipelines: CI/CD Working Together to Release Your Software
As a software producer, you need to keep releases moving, even as you need to move your technology ahead. Transitioning your Jenkins continuous integration (CI) pipelines to a newer, optimized system can’t be a roadblock, and your enterprise can’t afford the work stoppage a rip-and-replace rework would require.
We understood that deeply when we built our CI/CD solution, JFrog Pipelines. That’s why we made it very easy to connect your current Jenkins pipelines to ones in JFrog Pipelines, so that you can extend your existing toolchain, not disrupt it.
Like many organizations, you’ve already invested hundreds of developer hours building many Jenkins pipelines that perform and have become integral to your software build process. Those Jenkins workhorses can continue to drive essential parts of your CI, but hand off to new workflows in JFrog Pipelines.
Let’s take a look at how that’s done, to enable Jenkins and Pipelines to work together.
Pipelines and the Platform Difference
Pipelines is the CI/CD component of the JFrog DevOps Platform end-to-end set of solutions for “one-stop DevOps.” Powered by Artifactory, the JFrog Platform provides everything you need to manage your organization’s software delivery, from artifact repositories, distribution of binaries, security scanning and CI/CD automation.
Chances are good that your Jenkins pipelines are already pushing artifacts and builds to Artifactory repositories for things like Go, Docker, and Helm. That’s because Artifactory’s universal repository management enables connection with the DevOps tools you choose, including the most popular CI servers.That’s helped push Artifactory to be accepted as the industry standard for binary repository management.
JFrog Pipelines is the automation glue that helps unify all the tools in the JFrog DevOps Platform, Like Jenkins, it can move your software through each stage from code to build to binaries and all the way to distribution. But as part of the JFrog Platform, it’s naturally integrated with Artifactory, Xray, and Distribution, and can be administered through a unified permissions model for fine-grained access control.

Pipelines also operates at enterprise scale, able to support hundreds of CI/CD pipelines through a single, central platform for all administrators and teams.
Even with these compelling reasons to migrate your CI from Jenkins to Pipelines, it might not be practical to do so all at once.
From Jenkins to Pipelines
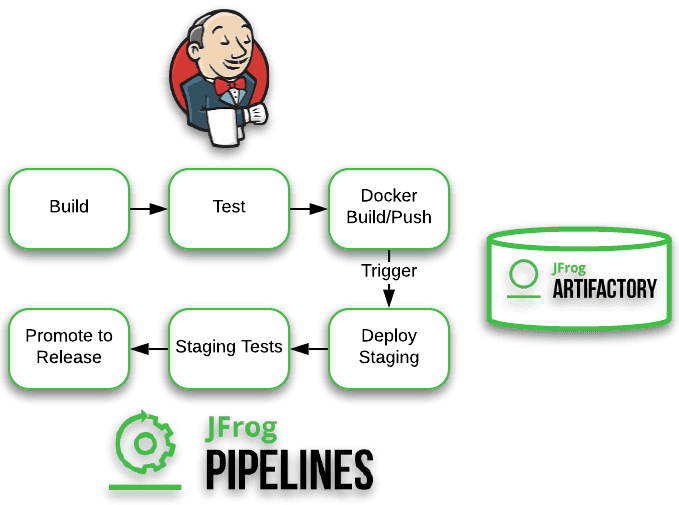
For this example, we have built a Go REST application that Jenkins will build, run unit tests and then push the application to a staging Docker repository. Next, JFrog Pipelines will deploy the Docker Go application from the staging repository to a Kubernetes cluster. We will use Google Kubernetes Engine (GKE). Additionally, we will use Artifactory as our Docker registry. This makes it easy to promote the build to release without pushing the same build to another release registry.
The code repository for this example contains our Go REST application, the Jenkins pipeline Jenkinsfile and the JFrog Pipeline YAML file. Per best practices, the pipeline infrastructure is defined in these files, too.
Jenkins Pipeline
Our Jenkins pipeline performs the initial build and testing of our application, pushing a Docker container to a repository with build information.
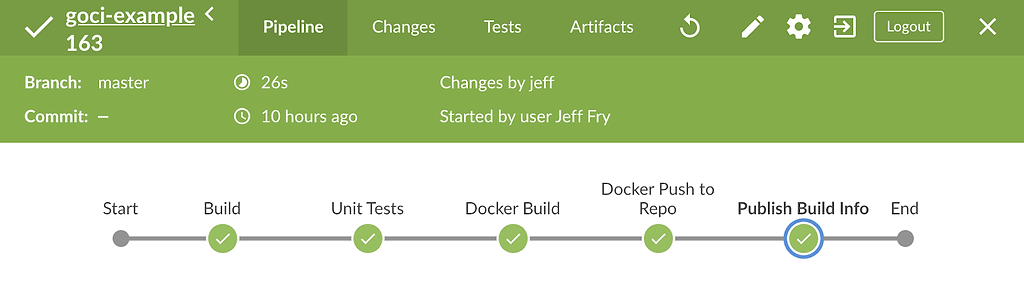
Let’s take a look at our Jenkins pipeline. The sections of the following Jenkinsfile that are important are the Publish Build Info and post stages. After Jenkins builds and tests our Go application image, we publish the build info to Artifactory.
stages {
 stage('Build') {
     steps {
         container('golang'){
             sh 'go build'
         }
     }
 }
 stage('Unit Tests') {
     steps {
         container('golang'){
             sh 'go test ./... -run Unit'
         }
     }
 }
 stage('Docker Build') {
   steps {
     container('docker'){
         sh "docker build -t partnership-public-images.jfrog.io/goci-example:latest ."
     }
   }
 }
 stage('Docker Push to Repo') {
   steps {
     container('docker'){
         script {
           docker.withRegistry( 'https://partnership-public-images.jfrog.io', 'gociexamplerepo' ) {
             sh "docker push partnership-public-images.jfrog.io/goci-example:latest"
           }
        }
     }
   }
 }
 stage('Publish Build Info') {
   environment {
     JFROG_CLI_OFFER_CONFIG = false
   }
   steps {
     container('jfrog-cli-go'){
         withCredentials([usernamePassword(credentialsId: 'gociexamplerepo', passwordVariable: 'APIKEY', usernameVariable: 'USER')]) {
             sh "jfrog rt bce $JOB_NAME $BUILD_NUMBER"
             sh "jfrog rt bag $JOB_NAME $BUILD_NUMBER"
             sh "jfrog rt bad $JOB_NAME $BUILD_NUMBER \"go.*\""
             sh "jfrog rt bp --build-url=https://jenkins.openshiftk8s.com/ --url=https://partnership.jfrog.io/artifactory --user=$USER --apikey=$APIKEY $JOB_NAME $BUILD_NUMBER"
         }
     }
   }
 }
}
Then in the post stage, we trigger JFrog Pipelines by referencing that build info in a special webhook call to the Pipelines REST API. We will talk about how this webhook is set up in JFrog Pipelines next.
post {
   success {
     script {
        sh "curl -XPOST -H \"Authorization: Basic amVmabcdefM25rMW5z=\" \"https://partnership-pipelines-api.jfrog.io/v1/projectIntegrations/17/hook\" -d '{\"buildName\":\"$JOB_NAME\",\"buildNumber\":\"$BUILD_NUMBER\",\"buildInfoResourceName\":\"jenkinsBuildInfo\"}' -H \"Content-Type: application/json\""
     }
   }
}
JFrog Pipelines
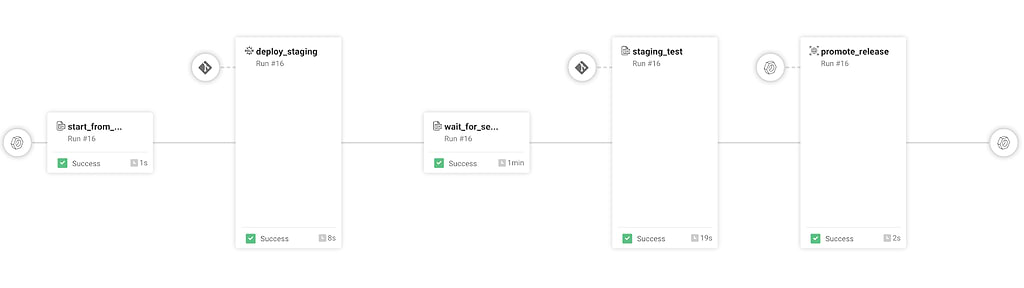
Our JFrog Pipeline will trigger through the build info pushed by the Jenkins pipeline, and perform the remaining deployment and staging actions to release.
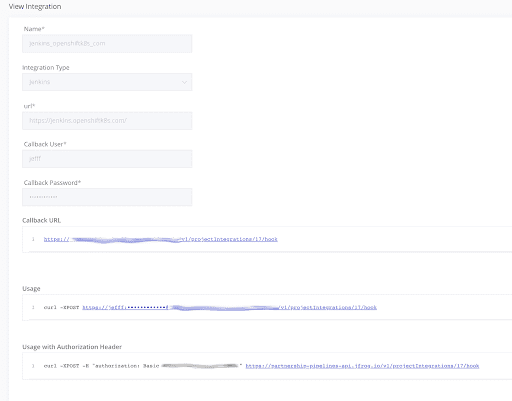
To connect Jenkins to JFrog Pipelines, we must first create a Jenkins integration in our Pipelines deployment, here called jenkins_openshiftk8s_com. This UI provides our curl webhook command above, and enables our Jenkins pipeline to trigger our JFrog pipeline.
JFrog Pipelines defines its pipeline steps in YAML. The first section of this file is our resources. These are sources and destinations of data that are used by the pipeline. In our case, we are defining our GitHub repo, a BuildInfo resource connected to the jenkins_openshiftk8s_com Jenkins integration, and a final BuildInfo resource to promote our release. The BuildInfo resource is used to store metadata for our build.
resources:
 - name: gociexampleGithubRepo
   type: GitRepo
   configuration:
     gitProvider: myGithub
     path: myaccount/goci-example
 - name: jenkinsBuildInfo
   type: BuildInfo
   configuration:
     sourceArtifactory: MyArtifactory
     buildName: goci-example/master
     buildNumber: 1
     externalCI: jenkins_openshiftk8s_com
 - name: releaseBuildInfo
   type: BuildInfo
   configuration:
     sourceArtifactory: MyArtifactory
     buildName: goci-example/master
     buildNumber: 1
Our first step is a Bash step that receives our Jenkins trigger through jenkinsBuildInfo.
- name: start_from_jenkins
 type: Bash
 configuration:
   inputResources:
     - name: jenkinsBuildInfo
 execution:
   onExecute:
     - echo 'Jenkins job triggered Pipelines'
If all goes well, we then deploy our Go REST application to our staging environment. In this case, we have a GKE cluster for this. We reference this cluster through a Kubernetes integration named gociexampleClusterCreds . We can integrate with any Kubernetes cluster by providing our kubeconfig data as an Integration object.
We use the HelmDeploy step to deploy our application using a HelmChart directory in our repo.
- name: deploy_staging
 type: HelmDeploy
 configuration:
   inputSteps:
     - name: start_from_jenkins
   inputResources:
     - name: gociexampleGithubRepo
       trigger: false
   integrations:
     - name: gociexampleClusterCreds
   releaseName: goci-example
   chartPath: chart/goci-example/
Then we have a Bash step that waits for the Go REST application to become available.
- name: wait_for_server
 type: Bash
 configuration:
   inputSteps:
     - name: deploy_staging
 execution:
   onExecute:
     - timeout 60 bash -c 'while [[ "$(curl -s -o /dev/null -w ''%{http_code}'' https://goci-example.35.238.177.209.xip.io)" != "200" ]]; do sleep 5; done' || true
Once our Go REST application comes up in our staging environment, we execute our staging tests.
- name: staging_test
 type: Bash
 configuration:
   inputSteps:
     - name: wait_for_server
   inputResources:
     - name: gociexampleGithubRepo
       trigger: false
   runtime:
     type: image
     image:
       auto:
         language: go
         versions:
           - "1.13"
   environmentVariables:
     STAGING_URL: "https://goci-example.35.238.177.209.xip.io"
 execution:
   onExecute:
     - cd ../dependencyState/resources/gociexampleGithubRepo
     - go mod download
     - go test ./test -run Staging
Finally, if our staging tests pass, we promote the build to release.
- name: promote_release
 type: PromoteBuild
 configuration:
   targetRepository: partnership-public-images.jfrog.io
   status: Released
   comment: Passed staging tests.
   inputResources:
     - name: jenkinsBuildInfo
   outputResources:
     - name: releaseBuildInfo
Our JFrog Pipeline can be further extended to provide continuous delivery (CD) operations using JFrog Distribution to publish your software to end systems and JFrog Edge systems. But we will leave that to a future blog post.
Keep DevOps Moving
As you can see, it’s a straightforward process to connect your Jenkins pipeline to one in JFrog Pipelines. If needed, you can also trigger a Jenkins pipeline from JFrog Pipelines.
Developing your software delivery toolchain from a patchwork of tools can be a time consuming and frustrating task. Using a unified toolchain like the JFrog Platform allows you to focus on your software and not the tools. But if you have existing tools, you can easily plug these into the JFrog platform and still take advantage of the JFrog Platform features.


