

Using the JFrog CLI with GitHub Actions

| NOTE: This blog describes features and functionality that have been deprecated by JFrog and GitHub since the original publish date. This entry remains active for reference only. For more information on JFrog CLI, please visit the JFrog CLI User’s Guide. |
Over the coming weeks, we’ll release a series of blog posts on how you can use the JFrog CLI, Artifactory, and GitHub Actions to build awesome software. First up, building a custom GitHub Action.
At GitHub Universe, probably the most interesting announcement was the release of GitHub Actions. GitHub’s way to create CI/CD pipelines and have them take care of running your build infrastructure.
The beauty of GitHub Actions is that they allow you to automate your workflow within GitHub, like building docker images, sending notifications using Twilio, or… using JFrog Artifactory!
At JFrog, we created our CLI to make it easy to create scripts to connect to any of the JFrog tools. Having a proper CLI makes scripts easier to read and to maintain, and as an added bonus the CLI makes it incredibly easy to hook up any CI/CD tool to the JFrog suite of tools as well. So, over the holidays I decided to put one and one together and create a GitHub Action that wraps the JFrog CLI.
💻 All the code and files I refer to are available on GitHub
It all starts with Docker
Every action that you run as part of your workflow is a Docker image, so to build your own action you need a Dockerfile. The one I used for the JFrog CLI is:
Overall, it was fairly easy to turn a CLI into a GitHub action 😄
A simple script
Now for the actual script that connects to Artifactory
For the action, I decided I wanted to support all three authentication mechanisms supported by the JFrog CLI and allow for the commands to have their usual arguments too.
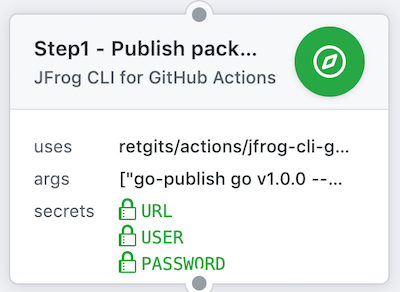
All of that combined results in a GitHub Action that looks like
A workflow to tie it together
The last step, and the one that developers would use, is to use the Action in a workflow and automate the process of storing artifacts. To do that, you’ll need a small snippet:
action "JFrog CLI for GitHub Actions" {
  uses = "retgits/actions/jfrog-cli@master"
  secrets = ["USER", "PASSWORD", "URL"]
  args = ["cmd"]
  env = {
    CRED = "username"
  }
}
There are four parameters for the action:
- uses: which GitHub Action and which build is used (in this case it uses the master branch of my jfrog-cli action);
- secrets: let’s be honest, we should never ever store usernames or passwords in a version control system, so the action uses three parameters from GitHub’s secret vault. The action will get the username, password, and URL from the vault at runtime so nothing is stored in the files in your repo;
- args: these are the commands that are executed (minus the
jfrog rtpart) - env: these are the environment variables that are passed into the container. In this case, they are the command (“ping”) and the type of authentication you want to use (“username”). These variables are stored in your repository, so you want to make sure you’re okay with that!
The result
If you use the exact same action, and the exact same configuration, you’ll end up with an action that simply sends a “ping” to your Artifactory server to see if it is alive. In the GitHub UI, you’ll see
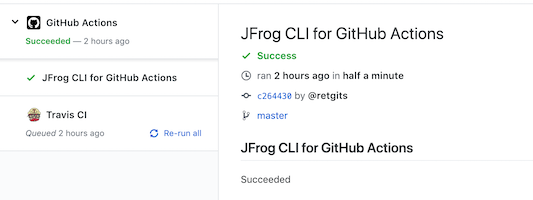
And in the details below, you’ll see the output of the build and the execution:
### STARTED JFrog CLI for GitHub Actions 21:25:56Z

... snip ...

Status: Downloaded newer image for gcr.io/github-actions-images/action-runner:latest
Authentication using username
OK

### COMPLETED JFrog CLI for GitHub Actions 21:26:27Z (31.521s)
What’s next
If you want to try out GitHub Actions, head over to the GitHub website and sign up for their beta program. For an environment to test drive all the features of JFrog Artifactory (and a lot more), you can sign up for a test drive on our demo environment. For questions or comments, feel free to leave a message here or on Twitter!
Experience
JFrog Today
Discover how the JFrog Platform unites DevOps, DevSecOps and MLOps for secure, rapid software delivery.


