

Resolving Go Modules From JFrog Artifactory Using JFrog CLI

Over the coming weeks, we’ll release a series of blog posts on how you can use the JFrog CLI, Artifactory, and GitHub Actions to build awesome software. The first in the series was building a custom GitHub Action and this week we’ll continue that by building Go apps.
Last year we added support for Go modules to Artifactory and that made it possible to have reproducible and secure builds by storing modules in Artifactory. Why? Let’s face it, you don’t want to be stuck using vendoring? In this post, we’ll use Go modules to resolve dependencies and build an app using the JFrog CLI.
💻 All the code and files I refer to are available on GitHub
Go apps are awesome
To get started you’ll need to have an app, and what could be better than the trusty “Hello World”? For this example, the app only needs three files:
.
├── go.mod   <-- a file describing the module and the dependencies
├── go.sum   <-- a file containing checksums of the dependencies
└── hello.go <-- the code
Let’s look at the code of the app
The go.mod file contains all the dependencies that are needed to build the app:
module github.com/you/hello
require (
 golang.org/x/text v0.3.0 // indirect
 rsc.io/quote v1.5.2
)
We’ve aptly named our module github.com/you/hello, if you want to name it differently that is totally okay!
Create a workflow
To build the app and get the dependencies set up correctly, you need a workflow with four steps:
- Get the sources of the modules from GitHub, because they’re not in Artifactory yet
- Publish the modules to Artifactory so other developers can use those instead of downloading and building them again
- Build the app and set up the dependencies for Artifactory’s Build Integration (more on this in another blog)
- Run the app (this is obviously an optional step, but we do want to see that it built correctly)
Step 1: Get sources
The action, created in the previous post, will automatically configure to use the Artifactory server you’ve configured. Because the modules aren’t in Artifactory yet, you’ll have to specify the --no-registry option (which means you’re not using Artifactory for this step).
action "Step1 - Get sources" {
  uses = "retgits/actions/jfrog-cli-go@master"
  secrets = ["URL", "USER", "PASSWORD"]
  args = ["go build go --no-registry"]
  env = {
    CRED = "username"
  }
}
Step 2: Publish modules
To make sure that future builds wouldn’t have to download and build modules again you can store the modules in Artifactory. The --self flag set to false means you’ll not store the package as a zip in Artifactory (which is okay for now, as the source is in GitHub and in the next blog you’ll actually store the module). The --deps flag set to all means that all dependencies will be stored in Artifactory.
action "Step2 - Publish modules" {
  uses = "retgits/actions/jfrog-cli-go@master"
  needs = ["Step1 - Get sources"]
  secrets = ["URL", "USER", "PASSWORD"]
  args = ["go-publish go --self=false --deps=all"]
  env = {
    CRED = "username"
  }
}
Step 3: Set build info
Build Integration is one of the most awesome features of Artifactory and the JFrog CLI. The feature allows you to capture all relevant information (like environment variables, dependencies, etcetera) and store that with a build so you know exactly how your artifact was built.
action "Step3 - Build Info" {
  uses = "retgits/actions/jfrog-cli-go@master"
  needs = ["Step2 - Publish modules"]
  secrets = ["URL", "USER", "PASSWORD"]
  args = ["go build go --build-name=my-build --build-number=1"]
  env = {
    CRED = "username"
  }
}
Step 4: Run the app
Just to make sure the app actually works, you can run it using one of the standard GitHub Actions called “sh”.
action "Step4 - Run app" {
  uses = "actions/bin/sh@master"
  needs = ["Step3 - Build Info"]
  args = "./hello"
}
You can find the entire file here and after you commit the changes GitHub will process the steps
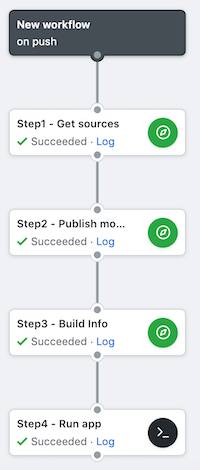
Seeing is believing
The four checkmarks look very promising, but because seeing is believing you can check the logs too.
Step 1: Get sources
### STARTED Step1 - Get sources 21:18:56Z
... snip ...
Authentication using username

[Info] Encrypting password...
[Info] Using go: go version go1.11.4 linux/amd64

go: finding rsc.io/quote v1.5.2
go: finding rsc.io/sampler v1.3.0
go: finding golang.org/x/text v0.0.0-20170915032832-14c0d48ead0c
go: downloading rsc.io/quote v1.5.2
go: downloading rsc.io/sampler v1.3.0
go: downloading golang.org/x/text v0.0.0-20170915032832-14c0d48ead0c
Successfully ran 'go build go --no-registry'

### COMPLETED Step1 - Get sources 21:22:31Z (3m34.329s)
Step 2: Publish modules
### STARTED Step2 - Publish modules 21:18:56Z
... snip ...
Authentication using username

[Info] Encrypting password...
[Info] Using go: go version go1.11.4 linux/amd64

[Info] Running 'go mod graph' in /github/workspace
[Info] Publishing package dependencies...
{
  "status": "success",
  "totals": {
    "success": 3,
    "failure": 0
  }
}
Successfully ran 'go-publish go --self=false --deps=all'

### COMPLETED Step2 - Publish modules 21:22:36Z (3m39.581s)
Step 3: Build Info
### STARTED Step3 - Build Info 21:18:57Z
... snip ...
Authentication using username

[Info] Encrypting password...
[Info] Using go: go version go1.11.4 linux/amd64

[Info] Running 'go mod graph' in /github/workspace
Successfully ran 'go build go --build-name=my-build --build-number=1'

### COMPLETED Step3 - Build Info 21:22:42Z (3m45.191s)
Step 4: Run app
### STARTED Step4 - Run app 21:18:57Z
... snip ...
Running './hello'...
Hello, world.
Successfully ran './hello'

### COMPLETED Step4 - Run app 21:22:42Z (3m45.283s)
🎉 it works!
What’s next
If you want to try out GitHub Actions, head over to the GitHub website and sign up for their beta program. For an environment to test drive all the features of JFrog Artifactory (and a lot more), you can sign up for a test drive on our demo environment. For questions or comments, feel free to leave a message here or on Twitter!
Experience
JFrog Today
Discover how the JFrog Platform unites DevOps, DevSecOps and MLOps for secure, rapid software delivery.


