

Three approaches to strengthening security with allowlists

There are many ways bad actors try to infiltrate and exploit companies, including by gaining access to your internal network and the applications connected to it. With more organizations adopting products in the cloud, or at the very least connected to the internet, addressing this potential attack vector is an important element of any security strategy. JFrog helps our customers address this potential security threat through the use of allowlists, but setting up an allowlist – while relatively simple – can pose challenges if it’s the first time you’ve ever done it.
In this post we’ll take a look at three approaches to improve network security with allowlists.
What is IP allowlisting in Network Security?
For developers, IP allowlisting is like a gate and ticket system at a concert or sports venue, allowing only approved IP addresses access to a network or application. This strengthens security by keeping out malicious attacks like DoS, DDoS, IP and port sniffing, man-in-the middle and others. However, one of the limitations of this strategy is that end-user IPs must stay static.
If you’re a developer using JFrog and looking to implement an IP/CIDR allowlist, there are three common scenarios to consider. Let’s look into how to address each of these scenarios:
1) IP/CIDR IP Range from VPN
2) Allowlist via DNS
3) Private Link Connection
IP/CIDR IP Range from VPN
VPN servers act as a proxy – an intermediary between your computer and the Internet.The use of a VPN server gives you the benefit of hiding your IP address from the Internet, which protects your personal information online. Furthermore, it makes it much more difficult for attackers to target you, since they can only see the IP address of the VPN server, not your real IP address.
The advantage and disadvantage of implementing allowlisting through VPN
Advantage: No need to add IP address for every user individually.
Disadvantage: If the VPN range or provider changes, the changes must also be made to the allowlisting page, which requires maintenance.
Implementing your allowlist:
To find the IP address for your VPN’s server, simply do a search in your web browser for “What is my IP?”. Alternatively, you can reach out to your IT team for the IP range for your VPN. For example, if you are using Zscaler as your VPN, you can easily get the IP address for your allowlist by following these steps:
- Check if a user’s traffic is going to the Zscaler service on the user’s device. To do this, browse to ip.zscaler.com.
- The My IP Address page provides details about the Zscaler cloud to which the device is sending its traffic. It also includes links to additional tools you can use to check connectivity.
Note: Please check your own VPN’s setting to get exact details regarding IP addresses.
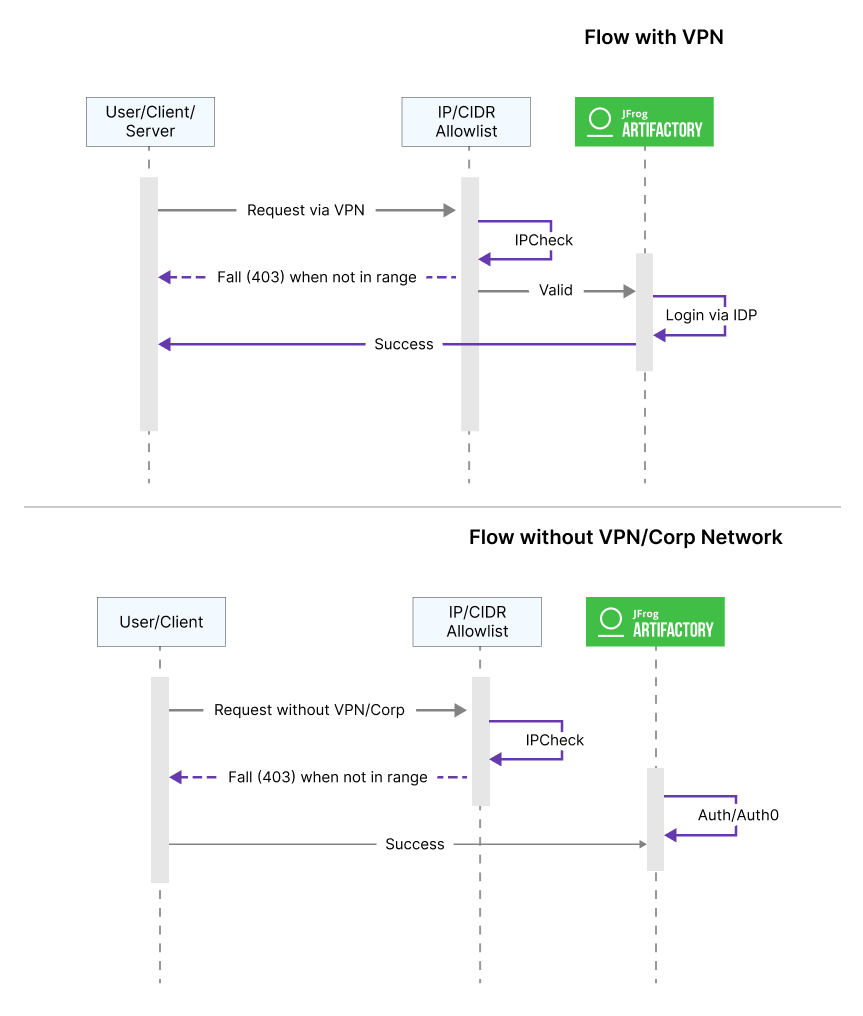 IP approval flow when using VPNs
Allowlist via DNS
Developers looking to keep IP addresses inside their company network private without exposing the internal network to access any internal servers should consider using a DNS server. Configuring the MyJFrog Portal with your DNS server IP and blocking all public IPs is a great way to ensure that all IPs remain secure and invisible to the outside world. Additionally, implementing an in-house DNS can significantly boost network speeds, with little need for human interaction.
The advantage and disadvantage of implementing allowlisting through DNS
Advantage: Limited access to the JFrog Platform gives better security
Disadvantage: Maintenance is a key here. Whenever there is a change in the DNS mapped IP, an update has to be made in MyJFrog Portal.
Implementing allowlisting through DNS
Every user is authenticated with DNS, ensuring that any request routed through the DNS server will be directed to its corresponding IP address. Configure these IPs in the MyJFrog Portal for the ultimate convenience.
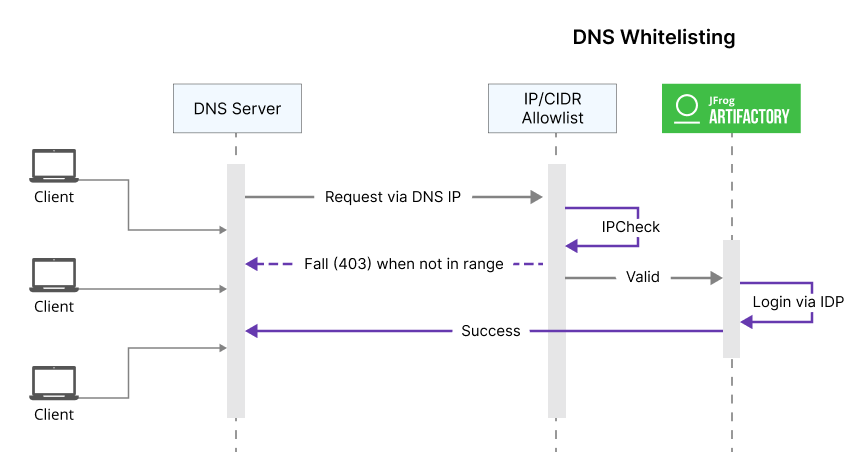
IP approval flow when using DNS Server
Private Link Connection
As organizations move towards cloud native services and applications, many of their internal services are still running on a virtual private cloud (VPC). This is because the public internet can pose a risk when connecting to other services from within the VPC.
JFrog understands the security concerns associated with this, and offers a Private Link connection to help reduce the risks. With this connection, customers can create a secure network connection that originates from their own cloud environment (like AWS/Azure/GCP VPC) to their JFrog Cloud (SaaS) instance, without having to go through the public internet. This traffic instead traverses within the cloud provider backbone.
The advantage and disadvantage of using a private link connection
Advantage: Data is transferred using the cloud backbone instead of the public internet, which makes it more secure.
Disadvantage: A known limitation to this approach is that all internal cloud services and JFrog should be in the same cloud.
Implementing your allowlist using a private link connection
To help JFrog customers who wish to reduce the security risks associated with exposing their JFrog SaaS instances via the public Internet, JFrog enables you to set up a PrivateLink connection using different providers. Please refer to this link for a step-by-step guide for setting up your Private Link connections.
Note: Setting up this connection will require actions taken on both the JFrog and Cloud provider ends.
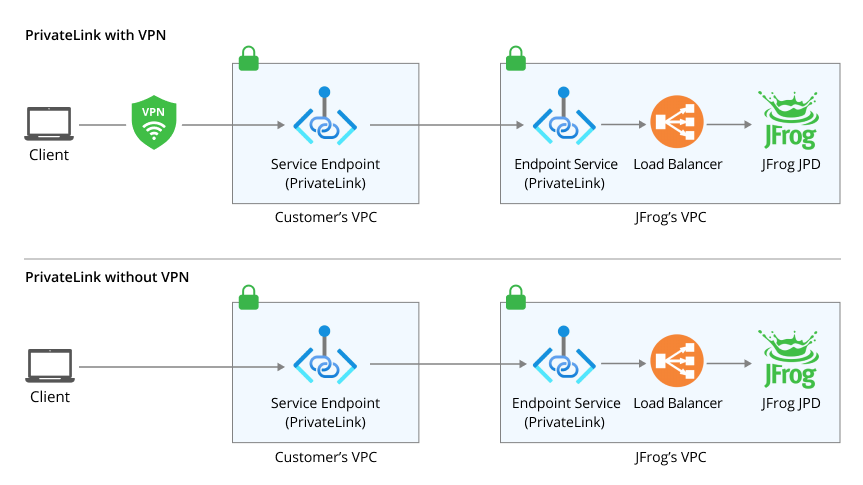
IP approval flow when using Private Link
Improve your network security, set up allowlisting today!
If you’re an existing JFrog customer who isn’t using this security feature, we definitely recommend you consider setting it up. If you need further help on this topic, reach out to our awesome support team.
If you’re not using JFrog, but looking to adopt the most secure software supply chain platform available – Look no further. Take JFrog for a spin with a free trial.


