

Managing Binaries With JFrog CLI and GitHub Actions

By
6 min read

Over the past few weeks, we’ve released a series of blog posts on how you can use the JFrog CLI, Artifactory, and GitHub Actions to build awesome software. Last week we created and published a Go module and recorded the Build Information and in this final post we’ll build and store the binary in Artifactory.
When we released Artifactory in 2006, we wanted to build a product that could manage any type of package and any type of artifact in a native fashion. So you could say that managing binaries is kind of our thing at JFrog. In this final post of the series, let’s upload the binary to Artifactory so we can distribute it from there!
💻 All the code and files I refer to are available on GitHub
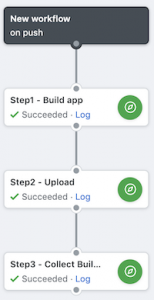
The workflow
A very common use case is to publish your binaries to Artifactory. To do that, you need a workflow with three steps:
- Get the modules and build an app
- Publish the binary to Artifactory (because that is really where they need to be)
- Collect the build info (similar to what you saw in a previous blog)
Step 1: Build app
The action will automatically configure to use the Artifactory server you’ve configured. You can get the modules either from Artifactory (if you’ve followed along with the other blogs) or from GitHub. The code below shows how to get the modules from GitHub, simply remove the --no-registry flag to get them from Artifactory.
action "Step1 - Build app" {
  uses = "retgits/actions/jfrog-cli-go@master"
  secrets = ["URL", "USER", "PASSWORD"]
  args = ["go build go --no-registry"]
  env = {
    CRED = "username"
  }
}
Step 2: Upload
Getting the binary into Artifactory is a matter of simply uploading it and that is a task the JFrog CLI can do very well. Let’s also change the build number to see a few more builds and see that the binary belongs to a specific build later on.
action "Step2 - Upload" {
  uses = "retgits/actions/jfrog-cli-go@master"
  secrets = ["URL", "USER", "PASSWORD"]
  args = ["upload hello generic-local --build-name=my-build --build-number=2"]
  env = {
    CRED = "username"
  }
  needs = ["Step1 - Build app"]
}
Step 3: Collect Build Info
As you’ve done in the previous blogs, you can collect the build information. This is very useful because it’s a different job than last time and there could be differences in the environment.
action "Step3 - Collect Build Info" {
  uses = "retgits/actions/jfrog-cli-go@master"
  secrets = ["URL", "USER", "PASSWORD"]
  args = ["build-collect-env my-build 2", "build-publish my-build 2"]
  env = {
    CRED = "username"
  }
  needs = ["Step2 - Upload"]
}
You can find the entire file here and after you commit the changes GitHub will process the steps
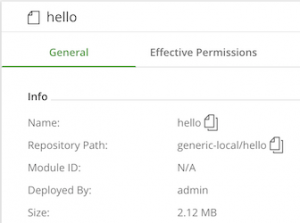
The binary
Like with all the other blogs, you can look at the logs and see the results!
Step 1: Build app
### STARTED Step1 - Build app 22:21:43Z
... snip ...
Authentication using username

Running 'go build go --no-registry'...
[Info] Encrypting password...
[Info] Using go: go version go1.11.4 linux/amd64

go: finding rsc.io/quote v1.5.2
go: finding rsc.io/sampler v1.3.0
go: finding golang.org/x/text v0.0.0-20170915032832-14c0d48ead0c
go: downloading rsc.io/quote v1.5.2
go: downloading rsc.io/sampler v1.3.0
go: downloading golang.org/x/text v0.0.0-20170915032832-14c0d48ead0c
Successfully ran 'go build go --no-registry'

### COMPLETED Step1 - Build app 22:24:36Z (2m52.851s)
Step 2: Upload
### STARTED Step2 - Upload 22:21:43Z
... snip ...
Authentication using username

[Info] Encrypting password...
Running 'upload hello generic-local --build-name=my-build --build-number=2'...
[Info] [Thread 2] Uploading artifact: hello
{
  "status": "success",
  "totals": {
    "success": 1,
    "failure": 0
  }
}
Successfully ran 'upload hello generic-local --build-name=my-build --build-number=2'

### COMPLETED Step2 - Upload 22:24:41Z (2m58.158s)
Step 3: Collect Build Info
### STARTED Step3 - Collect Build Info 22:21:43Z
... snip ...
Authentication using username

[Info] Encrypting password...
Running 'build-collect-env my-build 2'...
[Info] Collecting environment variables...
[Info] Collected environment variables for my-build/2.
Successfully ran 'build-collect-env my-build 2'
Running 'build-publish my-build 2'...
[Info] Deploying build info...
[Info] Build info successfully deployed. Browse it in Artifactory under https://35.232.80.15/artifactory/webapp/builds/my-build/2
Successfully ran 'build-publish my-build 2'

### COMPLETED Step3 - Collect Build Info 22:24:41Z (2m58.266s)
Artifactory
In Artifactory, you’ll now find the newly published binary in the Artifact Repository Browser
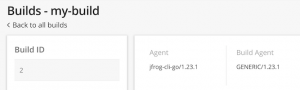
In the build information, you’ll find a new build too!
Recap
Over the past weeks, we’ve taken you on a JFrog CLI journey to show you:
- Using the JFrog CLI with GitHub Actions
- Building Go Apps Using the JFrog CLI
- Using the JFrog CLI to Create Go Modules
- Publishing Binaries Using the JFrog CLI (this post)
As we said before, we created our CLI to make it easy to create scripts to connect to any of the JFrog tools. That ease of use, together with the power of GitHub Actions will accelerate the speed at which you build and publish apps!
What’s next
If you want to try out GitHub Actions, head over to the GitHub website and sign up for their beta program. For an environment to test drive all the features of JFrog Artifactory (and a lot more), you can sign up for a test drive on our demo environment. For questions or comments, feel free to leave a message here or on Twitter!
Experience
JFrog Today
Discover how the JFrog Platform unites DevOps, DevSecOps and MLOps for secure, rapid software delivery.


