Best Practices for Artifactory Backups and Disaster Recovery
Introduction
Right at the heart of the DevSecOps pipeline, JFrog Artifactory is the central hub for all of your binary needs. In production, every minute is valuable. Whether it’s to deploy your latest packages or to cache openly available packages, it is vital that you have all of your binaries available at all times. The challenge is that there is no such thing as an indestructible computer or a flawless piece of software, and this is why we must make sure to have a backup plan, literally.
This white paper describes several methods for tackling these concerns, in hopes that one will work best for your organization.
How does Artifactory store your binaries and what’s so special about it?
Artifactory has specific ways to backup your artifacts so that you may import them back into a new instance and keep all your references and metadata. As described in the following section, the way Artifactory stores your binaries is a bit different than your usual storage, so that has to be taken into consideration for these tasks.
Artifactory stores both binaries and their metadata. The metadata is stored in a database (Derby by default), and includes information such as the checksum, repository, path, created time, and more. The actual binaries are, however, stored separately. Depending on how you configure your filestore, the files will be stored in one or multiple locations, using their SHA1 checksum value as the file name and the first two characters of the SHA1 value as the folder name. For example, with a default Artifactory installation you’ll find the following structure in the directory $JFROG_HOME/artifactory/var/data/artifactory/filestore (For version 6.x and below it would be $ArtifactoryHome/data/filestore)
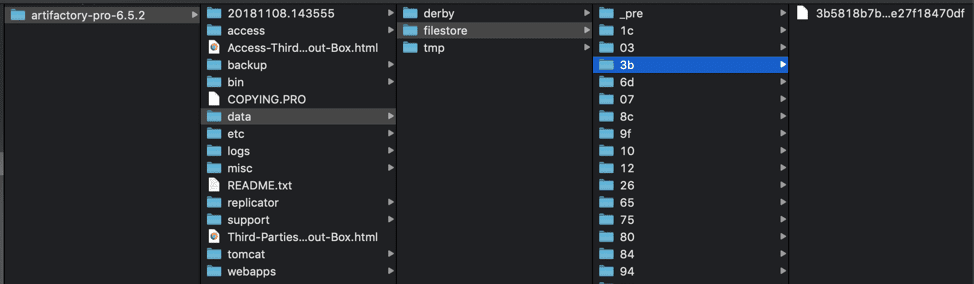 The file structure enables Artifactory’s deduplication, saving significant space with checksum based storage.
This file structure allows Artifactory to offer a deduplication feature that will save you countless GBs or TBs of space, using checksum based storage.
- Deduplication
By referencing binaries by their checksum, much like Git or Dropbox do, and not relying on filesystem paths, same-content files are never stored more than once. This is one of the few ways you can optimize the storage of binaries. - Checksum-based Storage
Artifactory was built from the ground up for optimal management of binaries with the capability to support any package format that emerged in the software development domain. One of the key features enabling these characteristics is Checksum-Based Storage. Click here to learn more.
This is why it’s important to backup your filestore, as well as the database or metadata for these files. Depending on the size of your instance there are several approaches.
The following sections will describe the different backup approaches and ways to keep your binaries safe.

1. Backing Up Small Artifactory Instances
System backups are a simple, built-in way of backing up your Artifactory instances, directly configured from within the Artifactory UI. User administrators can set daily, weekly, and even manual periodic backups using cron expressions.
Though enabled by default we recommend alternative backup processes once your instance’s artifact size is above 100GB
Once a system backup is created, it will be located by default in the $JFROG_HOME/artifactory/var/backup/artifactory/[backup_key] directory, which can also be configured using the UI. The Artifactory System Import that the backup creates can then be used to recreate an instance entirely if there is a failure.
In some user environments, the primary node is specifically configured with access to some NFS mount for Artifactory backups. Please note that with the introduction of Cloud-Native High Availability, where any node can create a backup, the user will need to set up access for all nodes to have write access to the mount for creating a backup.
Additional advanced backup options include:
- Incremental backups – Only backing up what the previous backup missed
- Include/Exclude – Inclusion or exclusion of specific repositories
- Retention period – Time period to keep backups, if they are not incremental
- Verify disk space – Check that there is enough space before performing a backup
- New Build/Repository Exclusion – Exclude builds and and new repositories from a backup
This type of Artifactory backup will create a new set of repository folders, that contain each artifact stored alongside with its metadata, meaning no deduplication. This complete duplicate of data can take a toll on your storage if you are backing up large instances, as the size of your backup will be larger than your current Artifactory storage.
You can mitigate this storage cost by backing up your filestore separately and performing a skeleton export of the database (system export using the Exclude Content = true option).
Ultimately, it is NECESSARY to switch to a different backup method if your instance reaches 500GB of storage, or if you go over 1 Million Artifacts in your instance.
2. Backing Up Large Artifactory Instances
For instances with a large dataset, alternate methods are suggested. This is because system backups can take a significant amount of time to complete, which may even overlap your cron duration and cause missed backup intervals. It will also be slow if a recovery is required. The purpose of a backup is to make data available even in case of hardware failure, or perhaps get it ready for migration to a different version or instance. Spending too much time on backups is counterproductive, especially when you really need the backup!
What we can do to simplify the process is to divide it into three steps: 1) Backing up the database, 2) Backing up the filestore (binaries), and 3) Backing up the Artifactory Home folder.
Filestore Backup
For the filestore we just need a copy of the entire filestore directory. This can be done in any way you prefer.
A third party IT backup solution with snapshot/copying capabilities can provide better control and performance for this task. It should be pointed to your $JFROG_HOME/artifactory/var/data/artifactory/filestore location in your file system by default, but this may vary depending on your configuration.
Tip: Any copy (snapshot) of your filestore will do. A periodical rsync of an NFS mount dedicated for this snapshot is also recommended.
Object storage services such as S3 also offer ways to keep your binaries.
Periodic Database Snapshots
We will need to either have active/passive database replication, or to take constant periodic snapshots of the database in order to have readily available backups.
Without the database backup, the filestore on its own is just a folder with files that are named after their checksum, making them impossible to identify in a timely manner. When it’s time to restore, you’ll need to use the latest available snapshot. Copying the filestore and taking periodic snapshots of your external database should be done around the same time to avoid references of non-existent binaries or other empty values. However, taking snapshots of the external database should be done first before copying the filestore.
Artifactory Home Backup
With the database containing all user and artifact data, and the filestore all the binaries, we have most of what we need to restore our Artifactory instance whenever we want. The last thing we want to backup is the Artifactory Home.
In particular, the Master Key is most important to keep backed up, as if we lose it we would lose all encrypted passwords during the recovery process. Without the Artifactory Home we would also lose other existing properties we may have set, or logs we wanted to keep. A full snapshot of the Artifactory Home is suggested for this reason.
System Export
Completing a full system export with the content excluded is also a good way to backup data. This is the equivalent of a DB dump with the addition of the configurations in the Artifactory Home directory, along with a collection of xml files that represent your binaries and repository locations are exported. It is similar to a system backup but without the binaries.
The reason it is not recommended to use this as your primary backup mechanism is that the export and restoration time will be longer depending on the number of artifacts and the large amount of database read/write operations.
Simple migration with System Exports
In some cases you will simply want to set up a copy of your instance, which can be done using backups or the system export.
The benefits of executing a migration is that it’s one of the simplest types of upgrades or instance cloning, since it only entails setting up a new instance to migrate data into, and requires no data in the new instance.
There are two methods that offer little to no downtime during this migration. The first method has a short downtime and requires the following steps:
- Disable Admin -> Advanced -> Maintenance -> Garbage collection on both servers
- Old server: Copy the $ARTIFACTORY_HOME/data/filestore folder to the new server’s filestore folder
- Old server: Take server off the network to block new requests
- Old server: Perform full system export with the “Exclude Content” option selected (no other options selected)
- Old server: Shut down <downtime step>
- Old Server: rsync from $ARTIFACTORY_HOME/data/filestore folder to the new server’s filestore folder one last time
- New server: Perform full system import (Do NOT select the Exclude Content option).
- New server: Turn on network traffic / switch DNS to new server.
- New Server: Enable Garbage Collection again
The second method is more complicated than the first, but has almost no downtime. It requires the following steps:
- Disable Admin -> Advanced -> Maintenance -> Garbage Collection on both servers
- Old server: Copy the $ARTIFACTORY_HOME/data/filestore folder to the new server’s filestore folder
- Old server: Perform full system export with the “Exclude Content” option selected (no other options selected)
- New server: Perform full system import (Do NOT select the Exclude Content option).
- Old Server: Set up all local repositories to replicate to the repositories on the new server with the “sync deletes” option turned off.
- New server: Turn on network traffic / switch DNS to new server.
- Old server: Execute all replication jobs to sync delta
- Old server: Shut down once done
- New Server: Enable Garbage Collection again
Ultimately, the migration method you choose will depend on your preference, tolerance for downtime and even industry. For example, financial industries tend to lean towards filestore sharding for security purposes. The main difference between the two methods is the replication part that will allow you to move over any artifacts that were deployed during the export/import process.
Filestore Sharding
There are additional methods that can help you avoid losing data, as well as any downtime before an instance is recovered. One of them is by increasing the redundancy of your artifacts at the time they are stored.
Artifactory offers a Sharding Binary Provider that lets you manage your binaries in a sharded filestore. A sharded filestore is one that is implemented on a number of physical mounts (M), which store binary objects with redundancy (R), where R <= M. This binary provider is not independent and will always be used as part of a more complex template chain of providers.
Sharding the filestores adds reasonable scalability, however be cautious of creating too many shards as additional shards do cause a performance impact. Therefore we generally recommend not exceeding 10 shards at the same time.
The process is initially more tedious as it requires manually procuring multiple mounts and setting them up accordingly. However the benefit comes later on, when it comes time to increase storage where additional mounts can be added more easily. Artifactory offers an API to trigger the rebalancing of redundancy to help set the initial copy of existing binaries.
In terms of redundancy, there is also one other way to maintain a copy of your artifacts, by maintaining a copy of your entire instance.
3. Disaster Recovery (DR)
Disaster Recovery, or DR, is a solution to easily recover from any event that may cause irreversible damage and loss of data. In addition to being a well designed solution, it also enables taking Artifactory down for other reasons such as hardware maintenance on the server machine.
We can achieve this by having a second Artifactory cluster. Depending on your preference and use case this may be an active-active setup where both instances are being used and synchronized, or an active-passive setup, where one Artifactory instance is receiving synchronization and is waiting until traffic is shifted over. They both have different benefits, and the JFrog platform can help you achieve both.
There is currently no built-in feature to synchronize everything to another server, but there are several features that can help us achieve this. First let’s look at synchronizing artifacts.
Using JFrog Federated Repositories for DR
Due to the growth in demand for multi-site topology, JFrog Artifactory released a powerful new repository type called Federated Repositories. These repositories act very much like local repositories, but are optimized for file synchronization across multiple topologies, and up to 10 different JPDs.
In order to set up federated repositories, we must make sure the version of the clusters is the same (for instances below version 7.49.3), that the clocks are properly synchronized, and that the instances properly trust each other via binding or via circle of trust for self-hosted instances.
For each of our private deployment repositories we want to either create them as Federated Repositories, or we want to convert them.
Federated Repositories are not supported for Terraform Backend
The Terraform backend is designed to manage the state of your infrastructure, and duplicating it into a federated repository could potentially lead to inconsistencies in the system state.
This is because the state managed by the Terraform backend is critical to the correct operation of Terraform, and any inconsistencies could lead to unexpected behavior or errors.
Federated repositories do not support locking on a file in a multi-repo environment. This is an important feature for ensuring consistency and preventing conflicts when multiple users or processes are attempting to modify the same state of a terraform backend.
Manually setting up DR using replication
Disaster recovery can be manually set up without the use of Federated Repositories, by using repository replication. Replication comes in the form of:
- Local Replication, where one Artifactory instance pushes the artifacts to another target local repository in a different instance.
- Remote Replication, where a remote repository in a different instance pulls artifacts locally from the source in the form of populating its cache ahead of time.
Replication does not support bi-directional sync
While Federated Repositories work in a 1-to-1 relationship syncing to each other, cyclical local replication actually causes problems and it is not supported, as opposed to the previously mentioned Federated Repositories which do support bi-directional connections. This means that achieving a bi-directional sync with the replication would require adapting our topology and making use of multiple local repositories along with virtual repositories to make them into a single endpoint.
The best approach with replication is using a single Virtual Repository consisting of a Local and a Remote Repository.
The remote repository allows us to pull the other sites’ artifacts and cache them ahead of time with remote replication, while the local repository hosts the artifacts being deployed and serves as the opposite remote repository. Since the same operation is being performed on the other end, this allows us to achieve bi-directional synchronization.
The same logic can also be applied as we increase the number of sites, so that multi-site topology synchronization is possible.
Although this increases the number of repositories to manage, and the time it takes to make changes to the repository settings, we still strongly recommend federated repositories for your synchronization. It may also make it a bit more difficult to manage permissions, which will be addressed later on.
Synchronizing Security Entities with Access Federation
Security entities in the JFrog platform include: Users, Groups, Permissions, and Tokens. Replication and Federated repositories don’t sync these parameters and need to be handled separately. Fortunately, the JFrog Platform has an Access Federation feature that allows us to sync these security entities with other platform instances.
As long as the Circle of Trust has been set up between the instances, we are ready to go and set up Access Federation directly using the UI.
First, we will select all the deployments we want to sync. These deployments should have already been registered on your platform.
We can select the entities we want synced and the permissions we want to filter.
And then confirm when it all looks good.
When the configuration is complete we should see it displayed in the Access Federation page.
Configurations and Repositories
We have tackled how to maintain repositories and synchronize security entities , but not configurations and other settings.
One way to keep the same configurations on both ends is by syncing the Artifactory config descriptor. This can be done via API or bootstrapping. For other security settings such as Crowd/LDAP/SSO settings, the Access YAML must be bootstrapped.
For settings such as Artifactory System Properties, it is best to either manually maintain it or have your orchestration tooling use the same settings for both instances. System YAML and Binarystore configurations are likely to contain instance-specific data, they must be manually configured for both as well.
For syncing repository creation we recommend creating an automated process for onboarding new repositories and using the REST API to create the repositories in both your prod and DR at the same time.
Conclusion
As described in this whitepaper, there are multiple ways to protect your binaries. Depending on your setup, industry requirements, repository size and backup frequency, you can choose the right fit for your organization.
To apply these methods on multiple sites, we strongly recommend having a passive DR site or an active-active setup, while at the same time making sure you have recurring backups of these instances.
All of the methods we have described have the same basic goal: Minimizing downtime in case of an unexpected event that can impact development and release time and maximizing developer productivity.