

Achieving Continuous Deployment with Artifactory Webhooks & Docker

By
9 min read
Continuous Deployment (CD) requires setting up your infrastructure and automation to update your solution with the latest code change from the main branch. That’s what we call “Liquid Software”. Full automation makes your deployment seamless, less error prone, faster and it makes the feedback loop shorter because you can now deploy after each change.
Achieving continuous deployment requires the following elements:
- Continuous Integration (CI), such as Jenkins or JFrog Pipelines, for validating/building the new version.
- An artifact manager, such as JFrog Artifactory, to store your artifacts and provide the target of your deployment (server, smart appliance, computer) with the new version.
- A deployment agent that will handle the new artifacts and make them operational (stop current server, download binaries, start server). There are two types of agents:
- Pull: Agents running on the target
- Push: Agents running in a single place that update the targets remotely
The pull and push deployment models have their pros and cons, you can also use a combination of both. The most significant drawback of the pull model is that the agent is not aware of changes in the binary store and therefore it does not know when to trigger the update. One of the downsides of the push model is security, since the target needs to make sure that the deployment agent is authenticated and can only do what it is authorized to do.
In this blog post you’ll learn how to create a push/pull solution. We’ll go through the steps for pushing a Docker image for validation, promoting it to production, and finally using a JFrog Artifactory webhook to trigger deploying it to our production server.
Setup Artifactory
First you’ll need a running Artifactory server. If you don’t already have one, you can create a cloud instance for free.
Start by creating two Docker repositories: docker-local-staging and docker-local-prod. Create a new repository:
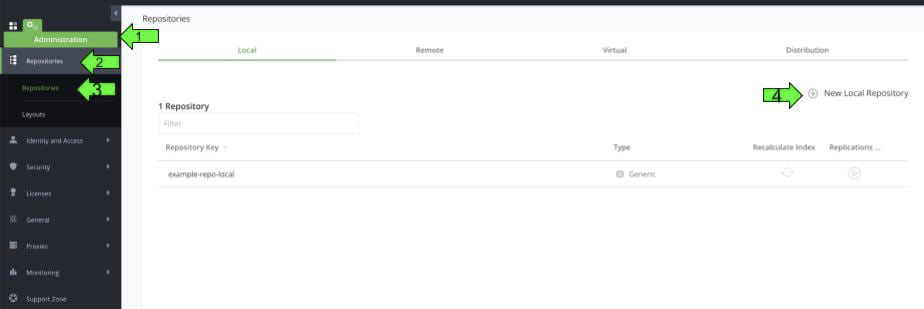
From the new repository window:
- Select Docker
- Enter “docker-local-staging” for the repository key
- Click the “Save and finish”
- Repeat for “docker-local-prod”
Now that you have your two empty repositories, continue to set up the webhook. Navigate to Admin Tab | General | Webhooks and click “New webhook”. Complete the form like this:
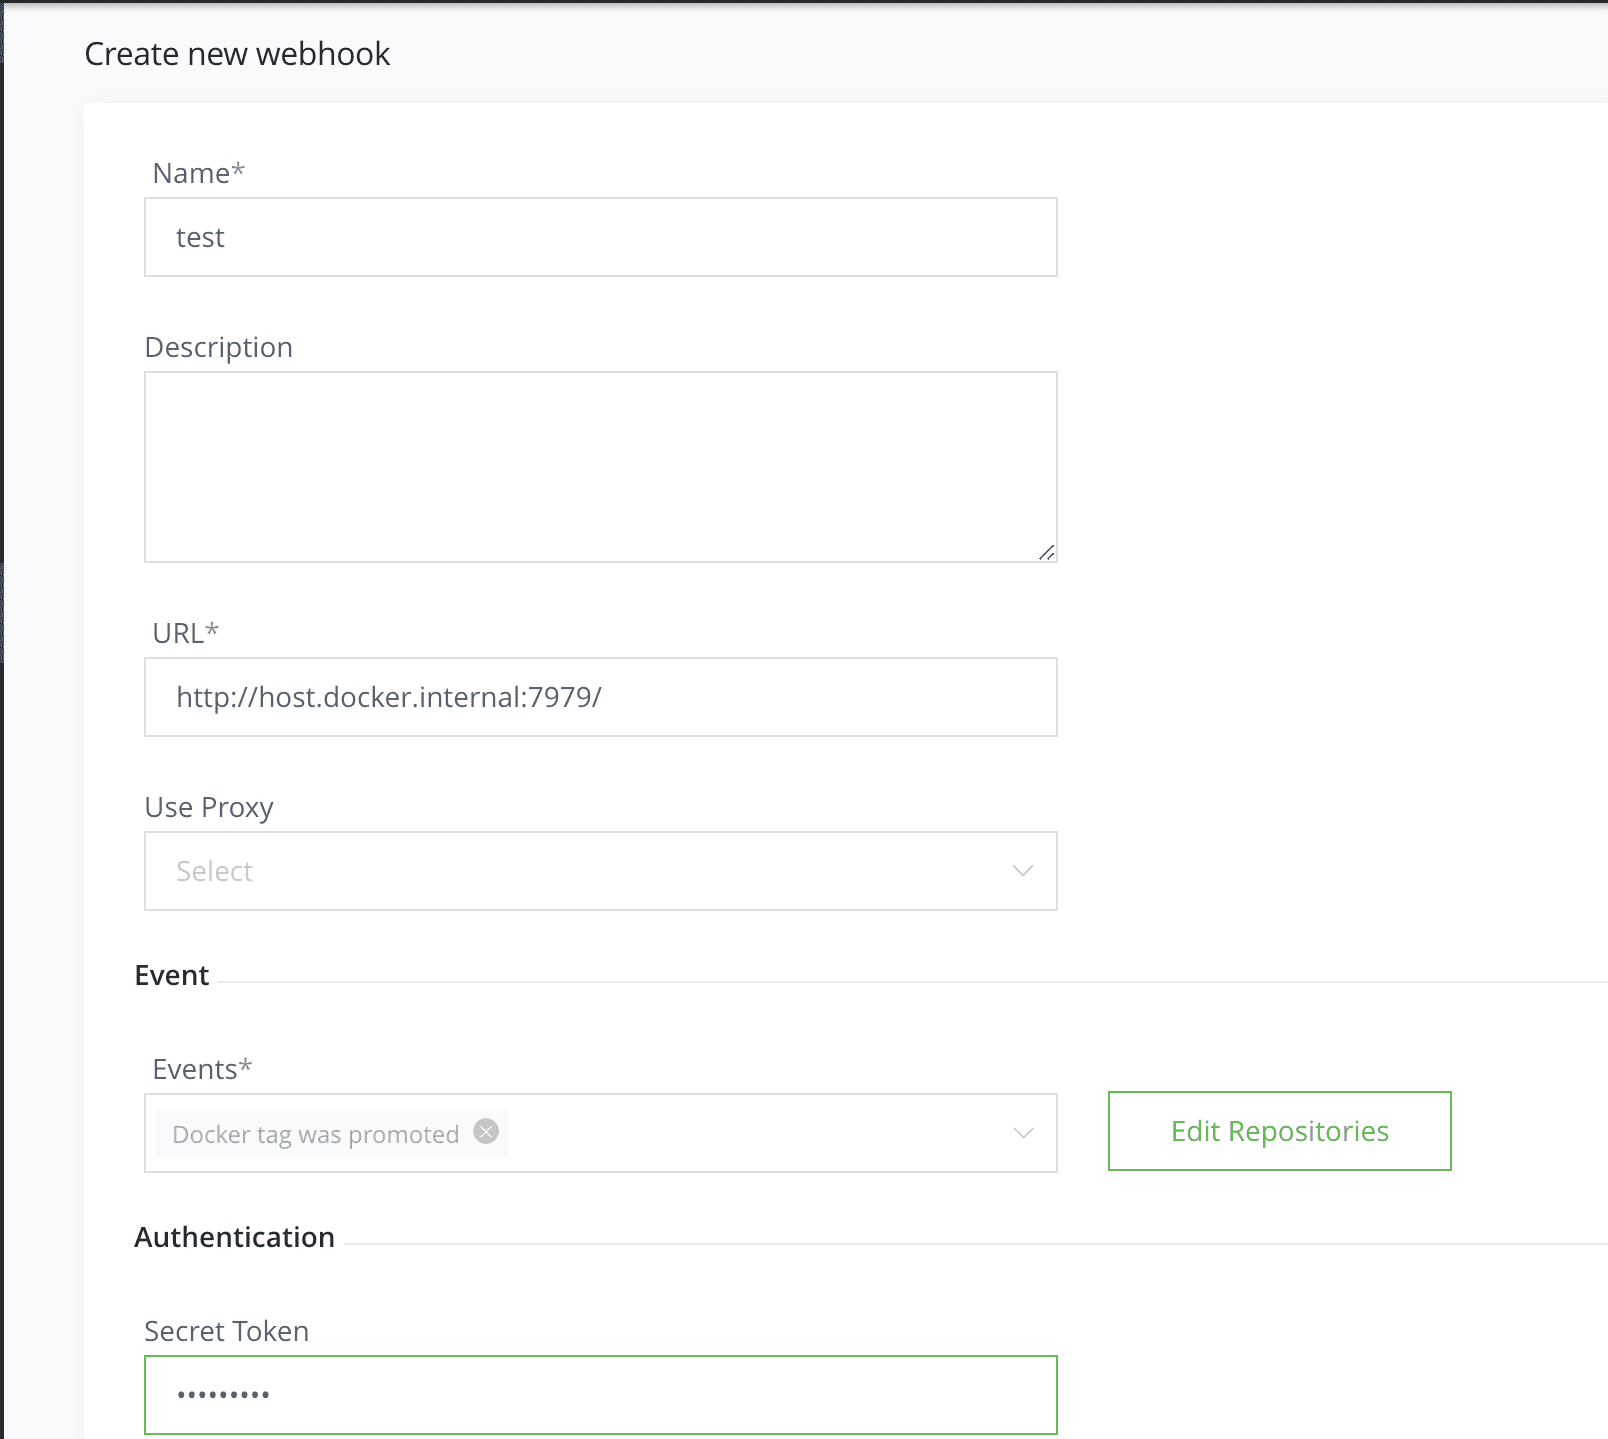
Note: In this example, the URL is set to “http://host.docker.internal:7979/”. This is because the webhook handler will be running on a localhost and on port 7979. The “host.docker.internal” hostname here is used to reach the host from a Docker container. In production you may need to change this to your production server URL and the port you chose.
On the secret field you can enter whatever string you want, it will be sent in the HTTP header “X-jfrog-event-auth” so you can validate the query is coming from a trusted source.
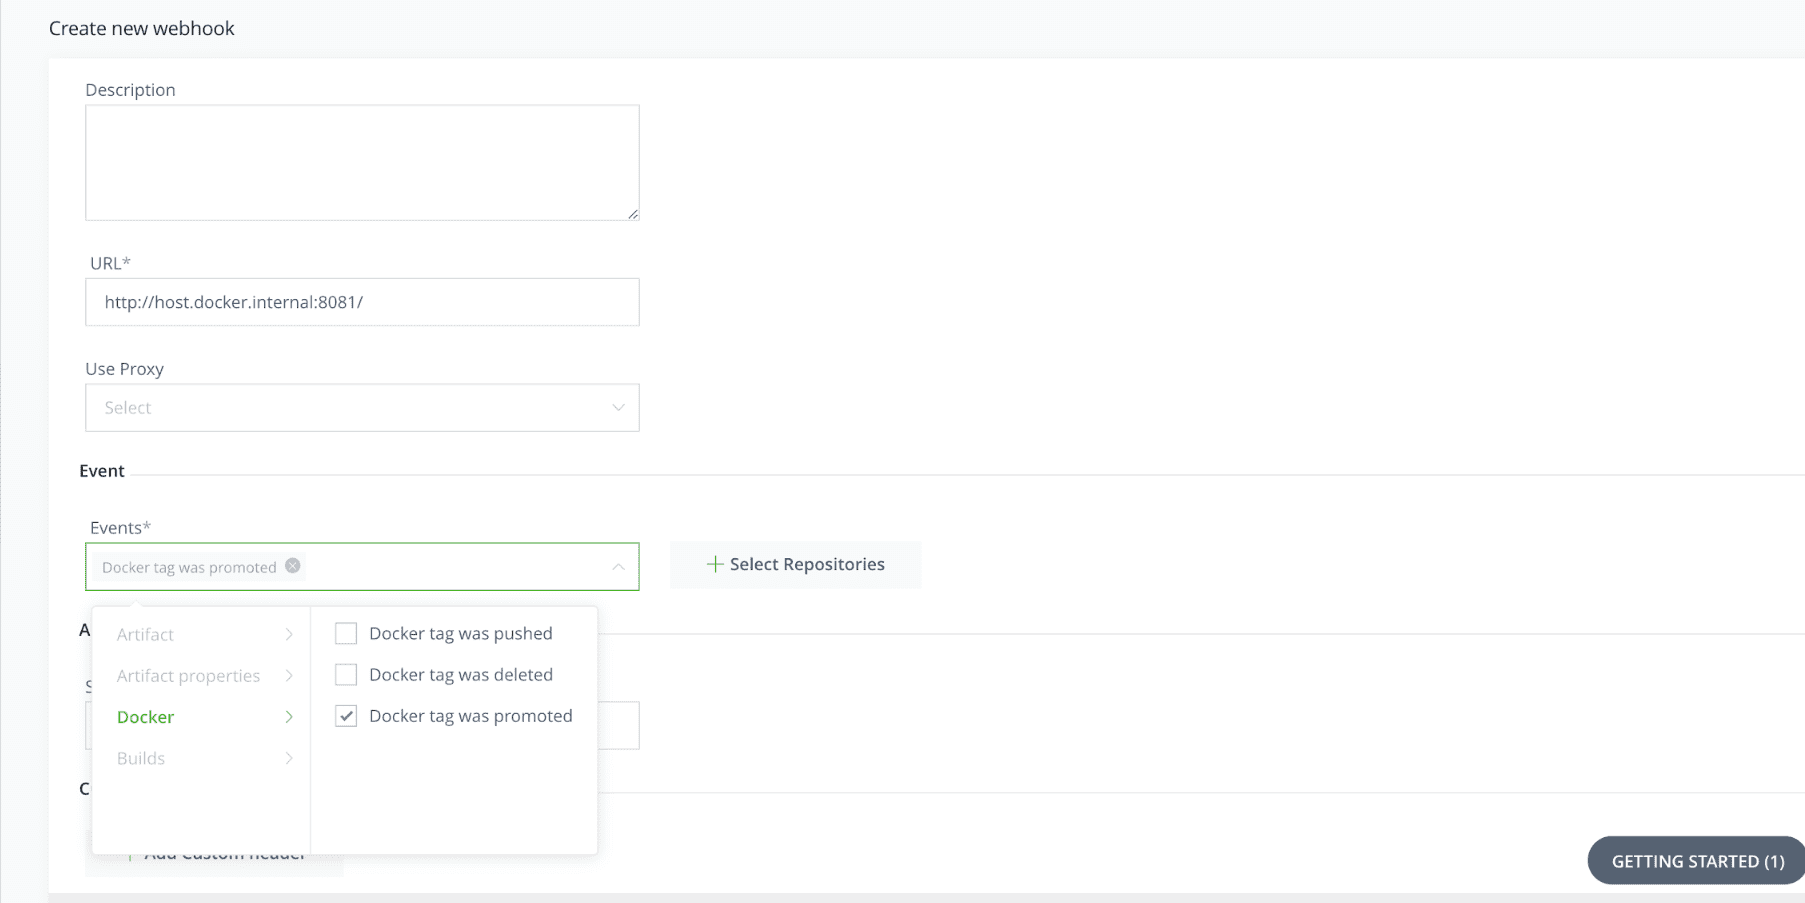
Select the “Docker tag got promoted” event. In Artifactory, Docker images can be promoted, which entails moving a Docker image from one repository to another without modifying its content. This ensures that the image that was tested in staging is that which will be deployed in production.
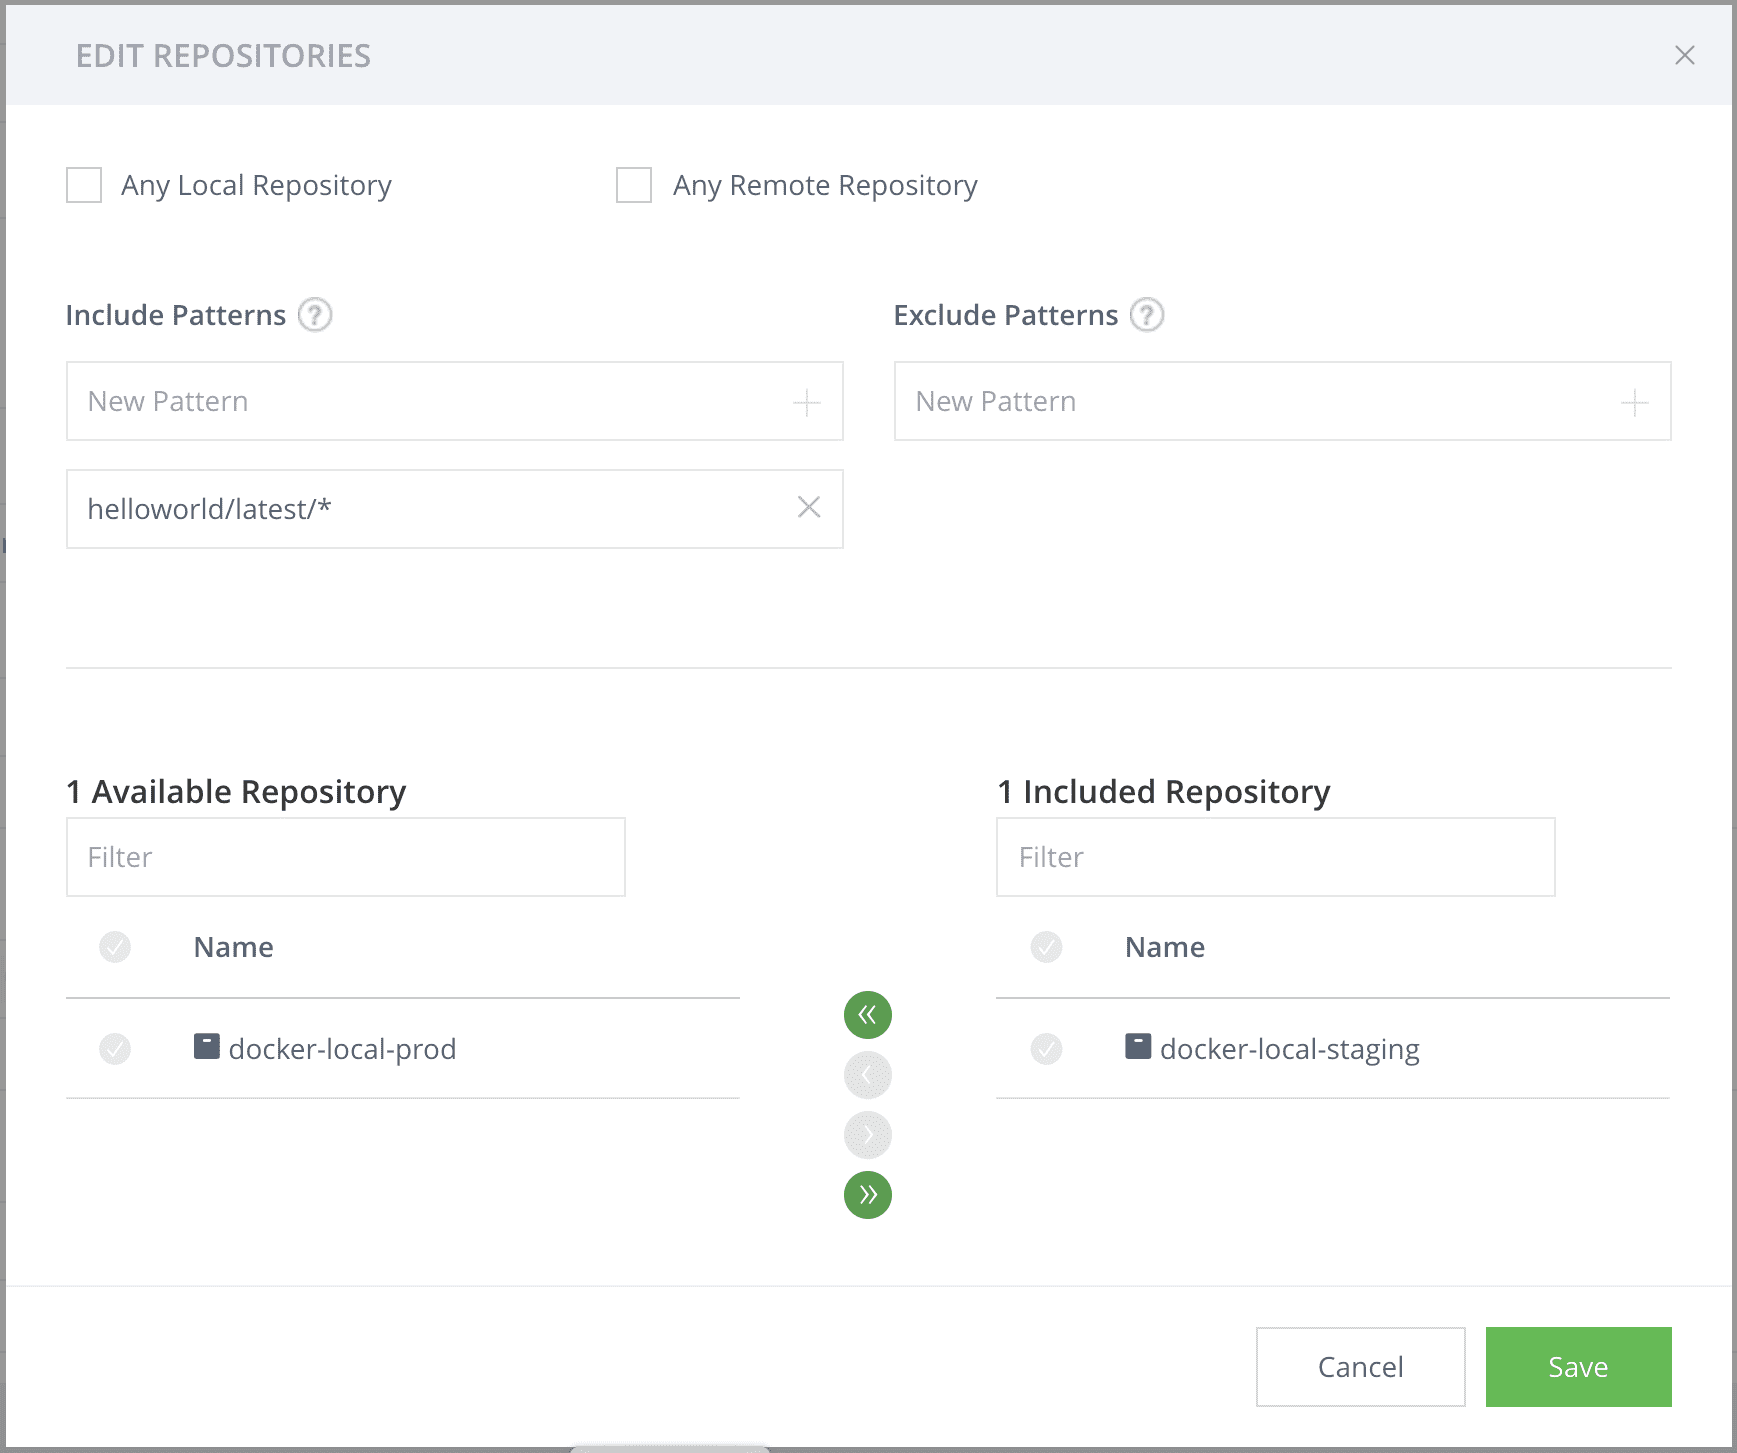
Click on “Select Repositories” then select the repository you will promote your image FROM. You can also add a filter in the “Include Patterns” section that matches your Docker image manifest.json path in the artifact browser.
Now that everything is set up on the Artifactory side, let’s move on to building our handler.
Webhook handler
The webhook handler will be running on the production server and will receive an HTTP request that will contain the event payload. In case of promotion it will look something like this:
{
    "domain": "docker",
    "event_type": "promoted",
    "data": {
        "image_name": "helloworld",
        "name": "manifest.json",
        "path": "helloworld/latest/manifest.json",
        "platforms": [],
        "repo_key": "docker-local-staging",
        "sha256": "ee34c5c94b4d7d0b319af21a84ebb0bcc16ef01be9a6ee0277329256ecee29b0",
        "size": 949,
        "tag": "latest"
    }
}
The webhook handler will need to:
- Read and parse the HTTP message body.
- Verify the Docker image and repository. Even if you added filters to the webhook settings in Artifactory, a server should always validate an incoming call.
- Pull the latest Docker image.
- Stop the running container (if one exists).
- Start the new version.
Here is the core of the handler. The full code sample is available in this Github repository.
func main() {
	http.HandleFunc("/", func (w http.ResponseWriter, r *http.Request) {
		ctx := context.Background()
		p, err := readPayload(r)
		if err != nil {
			http.Error(w, err.Error(), http.StatusBadRequest)
			log.Printf("Payload reading error: %+v", err)
			return
		}
		if !isMyServerEvent(p) {
			http.Error(w, "Bad event", http.StatusBadRequest)
			log.Printf("Unexpected event %+v", p)
			return
		}
		cli, err := client.NewClientWithOpts(client.FromEnv, client.WithAPIVersionNegotiation())
		if err != nil {
			log.Printf("New client error: %+v", err)
			return
		}
		err = pullLatestVersion(cli, ctx)
		if err != nil  {
			log.Printf("Pull error: %+v", err)
			return
		}
		err = stopRunningContainer(cli, ctx)
		if err != nil {
			if client.IsErrNotFound(err){
				log.Printf("Container does not exists")
			} else {
				log.Printf("Stop error: %+v", err)
				return
			}
		}
		err = startContainer(cli, ctx)
		if err != nil {
			log.Printf("Start error: %+v", err)
		} else {
            log.Printf("Container updated ")
        }
	})
	http.ListenAndServe(":8081", nil)
}
It uses multiple libraries:
- The golang builtin http server
- The docker golang SDK
The following method checks the event payload content. It checks various fields of the payload to be sure what the message is about. It also checks the secret you typed on the webhook creation form. The payload struct definition is available in this Github repository.
func isMyServerEvent(r *http.Request, p DockerEventPayload) bool {
	return p.Domain == "docker" &&
		p.EventType == "promoted" &&
		p.Data.ImageName == "helloworld" &&
		p.Data.RepoKey == "docker-local-staging" &&
		p.Data.Tag == "latest" &&
		r.Header.Get("X-JFrog-Event-Auth") == "mysecrets"
}
Next, use the following method to pull the latest image with the Docker SDK.
Note: Hard coding user credentials in the source code is a bad practice. The user and password are added in the sample below to show how to specify authentication. However, you should set up your server environment with “docker login” so you won’t need this.
func pullLatestVersion(cli *client.Client, ctx context.Context) error {
	authConfig := types.AuthConfig{
		Username: "admin",
		Password: "password",
	}
	encodedJSON, _ := json.Marshal(authConfig)
	_, err := cli.ImagePull(ctx, imageName, types.ImagePullOptions{RegistryAuth: base64.URLEncoding.EncodeToString(
		encodedJSON)})
	if err != nil {
		log.Printf("Pull error: %+v", err)
		return err
	}
	return nil
}
Then stop the running server:
func stopRunningContainer(cli *client.Client, ctx context.Context) error {
	return cli.ContainerRemove(ctx, containerName, types.ContainerRemoveOptions{Force: true})
}
The create and start the container (there is no “docker run” on the golang Docker SDK):
func startContainer(cli *client.Client, ctx context.Context) error {
	resp, err := cli.ContainerCreate(ctx,
		&container.Config{
			Image: imageName,
		},
		&container.HostConfig{
			PortBindings: nat.PortMap{
				"8080/tcp": []nat.PortBinding{
					{
						HostIP:   "0.0.0.0",
						HostPort: "8080",
					},
				},
			},
		}, nil, nil, containerName)
	if err != nil {
		return err
	}
	err = cli.ContainerStart(ctx, resp.ID, types.ContainerStartOptions{})
	if err != nil {
		return err
	}
	return nil
}
This completes the webhook handler, let’s try it out.
Build/Push your image
Use the following simple golang web server for testing:
package main

import (
    "fmt"
    "net/http"
)

func main() {
    http.HandleFunc("/", func (w http.ResponseWriter, r *http.Request)
      {
		fmt.Fprintf(w, "Hello World, %s!", r.URL.Path[1:])
	 }
    )
    http.ListenAndServe(":8080", nil)
}
Run it using the following go command:
go run serve.go
It’s simple and prints out “Hello world” when you load “http://localhost:8080” in your browser.
Here’s the Dockerfile for this app (most of it is from the golang Dockerfile template from VSCode):
FROM golang:alpine AS builder
RUN apk add --no-cache git
WORKDIR /go/src/app
COPY . .
RUN go install -v ./...

FROM alpine:latest
RUN apk --no-cache add ca-certificates
COPY --from=builder /go/bin/app /app
ENTRYPOINT ./app
LABEL Name=blogpostevent Version=0.0.1
EXPOSE 8080
Build the dockerfile with the following command. This should be automated in your CI process.
docker build . -t localhost:8082/docker-local-staging/helloworld
Use JFrog CLI to push the Docker image into Artifactory.
jfrog rt docker-push localhost:8082/docker-local-staging/helloworld docker-local-staging --url http://localhost:8082/artifactory --user admin --password password
Now you can ask your QA colleagues to test your server (they should tell you everything is OK because we don’t make any bugs, but in some rare cases it can happen). Once this is done and you want to go live, you only need to execute one command:
jfrog rt docker-promote helloworld docker-local-staging docker-local-prod --copy --user admin --password password --url http://localhost:8082/artifactory
This command will trigger the following process:
- Artifactory copies the Docker image to the docker-local-prod repository.
- Artifactory calls the Webhook with an HTTP request.
- The webhook server pulls the latest version.
- It kills the running server, if one exists.
- It starts the server with the latest changes.
Voilà! You have a Continuous Deployment setup.
Moving forward
Hopefully the above guide will help you get started with implementing continuous deployment and using webhooks. There are many additional functionalities that can be added. Here are some ideas:
- Execute all Docker / Jfrog CLI commands in your CI environment. For example, using a commit message that contains “#prod”, enabling developers to deploy.
- Use a real container orchestration. Instead of issuing Docker commands, it would be better to use Kubernetes, Docker swarm or maybe some cloud provider SDK.
- Improve security. You can add a custom header to the HTTP query coming from Artifactory to ensure the query is not sent from someone who found your open port and triggered the deployment all day long so your app is always down.
- Automate staging deployment by creating a webhook for the “docker push” event.
- Deploy your agent in a cloud FaaS or PaaS
- Prevent multiple parallel deployment of the “helloworld” container by aggregating two promotion events when they occur very close to one another
Closing
In this blog post we saw how to achieve the last mile of your CICD process, with the help of Artifactory webhooks and a fully automated workflow. Try it out for yourself! and reach out to us with your feedback.
Experience
JFrog Today
Discover how the JFrog Platform unites DevOps, DevSecOps and MLOps for secure, rapid software delivery.


