

Secure and Productionize Databricks AI Models with the JFrog Platform

By
10 min read

It’s well-known that Databricks is a world-class platform for data engineering and ML experimentation. Yet, for most organizations, the challenge isn’t building models; it’s the complex journey from a model in a notebook to a secure, governed, and production-ready application.
In this blog, we’ll show you how integrating the JFrog Platform with Databricks bridges that gap. We’ll walk you through a 5-step guide and demonstrate how to use JFrog’s artifact management and security scanning, and MLOps solutions to create one governed, traceable pipeline for your AI/ML models. This combination gives you the flexibility Databricks is known for, backed by the end-to-end security and governance required for production.
A 5-Step Guide to a Production-Ready Model
To make this guide practical, we’ll follow the complete lifecycle of a Hugging Face transformer model. As the largest public repository of open-source models and datasets, it’s the most common starting point for AI teams. We’ll show how you can take a model from its initial download, use it in Databricks, and move it all the way to a secure, production-ready endpoint.
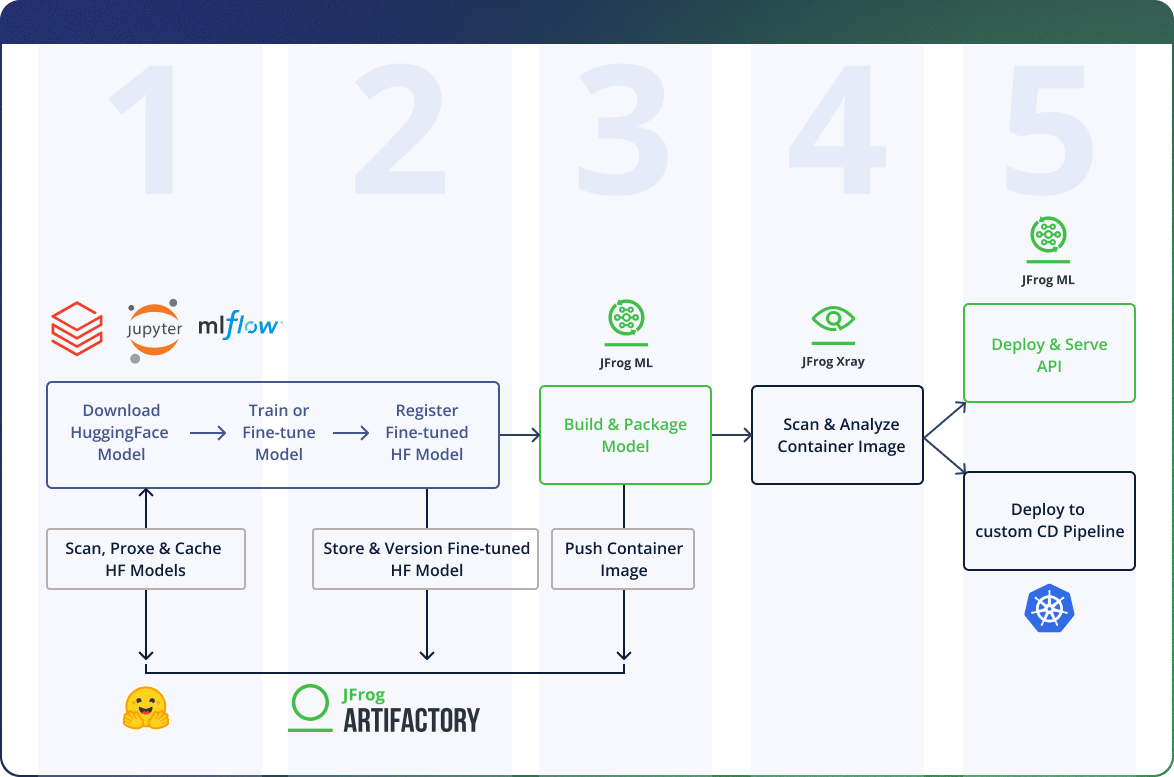
This guide will walk through the following five stages:
- Safely Downloading Models: Using JFrog Artifactory as a secure proxy to download, scan, and cache models from public repositories like Hugging Face before using them in a Databricks Notebook.
- Logging Proprietary Models: Moving from public models to your own by logging trained or fine-tuned models from Databricks into a unified, secure ML model registry in JFrog Artifactory.
- Packaging for Deployment: Using JFrog ML to automatically package your model binaries and custom code into a standardized, deployable container image.
- Scanning for Security: How JFrog’s security tools automatically scan your model’s container image for vulnerabilities in OS packages, libraries, and the model binaries themselves.
- Productionizing the Model: Deploying your secure container image as a scalable API endpoint, either on your own infrastructure or using JFrog ML’s hosted solution.
The diagram below illustrates this 5-step journey, showing how the Databricks and JFrog platforms work together at each stage.
Step 1: Safely Downloading Models from Public Repositories
Before training or fine-tuning begins, teams often start with a pretrained model from a public source like Hugging Face. While convenient, this introduces a significant security risk: how do you ensure the models you’re downloading are safe?
Hugging Face’s popularity makes it an attractive target for malicious actors. Downloading models directly from the internet can expose your organization to supply chain attacks, embedded vulnerabilities, or malicious code.
This is where JFrog Artifactory acts as a secure proxy, with JFrog Xray providing the critical security scanning.
Instead of having your Databricks environment pull models directly from Hugging Face, you configure it to route requests through Artifactory. When a data scientist requests a model in a Databricks Notebook, JFrog Artifactory proxies that request and provides three critical benefits:
- Caching: Artifactory caches the downloaded model locally. This improves performance and reduces bandwidth costs, especially for large models requested multiple times across your team.
- Security Scanning: As the model is downloaded, JFrog Xray automatically scans it for known vulnerabilities, malicious code, and license issues, giving you a first line of defense before the model ever enters your environment.
- Governance: You can use JFrog AI Catalog to enforce security policies that automatically block models with high-severity vulnerabilities, ensuring your data scientists only work with vetted, approved models.
Setting this up in your Databricks Notebook is straightforward. You just need to configure a few environment variables that the transformers library will pick up.
 ## Repo configuration
import os

# Point the HuggingFace client to your JFrog Artifactory proxy
os.environ["HF_HUB_ETAG_TIMEOUT"] = "86400"      # 24 hours
os.environ["HF_HUB_DOWNLOAD_TIMEOUT"] = "86400"  # 24 hours
os.environ["HF_ENDPOINT"] = "https://acme.jfrog.io/artifactory/api/huggingfaceml/my_private_huggingface_repo"
os.environ["HUGGINGFACE_HUB_TOKEN"] = "my_generated_token"
Then, download your model as you normally would, but now it’s routed securely through Artifactory:
from transformers import AutoModelForCausalLM

model = AutoModelForCausalLM.from_pretrained("Qwen/Qwen1.5-0.5B-Chat", use_auth_token=True)
Step 2: Storing Proprietary Models in a Unified Registry
Securely consuming public models is just one part of the equation. What about the models you train and fine-tune yourself?
Once you’ve trained a custom model with Databricks, you need a secure, centralized place to store it. This is where JFrog Artifactory acts as your production-grade model registry.
Artifactory acts as a universal registry. Unlike a simple tracker, it creates an immutable, versioned artifact that bundles your model binary with everything needed to reproduce and deploy it: dependencies, serving logic, custom code, and evaluation metrics.
The key benefit is unification. Your models live alongside all your other software components (like container images and libraries) under the same access controls, security scanning, and governance policies. This eliminates the silos and complexity of managing models separately from your main software supply chain.
After training or fine-tuning your model with Databricks Notebook, you can log and push it directly to JFrog’s model registry using the frogml Python SDK:
import frogml

frogml.huggingface.log_model(
    model=my_transformer_model_object,           # Your trained model
    tokenizer=my_transformer_tokenizer_object,   # Associated tokenizer
    repository="llm-models",                     # Target repository in Artifactory
    model_name="devops_helper",                  # Model identifier
    version="1.0.0",                             # Optional: defaults to timestamp
    parameters={"finetuning-dataset": dataset_name},  # Training params for traceability
    code_dir="code_dir",                         # Custom code needed for serving
    dependencies=["conda.yaml"],                 # Dependency manifest
    metrics=metrics_dict,                        # Evaluation metrics
    predict_file="code_dir/predict.py"           # Serving/inference logic
)
This call packages your model, tokenizer, metrics, dependencies, and serving logic into a single versioned artifact, ensuring reproducibility when deploying to production.
If you’re already using MLflow in Databricks, that’s great. Continue using it for experiment tracking and model comparison during development. Think of it this way: MLflow is for experimentation, while JFrog is the production registry where final, approved models are stored, scanned, and versioned for deployment.
Step 3: Building and Packaging Your Model
You’ve trained your model, logged it to Artifactory, and now it’s time to deploy. This is where many teams hit a wall. Packaging an ML model for production typically means writing Dockerfiles, setting up CI pipelines, and managing dependencies. For data scientists, this is a significant bottleneck.
JFrog ML bridges this gap by handling the infrastructure complexity for you. It provides a built-in build pipeline that packages your model into a production-ready container image. Instead of writing custom Dockerfiles or setting up CI workflows, you trigger the build with a single command:
frogml models build \
  --model-id devops_helper \
  --instance gpu.t4.xl \
  --tags "v1.23" \
  --dependency-file-path conda.yaml
Here’s what each parameter does:
--model-id: References the model you logged to Artifactory--instance: Specifies the compute resources (e.g., a T4 GPU) for the build--tags: Version tags for the resulting container image--dependency-file-path: Points to your dependency manifest (conda.yaml, requirements.txt, etc.)
When you run this command, JFrog ML pulls your model artifact, serving logic, and dependencies from Artifactory. It then builds a container image that includes everything needed to serve your model via API. The final container image is stored in an OCI-compliant (Open Container Initiative) repository in Artifactory.
This simplicity is valuable for data science teams. You get a model into a production-ready state without needing deep infrastructure knowledge or asking for assistance from DevOps teams. But you are not locked into a black box. The container image is stored in Artifactory, allowing your AI/ML engineering team to pull it into existing deployment workflows, scan it, and deploy it to any orchestration platform.
Step 4: Scanning Your Model Container for Security
Container images for models are complex artifacts. They contain your model binary, Python dependencies, system libraries, serving frameworks, and often GPU drivers. Each layer introduces potential vulnerabilities.
JFrog Xray and Advanced Security automatically scan all OCI-compliant container images in Artifactory, including images built by JFrog ML. Scanning happens immediately upon storage, providing visibility before models ever reach production.
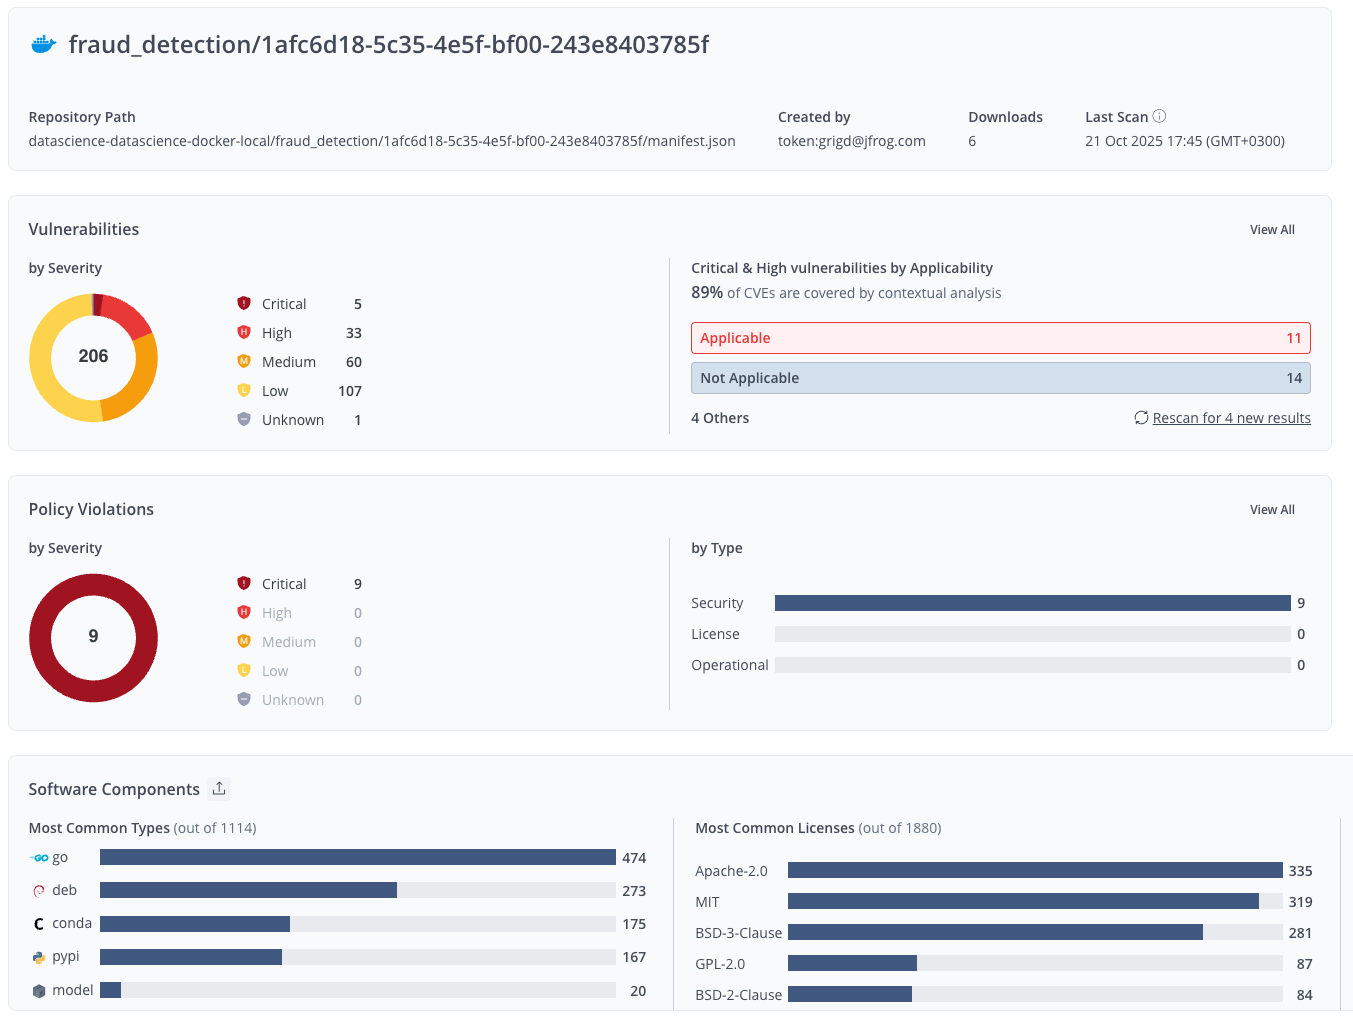
This automated scan gives your security and AI/ML teams three critical capabilities:
- Software Bill of Materials (SBOM): Each scan generates a complete SBOM that catalogs every component, including Python packages, OS libraries, model binaries, and dependencies. When a new vulnerability is disclosed, you can quickly identify all affected model images.
- Vulnerability and Contextual Analysis: JFrog identifies known CVEs across all layers. It also provides contextual analysis to determine if a CVE is exploitable in your specific use case, helping you focus on actual risks.
- Policy Enforcement: Configure policies to automatically block deployments if an image contains high-severity vulnerabilities or license violations. This stops a failed image before it goes live.
Step 5: Deploying Your Model as a Scalable API
Once your model image is built and scanned, you have two options for deployment.
1. Deploy to your own platform
Since the container image is a standard OCI artifact in Artifactory, you can pull it into your existing Kubernetes, AWS ECS, or any other orchestration platform. The image is self-contained and integrates into your existing CI/CD pipelines.
2. Deploy with JFrog ML
Alternatively, you can deploy directly through JFrog ML. This approach gives you built-in production features that would otherwise require significant engineering effort to implement.
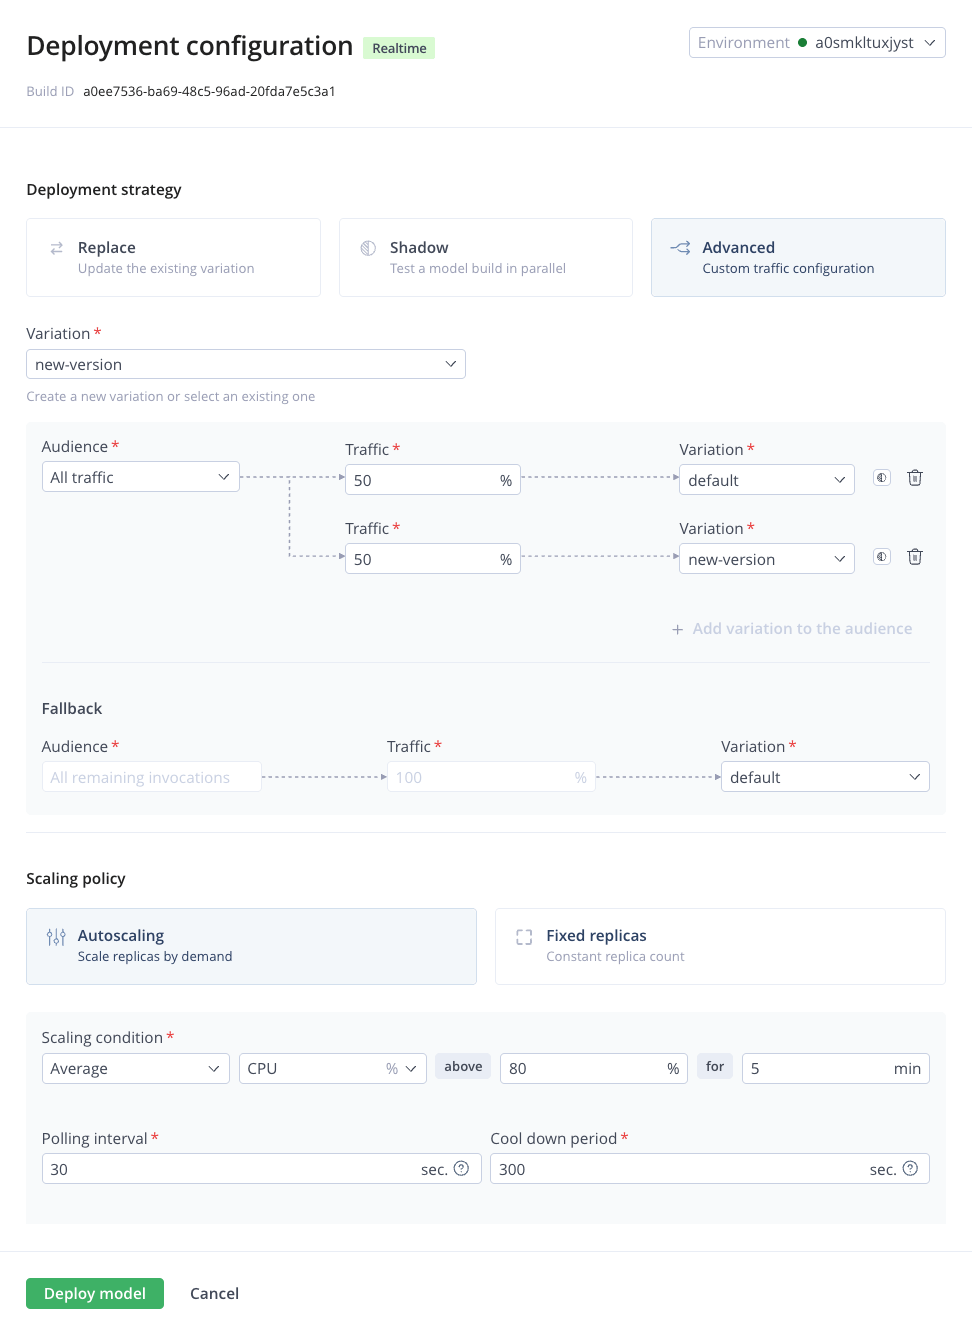
These capabilities include:
- Advanced Deployment Strategies: JFrog ML provides advanced strategies out of the box, including shadow, A/B, and canary deployments that let you test new models and gradually shift traffic.
- Autoscaling: The platform handles autoscaling based on resource utilization, throughput, error rates, and latency, optimizing both performance and cost.
- Inference Logging: JFrog ML automatically captures all inference requests and responses, logging them to a SQL-based analytics layer. This gives you visibility into model usage and behavior in production.
You can use these capabilities on your own infrastructure or on JFrog’s cloud hosting, depending on your organization’s requirements and preferences.
Key Takeaways
Bridging the gap between model development in Databricks and secure production deployment requires infrastructure that handles security and governance without creating bottlenecks for data science teams.
The integration between Databricks and JFrog addresses this challenge:
- You can safely consume public models through Artifactory’s secure proxy, eliminating supply chain risks.
- Your proprietary models are stored in a unified registry alongside all the code and dependencies needed to deploy them.
- Building production-ready containers doesn’t require custom CI pipelines or deep infrastructure knowledge.
- Xray scans everything automatically, giving you full visibility into vulnerabilities across your model binaries, dependencies, and container layers.
- Deployment is flexible, fitting into your existing infrastructure or managed via JFrog ML with built-in traffic management and autoscaling.
This approach is effective because it eliminates the choice between security and velocity. Data scientists can continue working in Databricks, while your MLOps and Security teams get the governance, traceability, and control they need to safely deploy models at scale.
If you’re running AI/ML workloads in Databricks and looking to strengthen your path to production, integrating with the JFrog Platform gives you a production-grade model supply chain that’s both secure and scalable.
Speak to our solution experts to start your trusted AI journey today!


