Persistence is Futile (or is it?) – How To Manage, Version and Promote Docker Volumes
In the movie Star Trek: First Contact, as the team comes across a very specific collective, they are greeted with the ever distinctive line: “We are the Borg. Lower your shields and surrender your ships. We will add your biological and technological distinctiveness to our own. Your culture will adapt to service us. Resistance is futile.” The last part of that line was the inspiration for us to create the presentation we gave at DockerCon 2019.
Docker images are awesome for managing and distributing software. The ease with which you can create a new version of your app and distribute that to your customers or run it on your own Kubernetes cluster is amazing. But how does that work with data and configuration? Should you always create a completely new image for one single parameter that changes? Should you distribute a new image when you add a new plugin to your Jenkins server?Docker images are awesome for managing and distributing software. But how does that work with data and configuration? Should you always create a completely new image for one single parameter that changes? Click To Tweet
Not always. We’ll show you a useful technique for capturing a container’s persistent data from a Docker volume. Once it exists as an artifact, it can be versioned and promoted in Artifactory along with the images in your Docker registry, and deployed to the environments you need your volumes.
Data Persistence
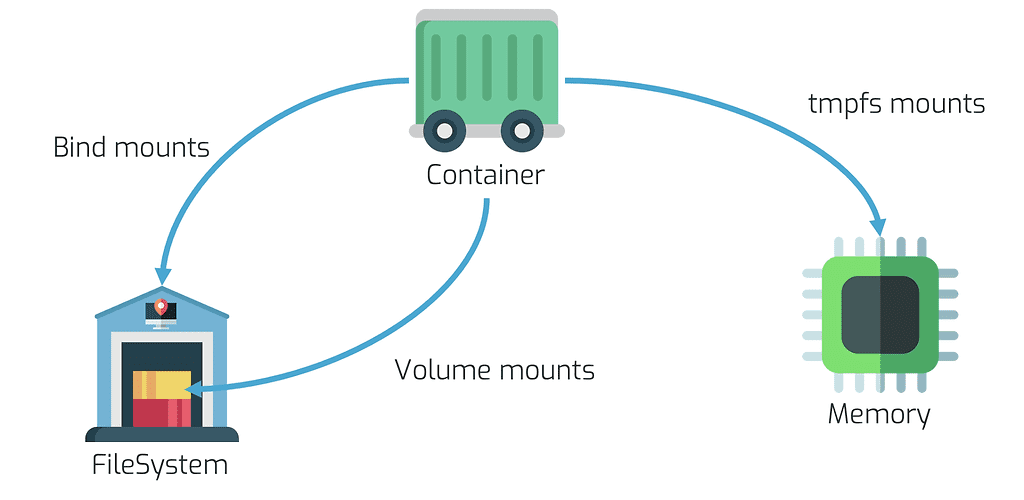
Your Docker container can store data in memory or on the filesystem, depending on the requirements you have for your container.
If you don’t care about losing data when a container is restarted, you could store all of that in the Docker host system’s memory using a tmpfs mount. This data is never written to any filesystem, so changes are not backed up.
If you do care about persistence of data, you can use bind mounts or volumes . The big difference between the two is where the data is ultimately stored, and who manages the files. Volume mounts are managed by the Docker daemon and are generally considered to be the best way to persist data (especially since bind mounts give the container access to the actual file system of the host with all the associated security risks). So should I never use bind mounts? You can, if you can guarantee that your folder structure never changes. That generally only applies to your local machine.
Jenkins Plugins and Jobs
During the talk we looked at the scenario where a Jenkins build server makes use of a set of plugins and has a set of predefined jobs. Should updates to those jobs result in a new image, or can we manage that in a smarter way?
To create a Docker volume containing the plugins, the build jobs and all the other configuration you can run the command:
docker run --rm -it --name=jenkins --mount source=jenkins-home,destination=/var/jenkins_home -p 8080:8080 jenkins/jenkins:alpine
This will create a new volume and remove the container once you’re completely done with configuring it.
The next step is to create a backup of the volume, and in this case a simple zip will work. The command you can use for that is:
docker run --rm --mount source=nginx-vol,destination=/var/jenkins_home -v $(pwd):/backup alpine:3.9 sh -c "apk add --no-cache zip && zip -r /backup/jenkins.zip /var/jenkins_home"
To get the file as a build into JFrog Artifactory you can use the JFrog CLI to run:
jfrog rt u --build-name=docker-volume-build --build-number=1 jenkins.zip generic-local/
jfrog rt bp docker-volume-build 1
The above commands will upload the jenkins.zip file to an Artifactory repository called generic-local and associate that with a build called docker-volume-build. Because this is a build, it will automatically be scanned by JFrog Xray if you’ve configured it to do so. Your security team will be very happy you did that.
At JFrog, we’re big on using pipelines and promotions of artifacts to run our own products and services, so to promote the build, using the JFrog CLI, run:
jfrog rt bpr --status=production --comment="Ready for production" docker-volume-build 1 generic-prod
This promotes the build to a new Artifactory repository called generic-prod.
Now that everything is in Artifactory, let’s look at how you can use that to create a new Docker volume and create a Docker container that uses the volume.
If you’re running the commands on the same machine, as we did during the talk, you might want to delete the volume first by running:
docker volume rm jenkins-home
After that, three steps are needed to get everything back the way it was:
# Download the file from Artifactory
jfrog rt dl generic-prod/jenkins.zip

# Create the volume
docker run --rm --mount source=jenkins-home,destination=/var/jenkins_home -v $(pwd):/backup alpine:3.9 sh -c "cd / && unzip /backup/jenkins.zip && chmod -R 777 /var/jenkins_home"

# Run your container
docker run --rm -it --name=jenkins --mount source=jenkins-home,destination=/var/jenkins_home -p 8080:8080 jenkins/jenkins:alpine
As you browse to https://localhost:8080, you’ll be greeted by the Jenkins login screen as opposed to the configuration screen for a new server.
Why is This So Useful?
Throughout the talk, and the article, we looked at why using Docker volumes is so useful. When the base image remains the same all the time, and you only update a few files (like plugins, new Jenkins jobs, or static sites in a JAM stack) this will save you a lot of updates in your Docker registry. It’ll potentially get you some points with the security team because you can scan the volumes with JFrog Xray.
What’s Next?
If you want to test drive all the features of JFrog Artifactory (and a lot more) and try out these steps, you can sign up for a test drive on our demo environment. For questions or comments, feel free to leave a message here or drop me a note on Twitter!


