Cloud Native CI/CD Pipelines using AWS CodeStar and JFrog Artifactory
Want to streamline your DevOps toolchain for a new project on the cloud? Want to manage, store, share, and version binary artifacts? It’s time to explore the composite solution offered by AWS CodeStar and JFrog Artifactory.
When deciding to kick off a new project, technology companies and enterprise solution providers often run into walls when setting up their DevOps components. A plethora of tools, each one with it’s complex configuration to integrate into a synergistic pipeline slows down progress and increases costs.
Let’s look at a CI/CD implementation through AWS CodeStar and several challenges one can face at the time of implementing a DevOps toolchain.
AWS CodeStar allows teams to quickly develop, build, and deploy applications and microservices on AWS. However, the absence of a universal binary repository creates a challenge. In such an implementation, a single project connects to multiple binary repositories and storage sources such as Docker Hub, ECR, Maven Central, npmjs, RubyGems, S3, and others.
Let’s look at a real time solution where a single AWS CodeStar project builds and deploys a Java web application. The following tools are used to implement the solution:
- CodeCommit as a version control service
- CodeBuild to build the application
- CodeDeploy to deploy the application to the production environment
- CodePipeline to build the CI/CD pipeline by connecting the above tools
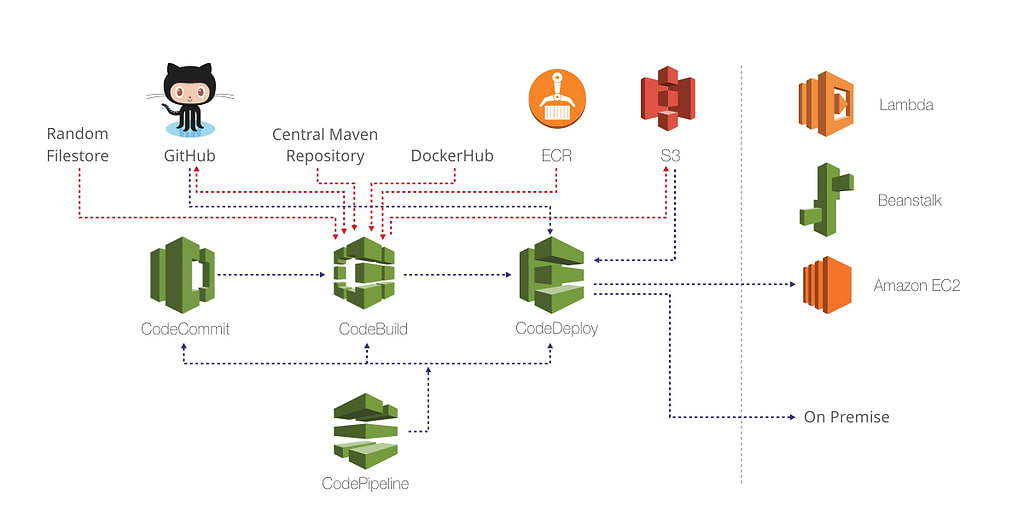
The dependencies of this single and simple project are pulled from multiple sources such as ECR, S3, Maven Central, and npmjs (for npm). Figure 1 illustrates the workflow of the solution.
Figure 1. Using AWS CodeStar to implement a CI/CD pipeline
As shown in Figure 1, there are multiple binary providers in a pipeline, which creates several challenges:
- Higher maintenance cost to manage multiple configurations and providers
- Lack of traceability to figure out the origin (CI job/source code revision) of the binary file
- Lack of context in the form of metadata
- Difficulty to enforce policies
In general, with multiple binary providers, the most painful problem is to make sure that the correct version of a binary of any type is being used. For example, tested or scanned binaries versus snapshot or vulnerable versions of binaries.
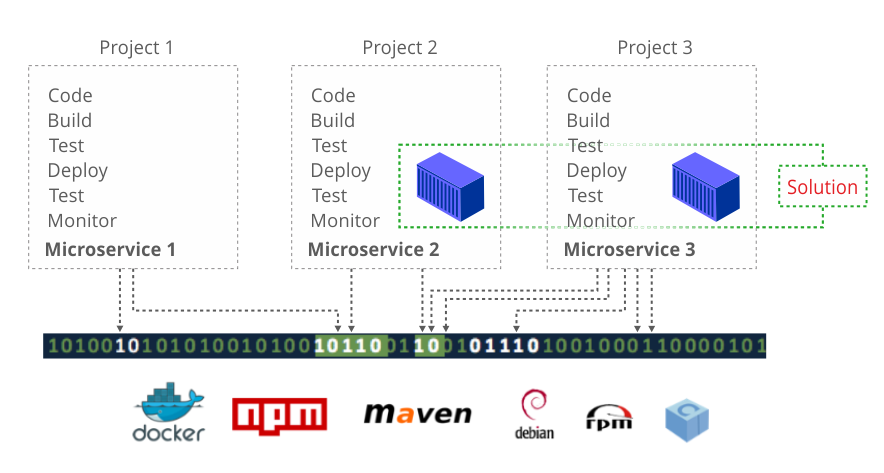
Imagine a scenario with multiple CodeStar projects and cross-project dependencies. In the world of microservices, the challenge is magnified because we have multiple micro-focused applications working towards resolving a bigger challenge. The solution involves several AWS CodeStar projects (i.e. one per microservice) and cross-project dependencies. Figure 2 illustrates a working solution comprised of several CodeStar projects and dependencies.
Figure 2. Multiple CodeStar projects and dependencies
Cross-project dependencies can arise because of a team structure, architecture or the way a CI/CD pipeline is implemented. For example, Project 1, from Figure 2, is responsible to build a web application and Project 2 (owned by the DevOps team) is responsible to containerize it and eventually deploy the solution to production. In this case, managing cross-project binaries of multiple types coming from multiple repositories adds to the overall complexity. The lack of a single source of truth or a universal binary repository makes the implementation of policy enforcement difficult.
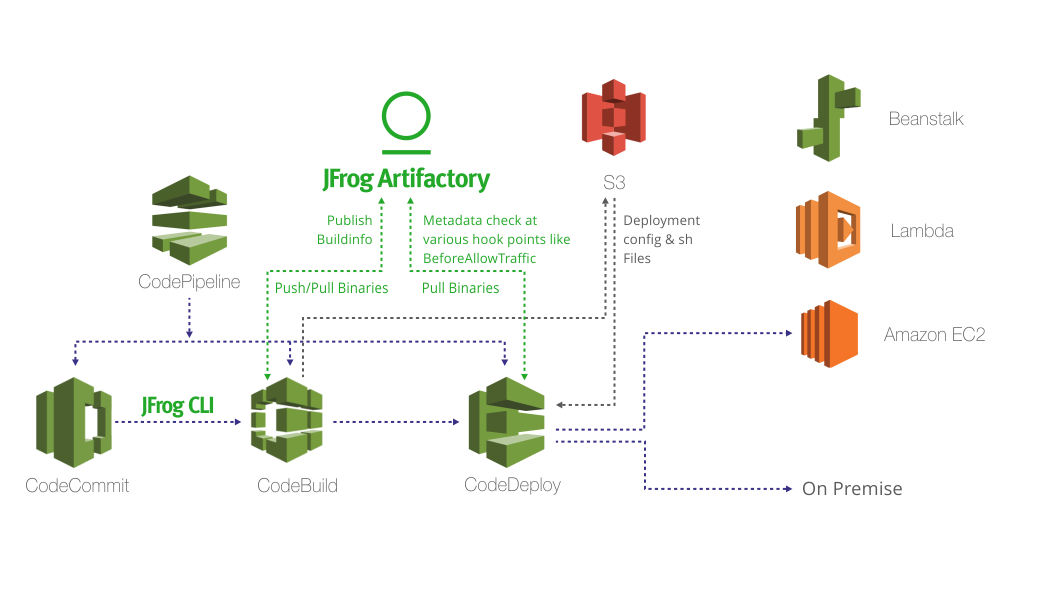
The solution to resolve these challenges is to use a universal binary repository that will act as a single source of truth for all your binaries. It’s the most pragmatic approach to managing multiple binaries of different types and their associated metadata in a single place. And, that’s where JFrog Artifactory comes into the solution! The good news is that AWS CodeStar integrates with JFrog Artifactory. The integration allows Artifactory to act as a single source of truth for all types of binaries across multiple AWS services such as CodeBuild and CodeDeploy. To make it more interesting, the same Artifactory instance also acts as a single source of truth for cross-project (AWS CodeStar projects) dependencies and offers additional benefits such as exhaustive build information(BuildInfo), promotion, traceability, and universal support for all major development technologies. Figure 3 illustrates a composite solution of AWS CodeStar and JFrog Artifactory.
Figure 3. A composite solution of AWS CodeStar and JFrog Artifactory
Integrating JFrog Artifactory with AWS CodeStar
The following steps drive you through the integration process of Artifactory with CodeStar. For detailed information about building and deploying applications on AWS by using CodeStar and Artifactory, go to the AWS CodeStar home page. In addition, get a free trial license of Artifactory, if needed. To help you along, we’ve created this a GitHub project that includes scripts and configuration files to build and deploy a containerized Java web application, which is similar to the example used in this blog post.
Start by creating two Java projects in AWS CodeStar (AWS CodeStar -> Create a new project). Select “Web application” under “Application category”, select “Java” under the “Programming languages section” and select “Amazon EC2” under “AWS services”. As an example, let’s name these two projects “demo-java-app” and “demo-docker-framework”. Project files including build and deployment files will be created by default that can be viewed via AWS CodeCommit.
Update the “demo-java-app” project’s buildspec.yml file to integrate with JFrog Artifactory using the following 3-step approach:
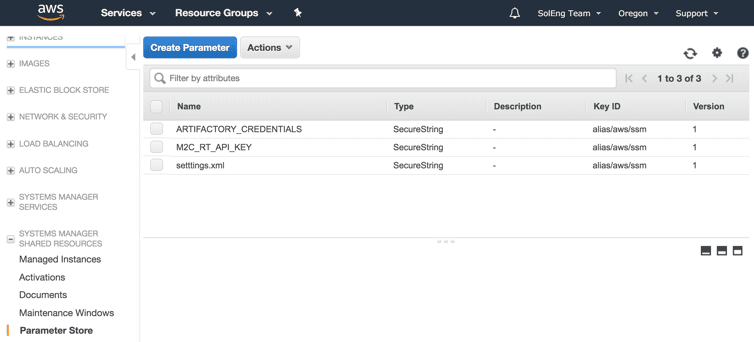
- Create a SecureString parameter in ParameterStore to store Artifactory credentials. It is recommended not to use environment variables to store credentials.
a. Specify the newly created SecureString ARTIFACTORY_CREDENTIALS as part of the buildspec.yml.
env:
  parameter-store:
    ARTIFACTORY_API_KEY: "ARTIFACTORY_CREDENTIALS"
b. You must create a role policy under the CodeBuild service role to allow access of the ParameterStore resources. Browse to IAM, Roles and find an existing role name of your Code Build project. Add an inline policy that looks like following:
{
    "Version": "2012-10-17",
    "Statement": [
        {
            "Effect": "Allow",
            "Action": [
                "ssm:DescribeParameters"
            ],
            "Resource": "*"
        },
        {
            "Effect": "Allow",
            "Action": [
                "ssm:GetParameters"
            ],
            "Resource": [
                "arn:aws:ssm:us-west-2:1xxxxxxxxxxx:parameter/ARTIFACTORY_CREDENTIALS",
                "arn:aws:ssm:us-west-2:1xxxxxxxxxxx:parameter/M2C_RT_API_KEY"
            ]
        }
    ]
}
You can learn more about controlling access to Systems Manager parameters in the Amazon EC2 Systems Manager User Guide.
2. Edit the CodeBuild project to add the following environment variables under Advanced Settings:
| Environment variable | Description |
| ARTIFACTORY_URL | Artifactory URL. For example, https://my-artifactory/artifactory |
| ARTIFACTORY_USER | Artifactory user name with read/write permissions. |
| ARTIFACTORY_MVN_REPO | Artifactory Maven repository URL. It is recommended to use a virtual repository URL. For example, https://my-artifactory/artifactory/libs-release |
3. The updated buildspec.yml file performs the following:
- Downloads the necessary packages
- Configures Maven to point to Artifactory
- Builds Maven project
- Publish binaries including metadata to Artifactory
a. Download the necessary packages including JFrog CLI.
install:
    commands:
      - echo Entering install phase...
      - wget https://jcenter.bintray.com/org/apache/maven/apache-maven/3.3.9/apache-maven-3.3.9-bin.tar.gz
      - tar xzvf apache-maven-3.3.9-bin.tar.gz -C /opt/
      - export PATH=/opt/apache-maven-3.3.9/bin:$PATH
      - wget https://dl.bintray.com/jfrog/jfrog-cli-go/1.12.1/jfrog-cli-linux-amd64/jfrog
      - chmod +x jfrog
b. Configure Maven settings.xml to point to Artifactory. The complete file can in JFrog’s AWS CodeStar example on GitHub.
pre_build:
    commands:
      - echo Entering pre_build phase...
      - ./jfrog rt config --url $ARTIFACTORY_URL --user $ARTIFACTORY_USER --apikey $ARTIFACTORY_API_KEY
      - sed -i -e 's|ARTIFACTORY_USER|${ARTIFACTORY_USER}|g' settings.xml && sed -i -e 's|ARTIFACTORY_PASSWORD|${ARTIFACTORY_API_KEY}|g' settings.xml && sed -i -e 's|ARTIFACTORY_MVN_REPO|${ARTIFACTORY_MVN_REPO}|g' settings.xml
c. Build the Maven project.
build:
    commands:
      - echo Entering build phase...
      - echo Build started on `date`
      - mvn -s settings.xml -f pom.xml compile
      - mvn -s settings.xml -f pom.xml package
d. Publish binaries and build information to Artifactory.
post_build:
    commands:
      - echo Entering post_build phase...
      - echo Build completed on `date`i
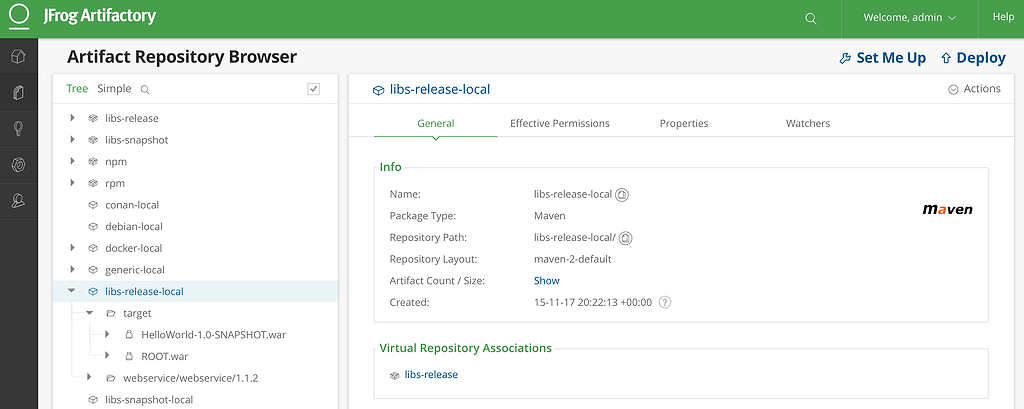
      - ./jfrog rt u "*.war" libs-release-local --build-name=codestar-demo-java-app --build-number=$CODEBUILD_BUILD_ID --flat=false
      - ./jfrog rt bce codestar-demo-java-app $CODEBUILD_BUILD_ID
      - ./jfrog rt bp codestar-demo-java-app $CODEBUILD_BUILD_ID
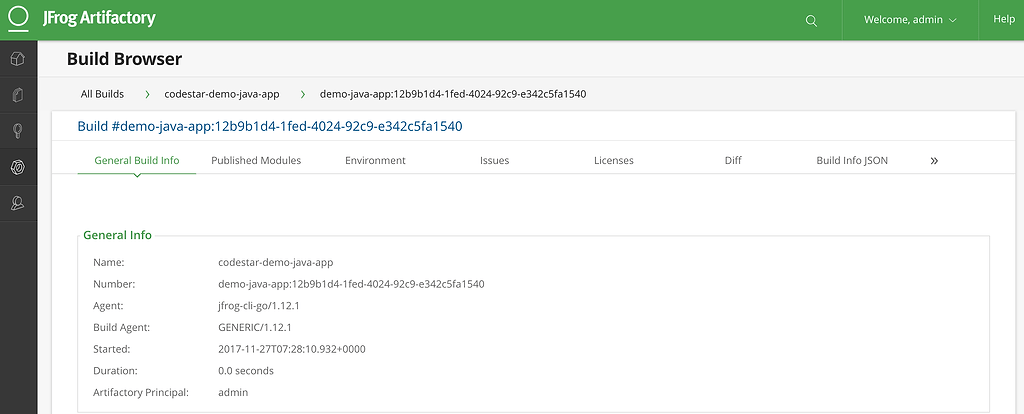
Executing the above steps creates and publishes a Java web application along with metadata.
The next step is to containerize the web application using the “demo-docker-framework” project.
Update the “demo-docker-framework” project’s buildspec.yml, appspec.yml and other helper scripts to integrate the build and deployment process with Artifactory using a 4-step approach:
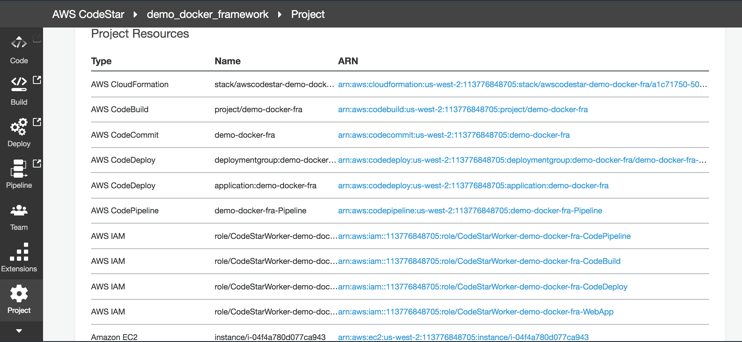
1. Install Docker on the EC2 instance of the “demo-docker-framework” project. The EC2 instance used for the project can be located under the “Project Resources” section (AWS CodeStar->$PROJECT->Project).
2. Create or use the existing SecureString parameter (ParameterStore resource) to store Artifactory credentials. Make sure to update the role policy that is part of the CodeBuild service role of the “demo-docker-framework” project to allow access of the ParameterStore resources.
3. Update the CodeBuild project (AWSCodeStar->$PROJECT->CodeBuild->Edit Project)
- Set the current image (builder agent) to point to docker:17.06.0-ce-dind
- Select the Privileged flag. This step allows the creation of docker images.
- Add environment variables (under advanced settings)
| Environment variable | Description |
| ARTIFACTORY_URL | Artifactory URL. Example: https://my-artifactory/artifactory |
| ARTIFACTORY_USER | Artifactory user name. This user should have read/write permissions. |
| ARTIFACTORY_MVN_REPO | Artifactory Maven repository that includes the maven artifact (java web application, in this case) that needs to be containerized. Example: libs-release-local |
| WEB_APPLICATION_PATH | Subfolders (if-any) within the repository that includes the maven artifact (java web application, in this case). Example: target/ |
| WEB_APPLICATION_NAME | Name of the web application. Example: ROOT-1.0.war |
| ARTIFACTORY_DOCKER_REPO | Artifactory Docker registry. Example: rt-docker.jfrog.io |
| IMAGE_TAG | Dynamic version that will be one of the tags of the docker image created as part of the build. Example: latest, latest1, etc. Note, in addition to a dynamic tag, there will be a static tag that reflects the CodeBuild ID. |
4. The updated buildspec.yml file configures dind to build docker images, installs required packages, leverages access tokens to authenticate with Artifactory, builds docker image and publishes the docker image along with the build information (metadata) to Artifactory and updates deployment scripts.
a. Configure dind (to build docker images) and install required packages
install:
    commands:
      - echo Entering install phase...
      - nohup /usr/local/bin/dockerd --host=unix:///var/run/docker.sock --host=tcp://0.0.0.0:2375 --storage-driver=vfs&
      - timeout -t 15 sh -c "until docker info; do echo .; sleep 1; done"
      - apk add --no-cache --update openssl curl jq
b. Create an Access Token in Artifactory. It is recommended to use an Access Token since it expires after a configurable time and can also be revoked.
pre_build:
    commands:
      - echo Entering pre_build phase...
      - export RESPONSE=$(curl -H "X-JFrog-Art-Api:$ARTIFACTORY_API_KEY" -XPOST "$ARTIFACTORY_URL/api/security/token" -d "username=$ARTIFACTORY_USER" -d "scope=member-of-groups:writers" -d "expires_in=600")
      - export ACCESS_TOKEN=$(echo "$RESPONSE"| jq -r .access_token)
      - docker login -u $ARTIFACTORY_USER -p $ACCESS_TOKEN $ARTIFACTORY_DOCKER_REPO
By default, a ‘readers’ group exists. It is recommended to create and use a new group, ‘writers’, so that access tokens can be used for RW operations. More information about groups is located in the JFrog Artifactory User Guide. Except credentials, all other parameters such as the Docker registry name, URL, etc are fetched via environment variables. Details are located on our Docker framework example on GitHub.
c. Run a docker build (dockerfile) and statically tag the docker image to point to the CODEBUILD_BUILD_ID
build:
    commands:
      - echo Entering build phase...
      - echo Build started on `date` and CODEBUILD_BUILD_ID is $CODEBUILD_BUILD_ID
      - curl -O -H "X-JFrog-Art-Api:$ARTIFACTORY_API_KEY" $ARTIFACTORY_URL/$ARTIFACTORY_MVN_REPO/$WEB_APPLICATION_PATH$WEB_APPLICATION_NAME
      - docker build -t $ARTIFACTORY_DOCKER_REPO/my-app-image:$IMAGE_TAG --no-cache --build-arg WEB_APPLICATION_NAME=$WEB_APPLICATION_NAME .
      - echo Tagging docker image with static tag $(echo $CODEBUILD_BUILD_ID | sed 's/:/-/')
      - docker tag $ARTIFACTORY_DOCKER_REPO/my-app-image:$IMAGE_TAG $ARTIFACTORY_DOCKER_REPO/my-app-image:$(echo $CODEBUILD_BUILD_ID | sed 's/:/-/')
d. Publish docker images to Artifactory and modify deployment files with access tokens, docker image names and tags
 post_build:
    commands:
      - echo Entering post_build phase...
      - echo Build completed on `date`
      - export STATIC_TAG=$(echo $CODEBUILD_BUILD_ID | sed 's/:/-/')
      - docker push $ARTIFACTORY_DOCKER_REPO/my-app-image:$IMAGE_TAG
      - docker push $ARTIFACTORY_DOCKER_REPO/my-app-image:$STATIC_TAG
      - sed -i -e "s|STATIC_TAG|$STATIC_TAG|g" scripts/start_server
      - sed -i -e "s|STATIC_TAG|$STATIC_TAG|g" scripts/install_dependencies
      - sed -i -e "s|ACCESS_TOKEN|$ACCESS_TOKEN|g" scripts/install_dependencies
      - sed -i -e "s|ARTIFACTORY_USER|$ARTIFACTORY_USER|g" scripts/install_dependencies
      - sed -i -e "s|ARTIFACTORY_DOCKER_REPO|$ARTIFACTORY_DOCKER_REPO|g" scripts/install_dependencies
As you can see, AWS CodeStar allows teams to quickly develop, build, and deploy applications and microservices on AWS; and with the integration of JFrog Artifactory you now have the ability to manage these processes with a single source of truth for your builds.
Go cloud-native with AWS CodeStar and JFrog Artifactory as your single source of truth.
